


This guide will show you how to create and deploy an NFT Drop smart contract using Crossmint.
By the end, you will have learned how to build an NFT Drop without any code. You will also have learned how to enable credit card and cross-chain payments for your NFT Drop with our NFT Checkout.
This guide will take you 10 mins to complete (approximately).
Let's get started!
What is an NFT drop?
An NFT drop is an event where a new collection of Non-Fungible Tokens (NFTs) is released for sale. This typically marks the first time these unique digital assets are made available to the public, often involving primary sales of the collection.
An NFT drop is used for a variety of use-cases such as subscriptions, collectibles, utility based tokens, etc. They are also used in the Music Industry, Gaming, Sports Memorabilia, Fashion Industry, Event Tickets, and also Education and Certifications.

NFT Drops Explained
Imagine you're at a store where they release a limited edition of a popular product. There's anticipation, excitement, and a rush to get one before they're all gone. An NFT Drop is similar, but it happens in the digital world.
NFT stands for Non-Fungible Token. Think of it as a special kind of digital item that can be anything from artwork to music. What makes NFTs unique is that each NFT has a digital signature, which makes them distinct. It's like owning an autographed item – its uniqueness is what gives it value.
A drop is when a new collection of NFTs is released. It's a planned event where a specific number of NFTs are made available for purchase. Think of it as the grand opening of a digital art exhibit where each piece is for sale.
NFT Drops are exciting because they offer something special - a chance to own a unique piece of digital content. Often, these drops are limited, meaning there's only a set number of NFTs available. This scarcity can make them highly sought after.
To buy an NFT during a drop, you usually need a digital Web3 wallet and some cryptocurrency (like Ethereum). The process can vary, but it typically involves going to a website where the drop is happening and making your purchase. Crossmint solves this by creating Email Wallets for your users and by enabling your users to purchase your NFTs using a Credit Card.
How to Build an NFT Drop using Crossmint?
Before we begin, please ensure that you have a Developer Account created on Crossmint. If not, please head over to Crossmint Console and create an account.
Note: We will be using Crossmint's Staging Console for this tutorial. It's recommended that you familiarize yourself with this tutorial on Staging before you work with Crossmint's Production Console. Click here to go to the Staging Console.
Let's begin!
Creating the NFT Collection and Deploying the Smart Contract
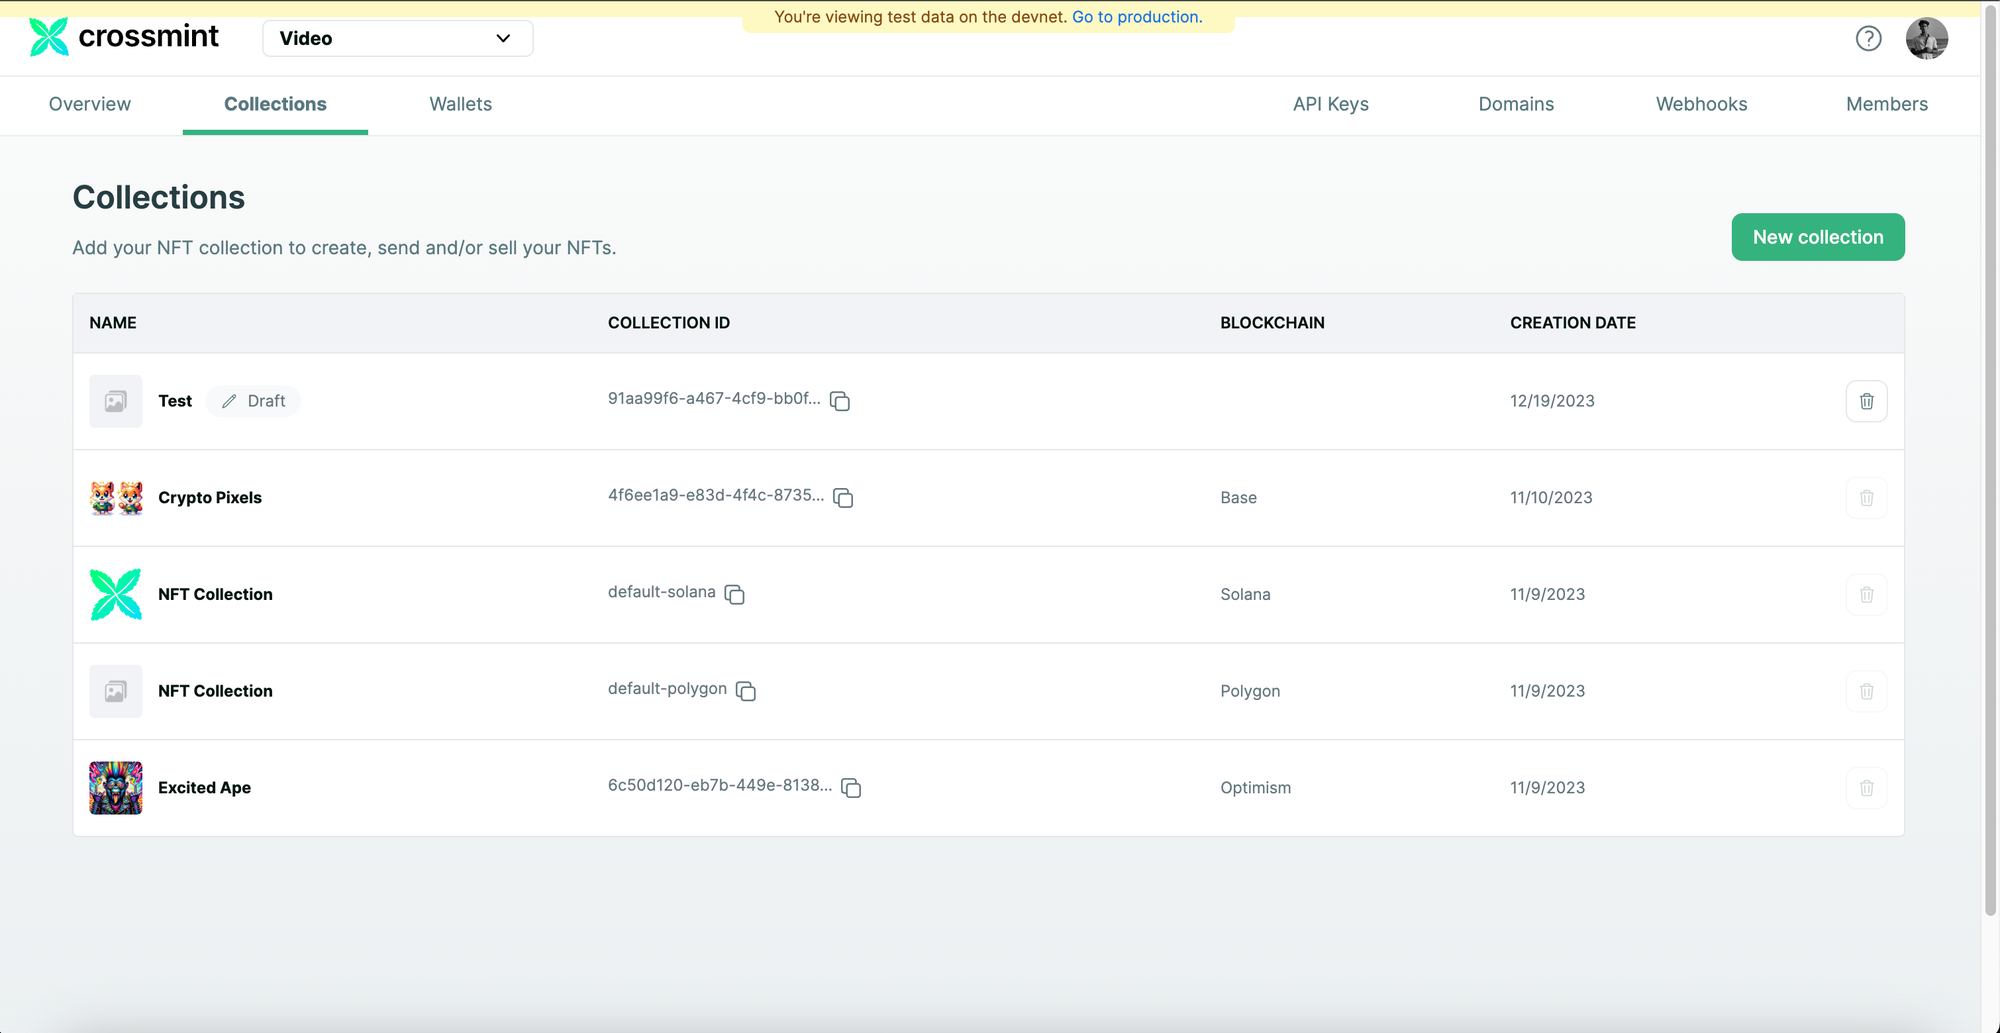
Please proceed to the Staging Console and sign in. Click on "Collections" and click on "New collection" to create an NFT Collection.
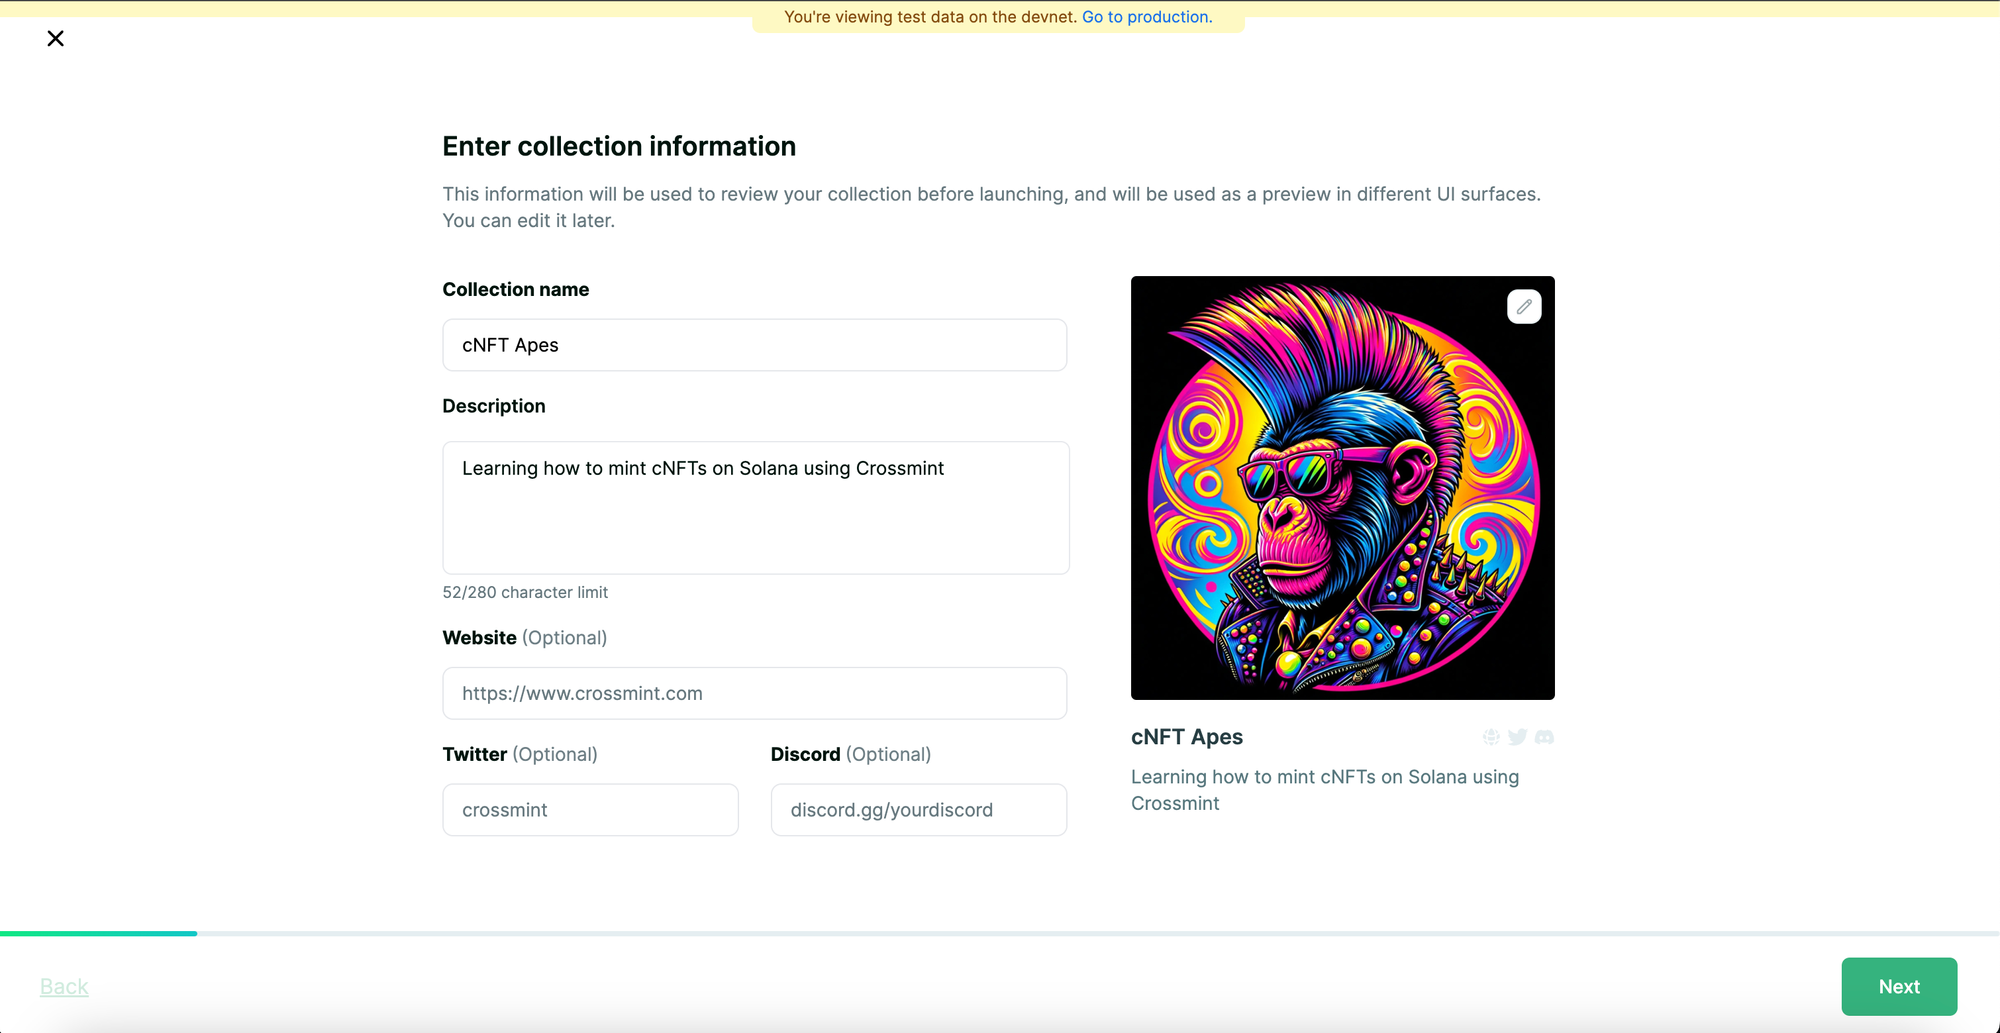
Enter the collection information, such as "Collection Name", "Description", etc and also upload a cover image for your NFT Collection. After entering the collection information, click on "Next" to proceed.
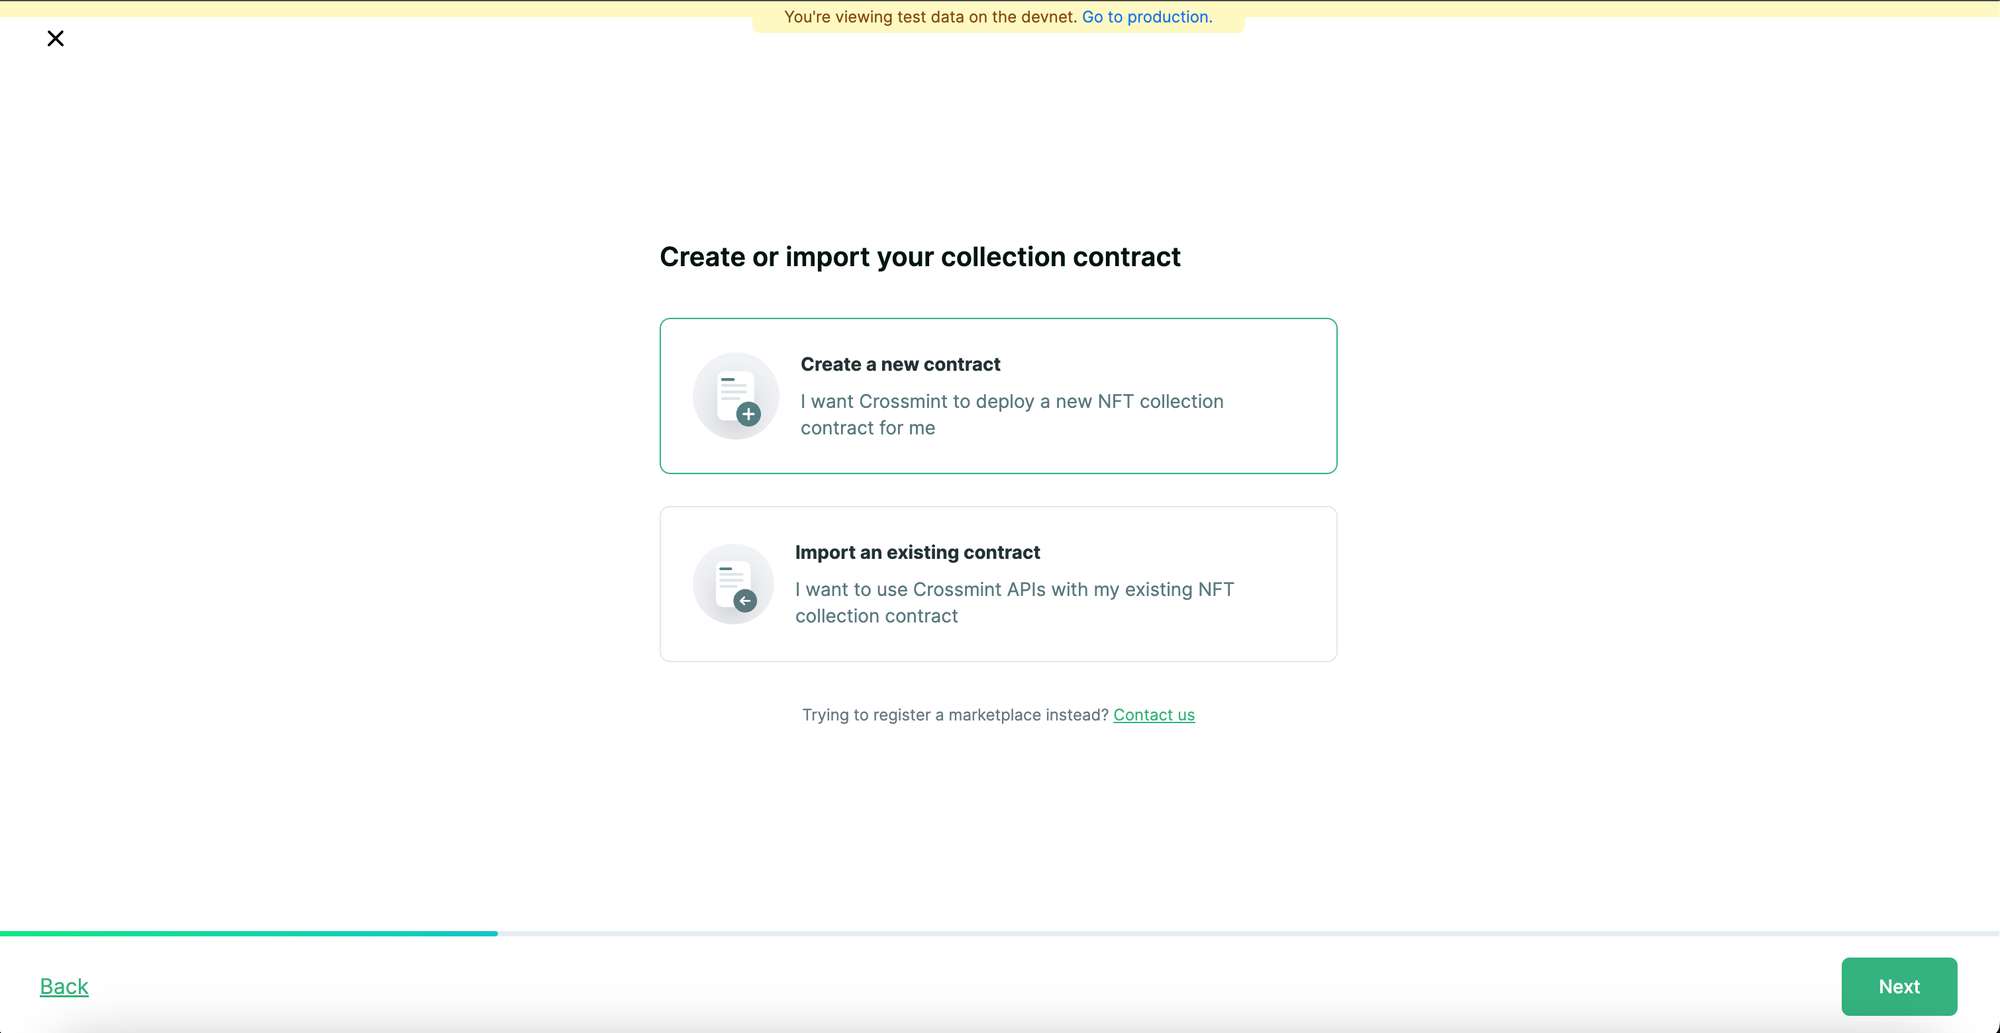
Since, our goal is to create a new collection, select "Create a new contract" and click on "Next" to proceed.
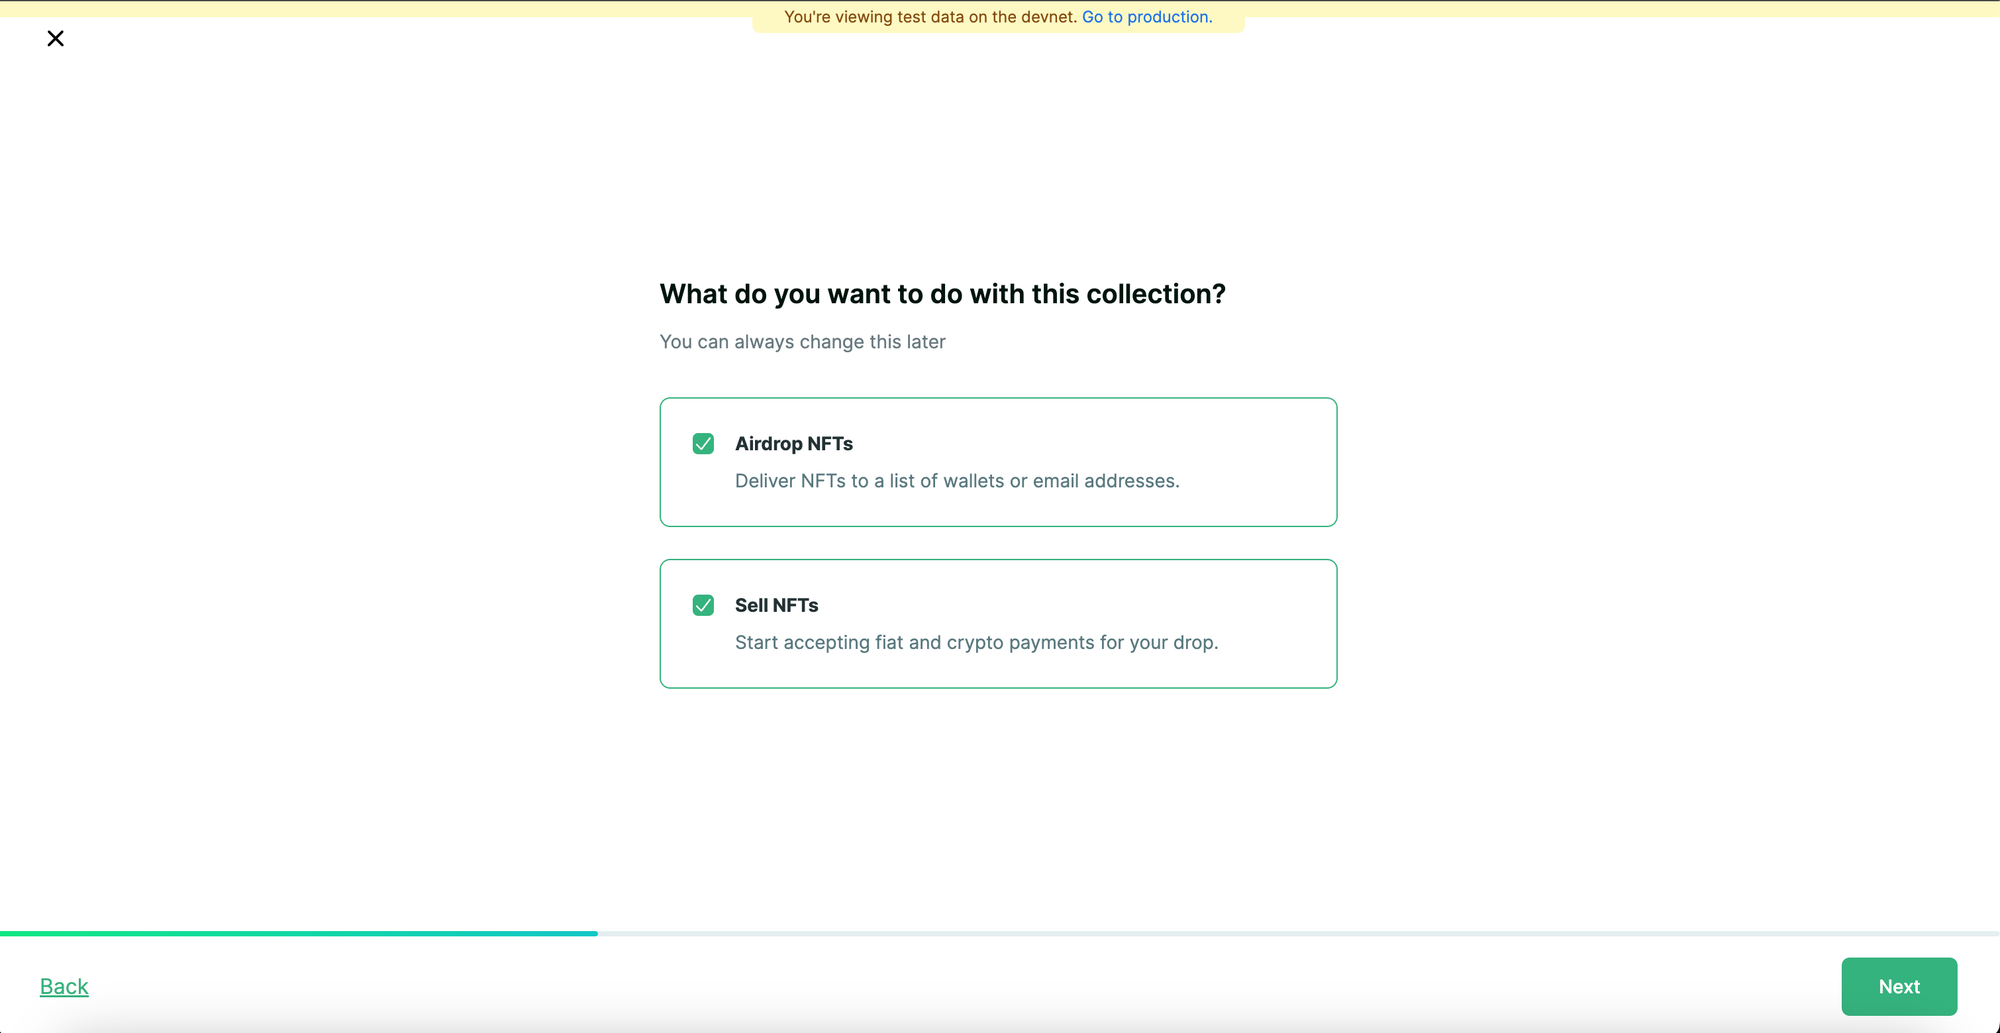
We need to select, "Sell NFTs" since we want to accept fiat and/or cross-chain crypto payments for our NFT Drop. You can also select "Airdrop NFTs" to deliver NFTs to a list of wallet or email addresses. Upon selecting the option(s), click on "Next" to proceed.
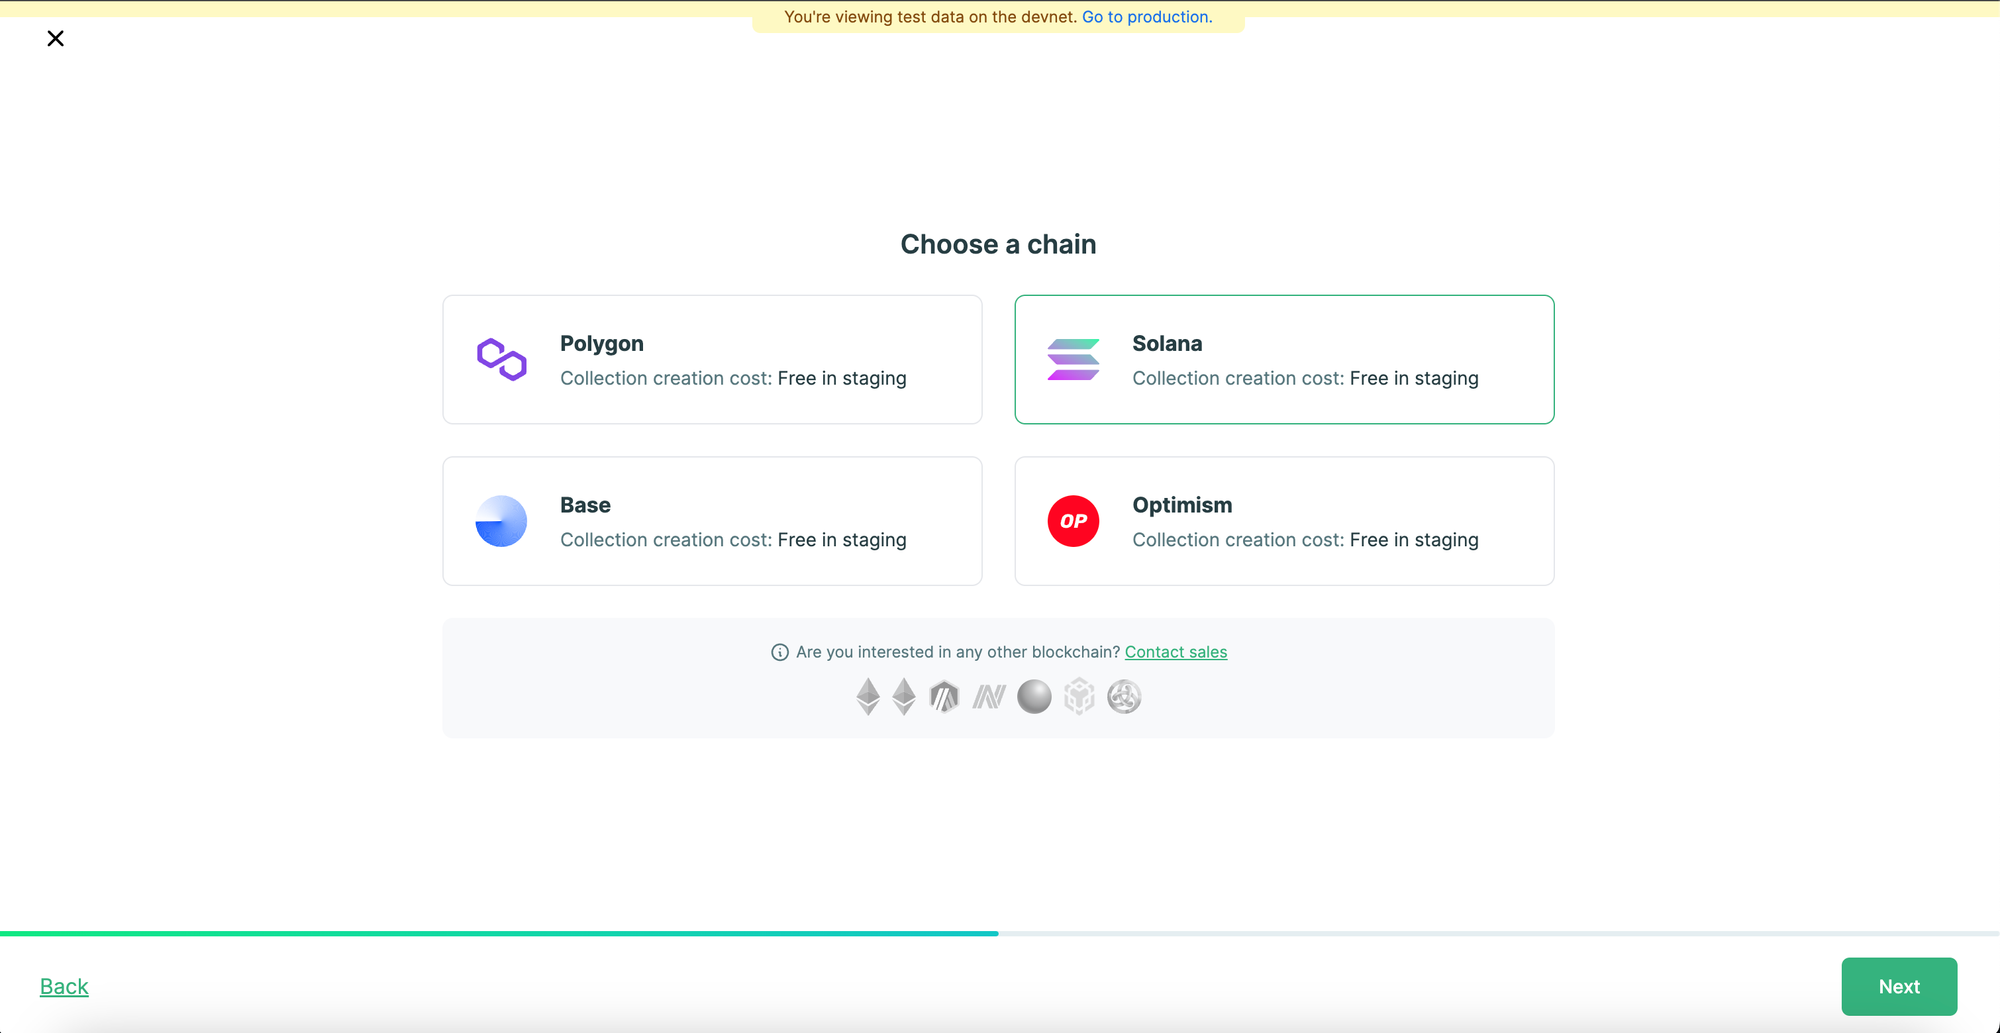
Select the Blockchain of your preference. The chain that you select will be the Blockchain where the smart contract will be deployed to and where your NFT Collection will be created on.
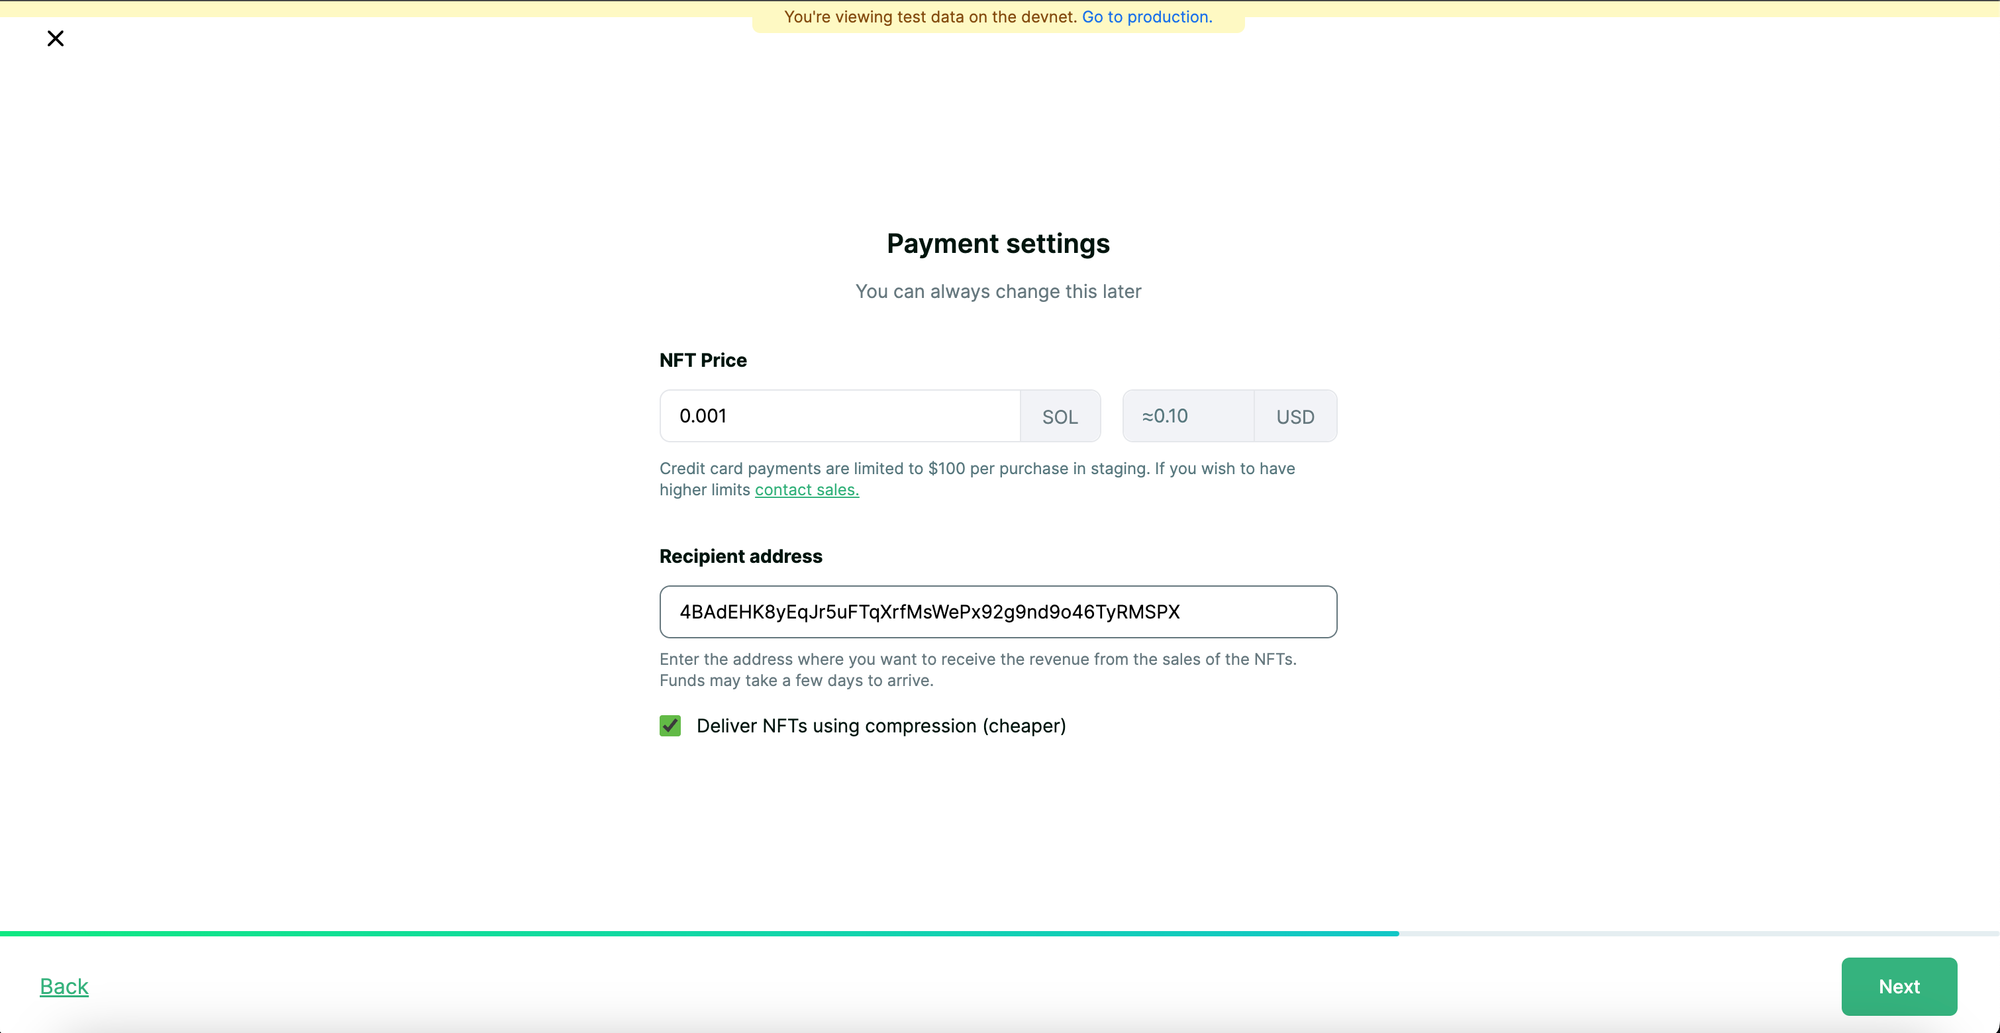
Now, you need to configure the Payment Settings. "NFT Price" is the price per NFT. In this case, we are going to set it as "0.001". The "Recipient address" is the address that will receive the revenue from the sales of the NFTs. You need to copy and paste your EVM/Solana wallet address. Click on "Next" to proceed.
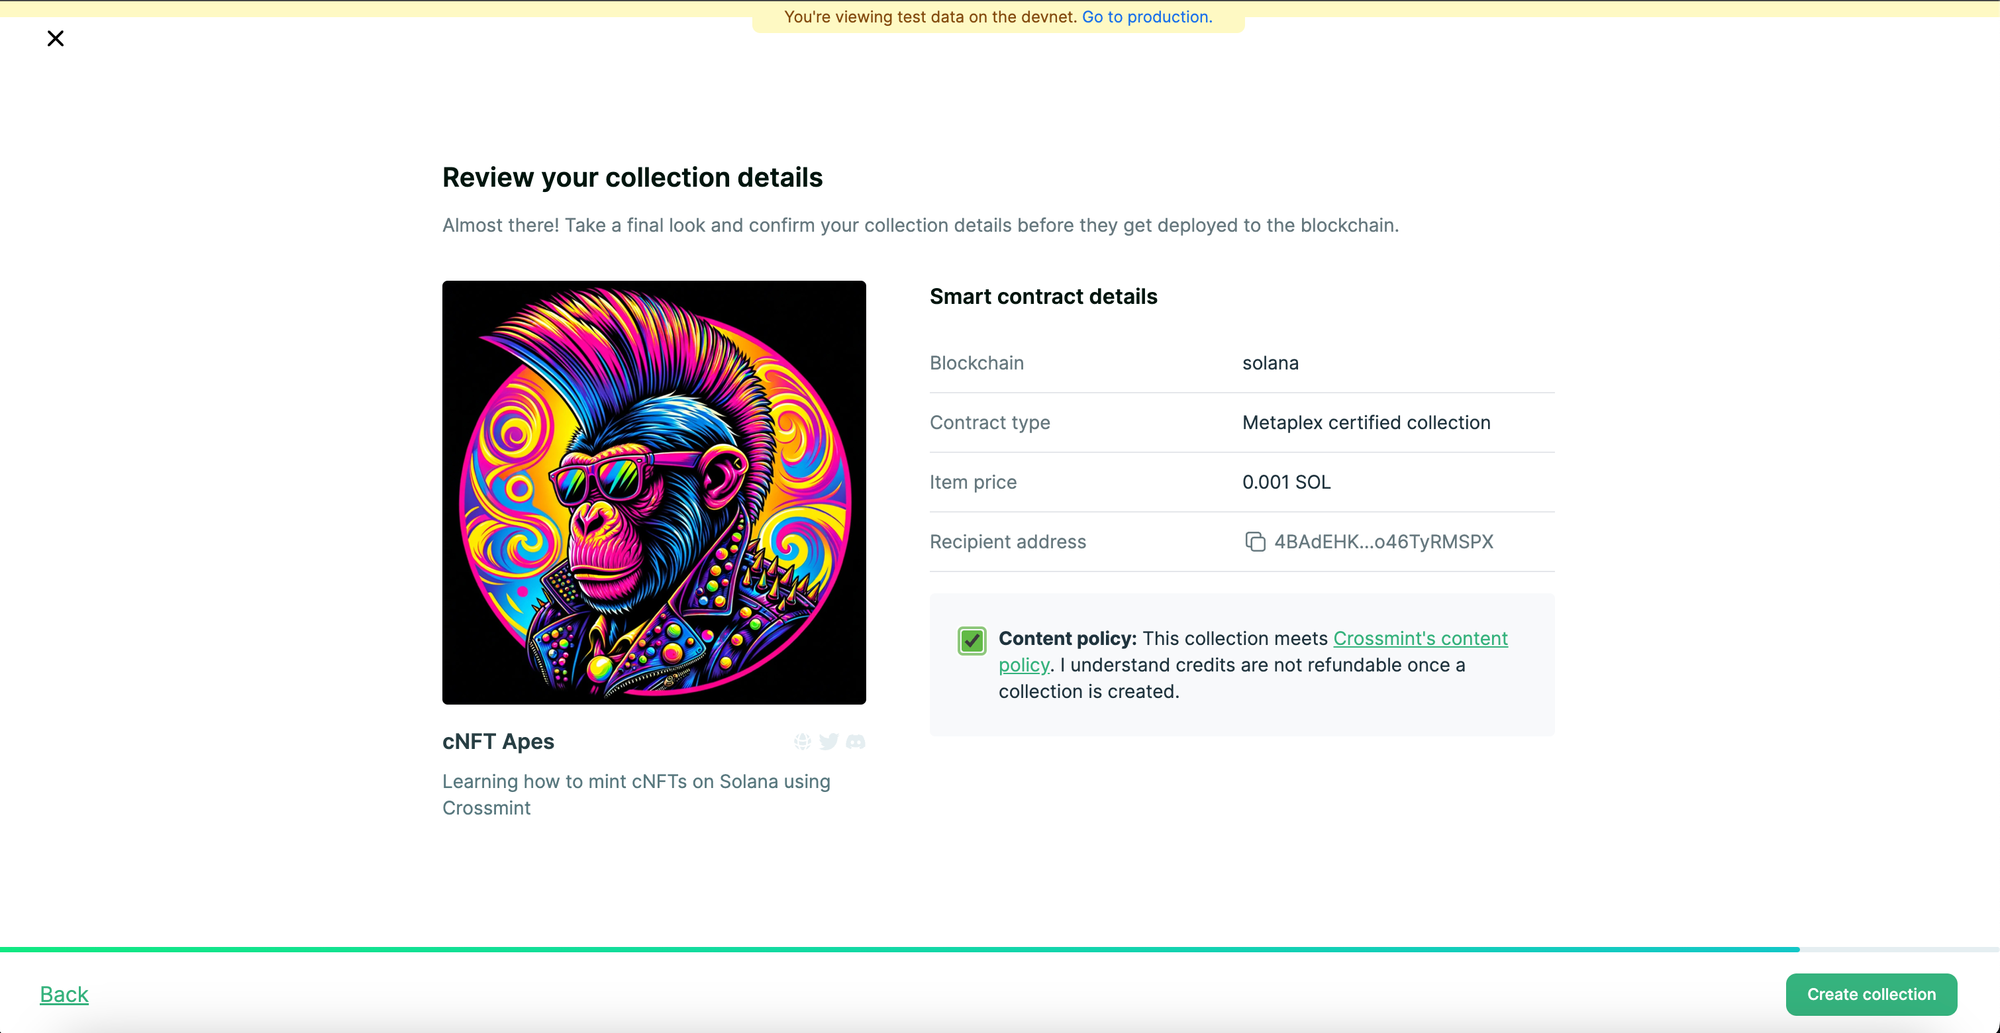
Review your collection details and accept the Content policy by clicking on the checkbox. Click on "Create collection" to create the NFT Collection on the Blockchain (the chain you selected).
Your collection will be created in a few minutes.
Note: I deployed the NFT Collection on Solana, and as a result a few things may vary if you selected a different Blockchain to create the Collection on. However, the tutorial and the process remains the same regardless of which Blockchain you create the Collection on.
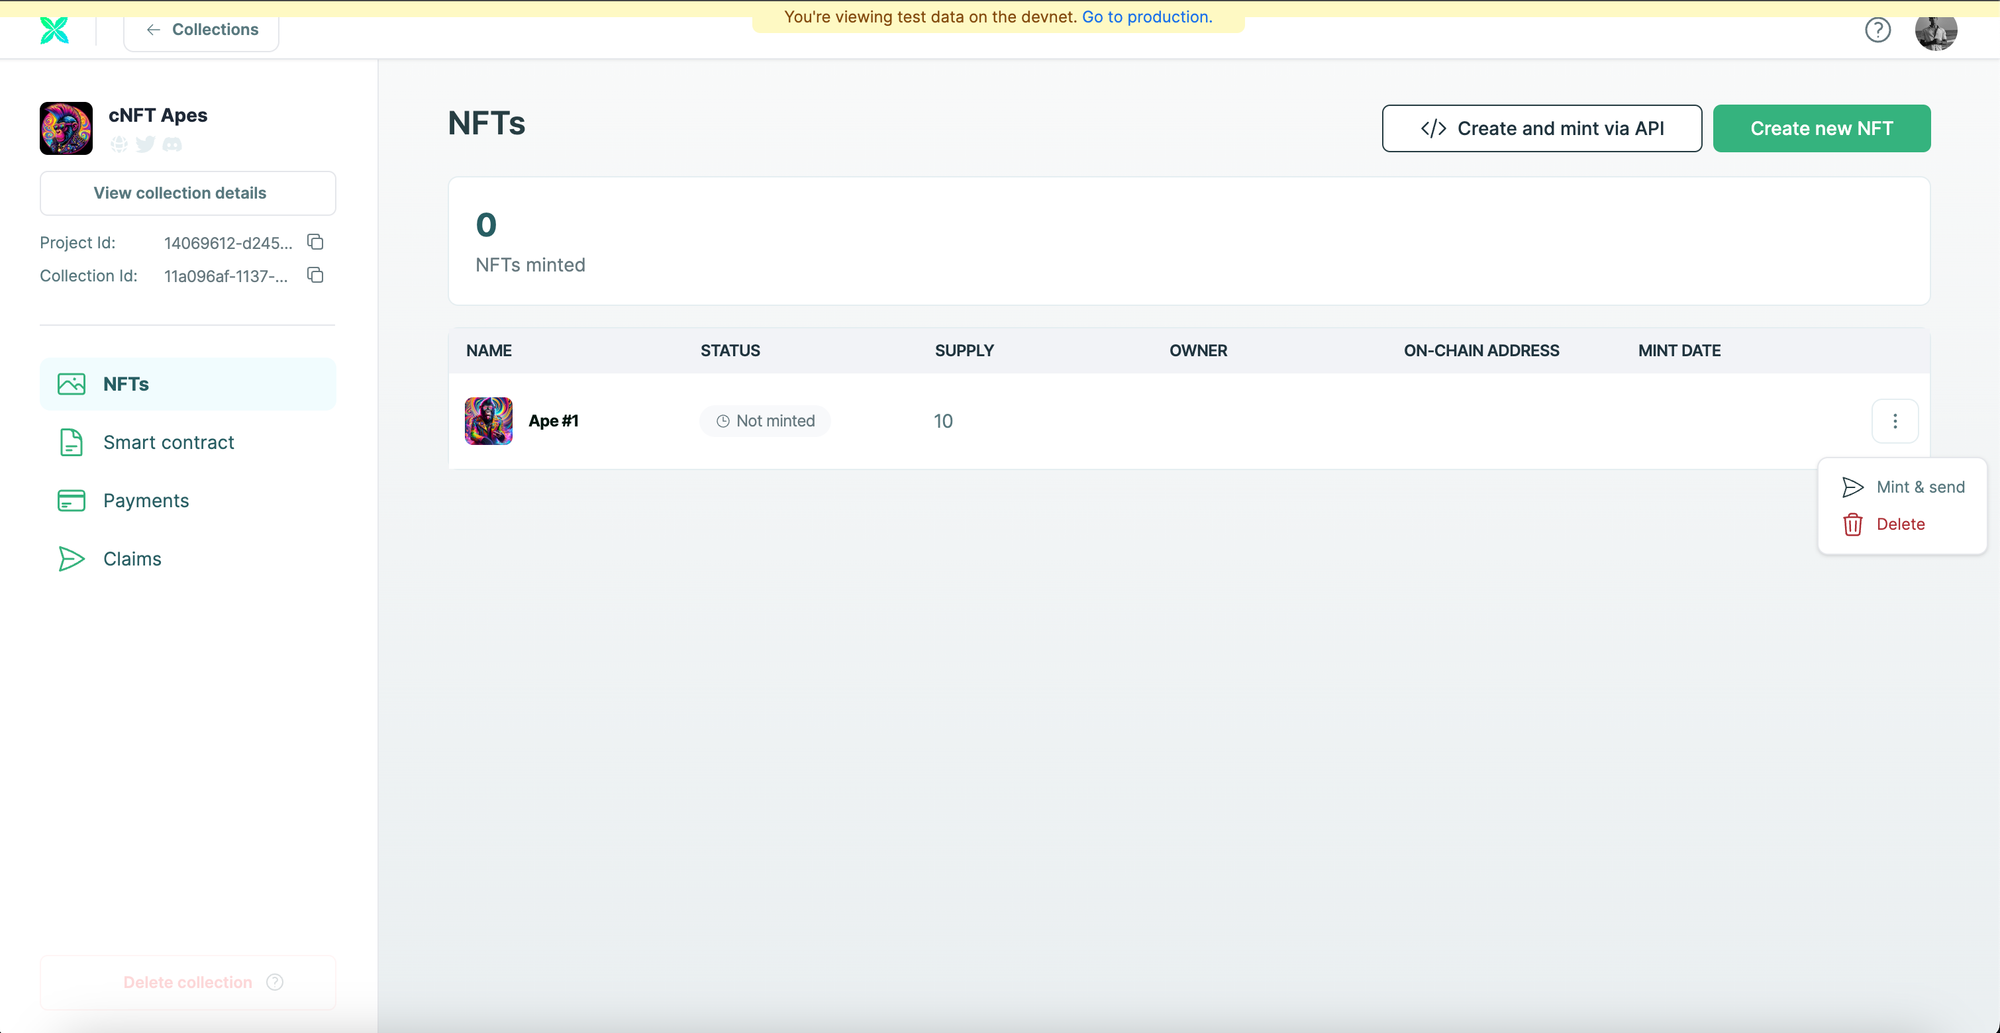
Upload and Create your NFTs
Once your collection has successfully been created, you will see two options to upload your NFTs. We will be using "Manual upload" for this tutorial. Click on "Manual upload" to proceed.
Note: You can also upload your NFTs and its corresponding metadata using API upload. Click here to learn more.

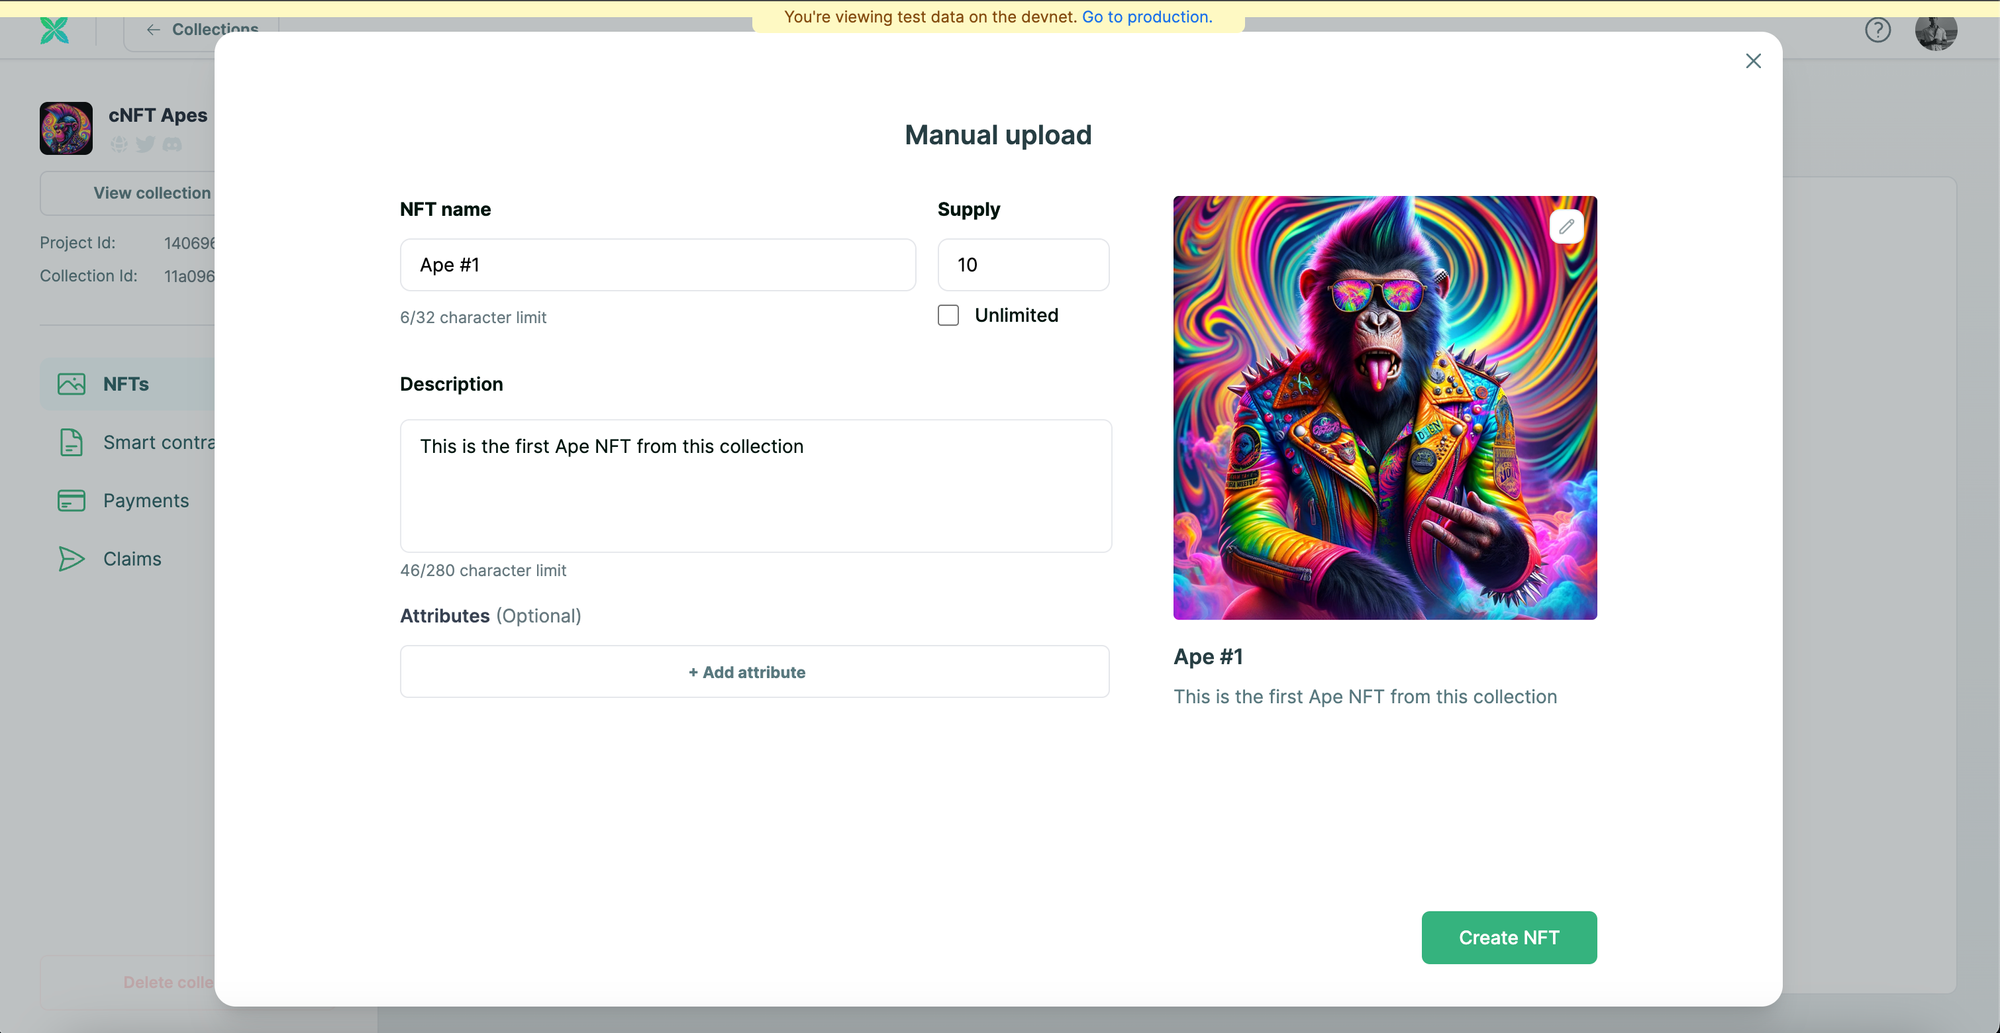
Enter the "NFT name", "Description" and "Supply". In this tutorial, we will be limiting the "Supply" to "10". You also need to upload the image for your NFT. Click on "Create NFT" to proceed.
You will be able to notice that the NFT was successfully created.
How to configure the NFT Drop for sale?
If your goal is to create an NFT Drop for sale and allow your users to purchase your NFTs for a specified price, you need to use the "No-code storefront".
Note: You can also add this to your website. Crossmint provides a Pay button that lets you add an NFT Checkout to your website. Click here to learn more.
Click on "Payments". Click on the toggle button to Enable payments. Payments should be enabled by default, however, if it is disabled, please enable it.
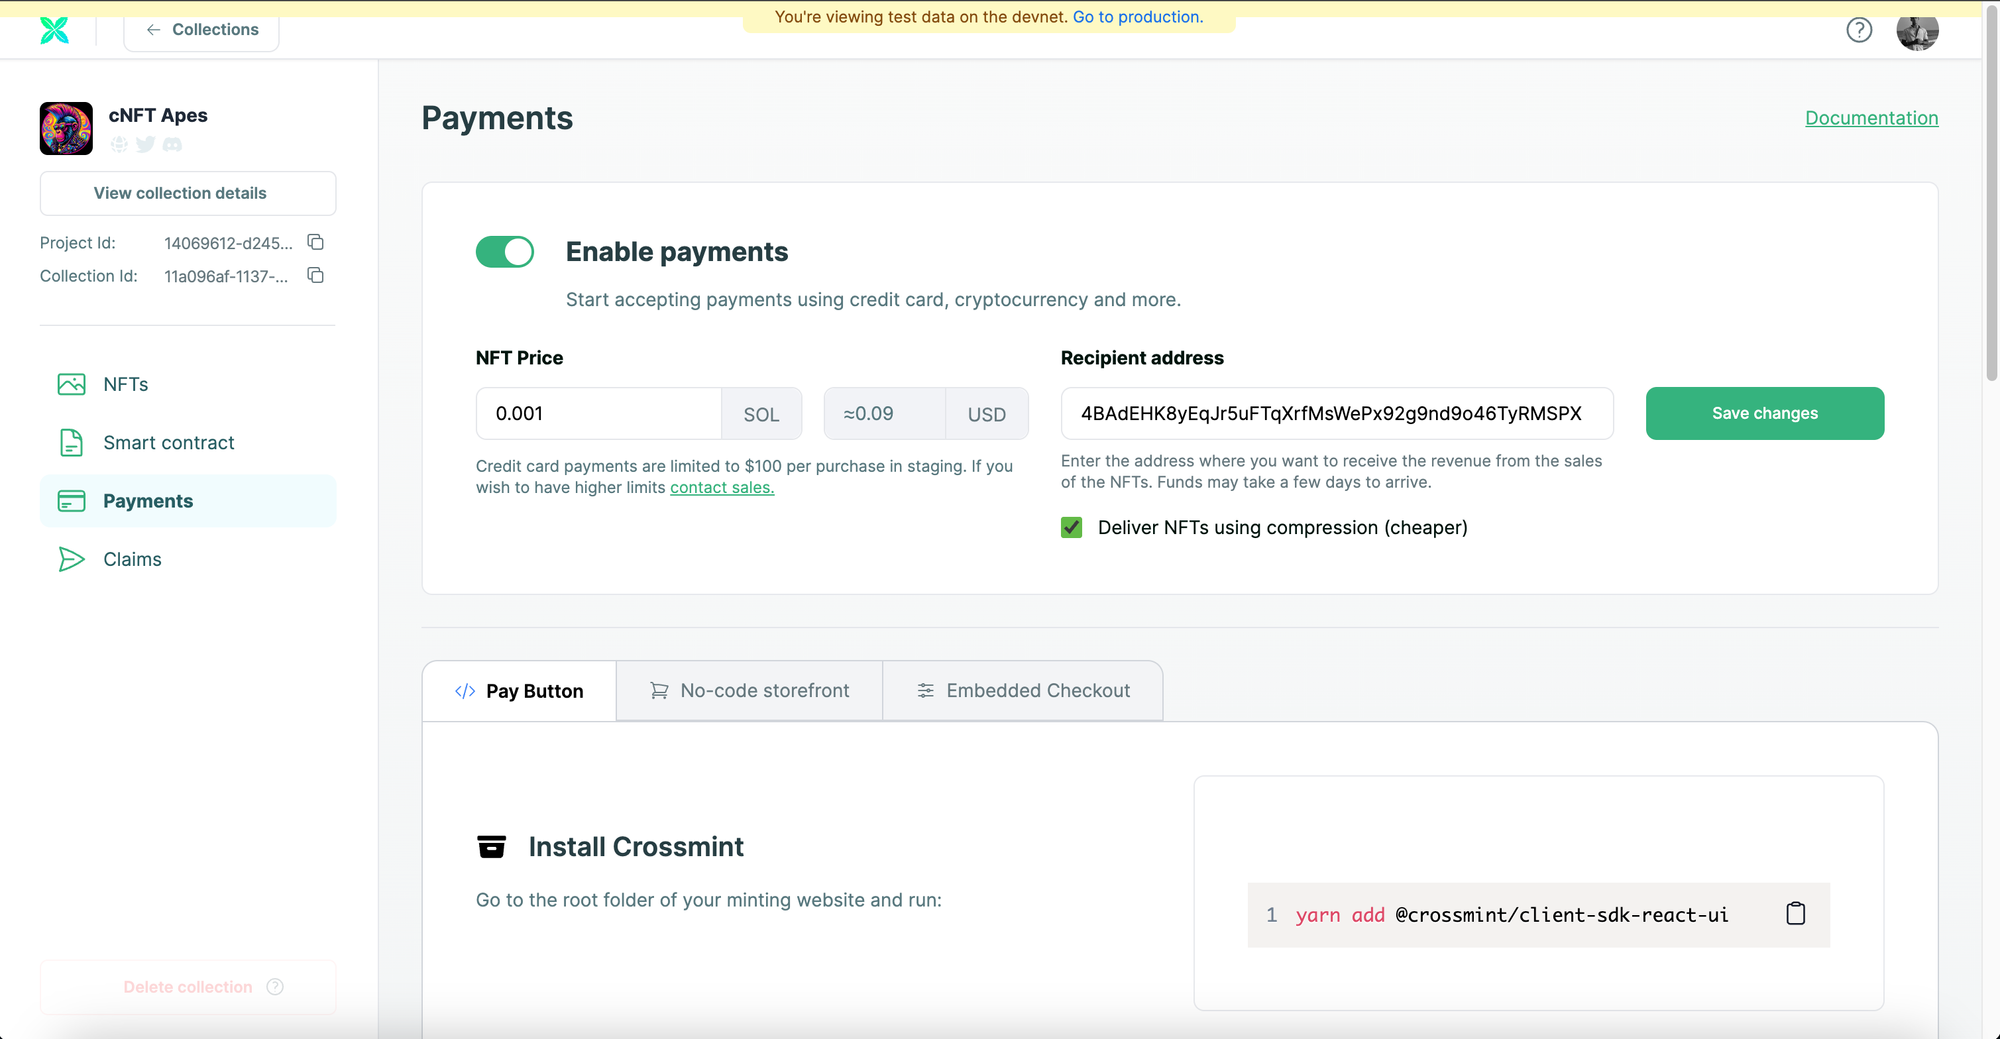
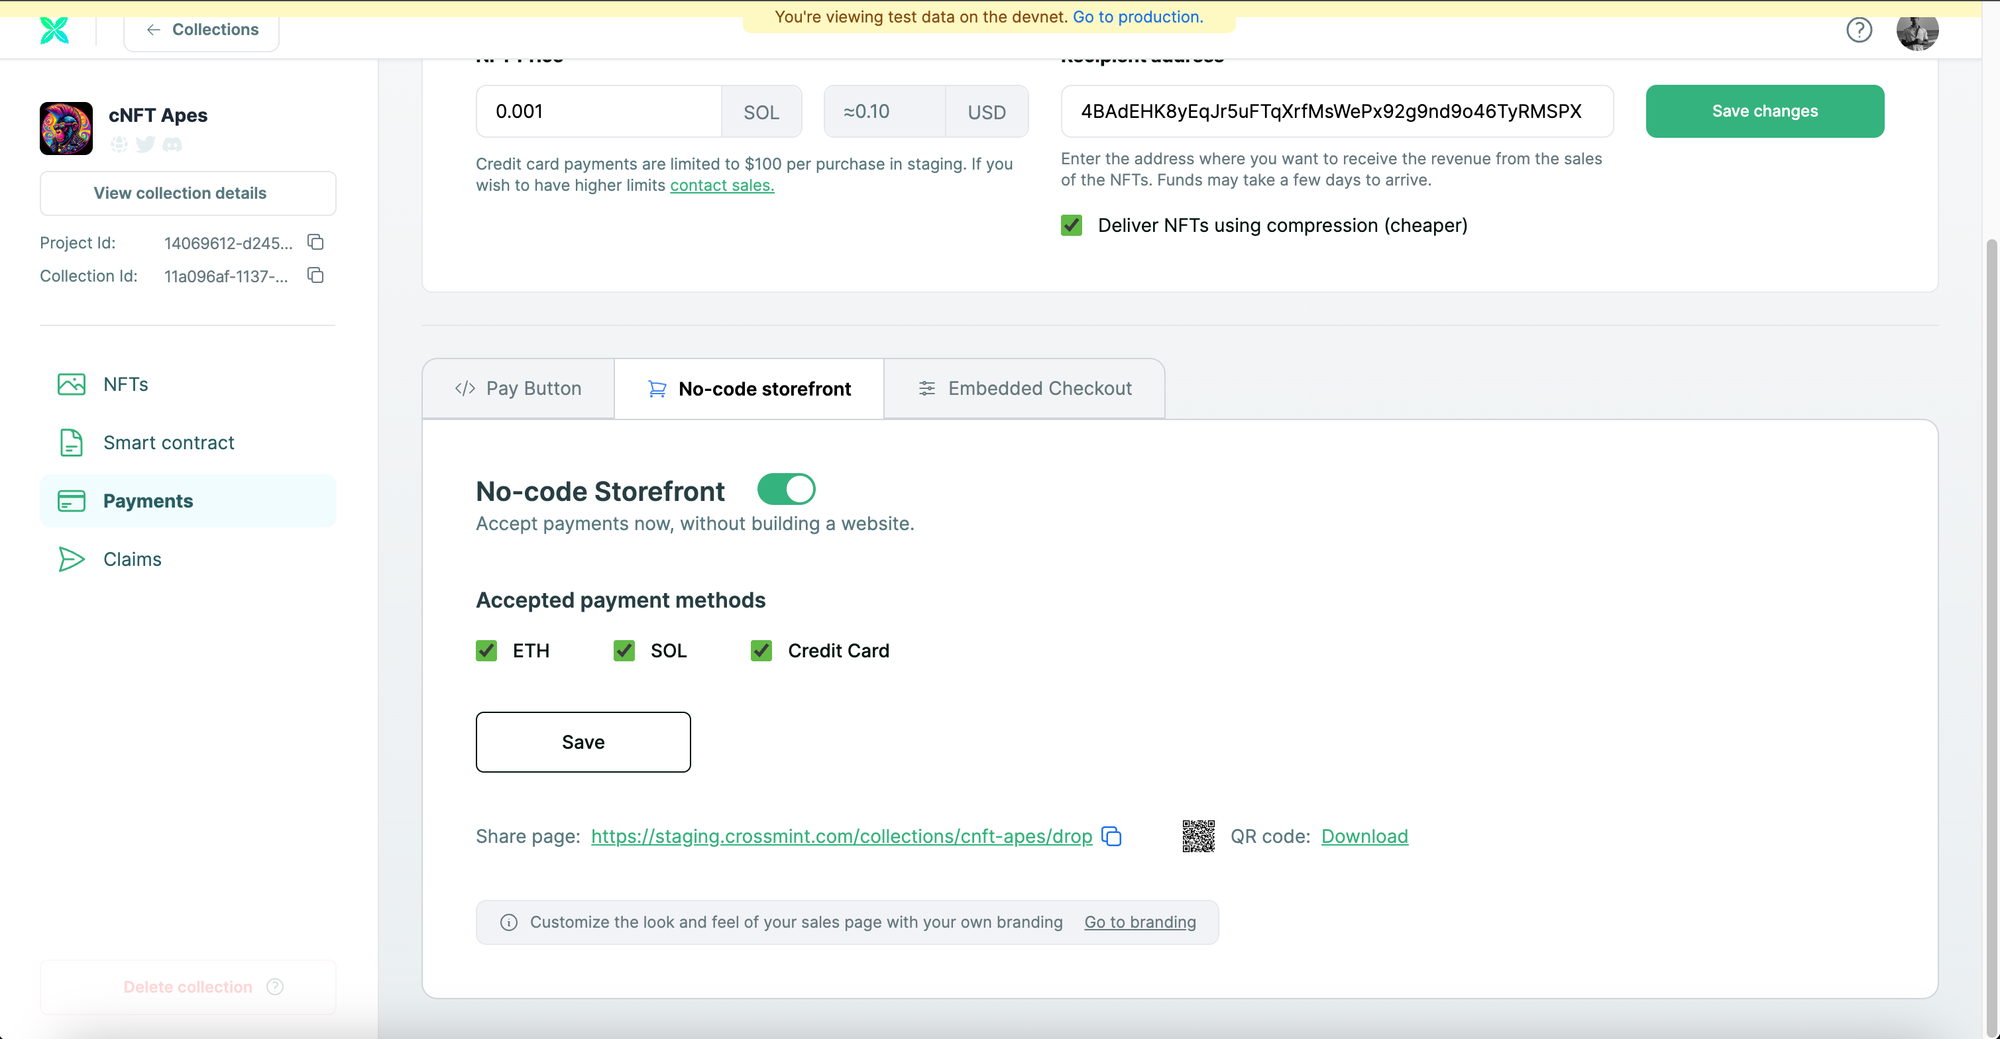
Click on "No-code storefront". Now, enable the No-code Storefront using the toggle button. You can now select the accepted payment methods, they are, ETH, SOL, and Credit Card. For the sake of this tutorial, I am going to enable all three payment methods.
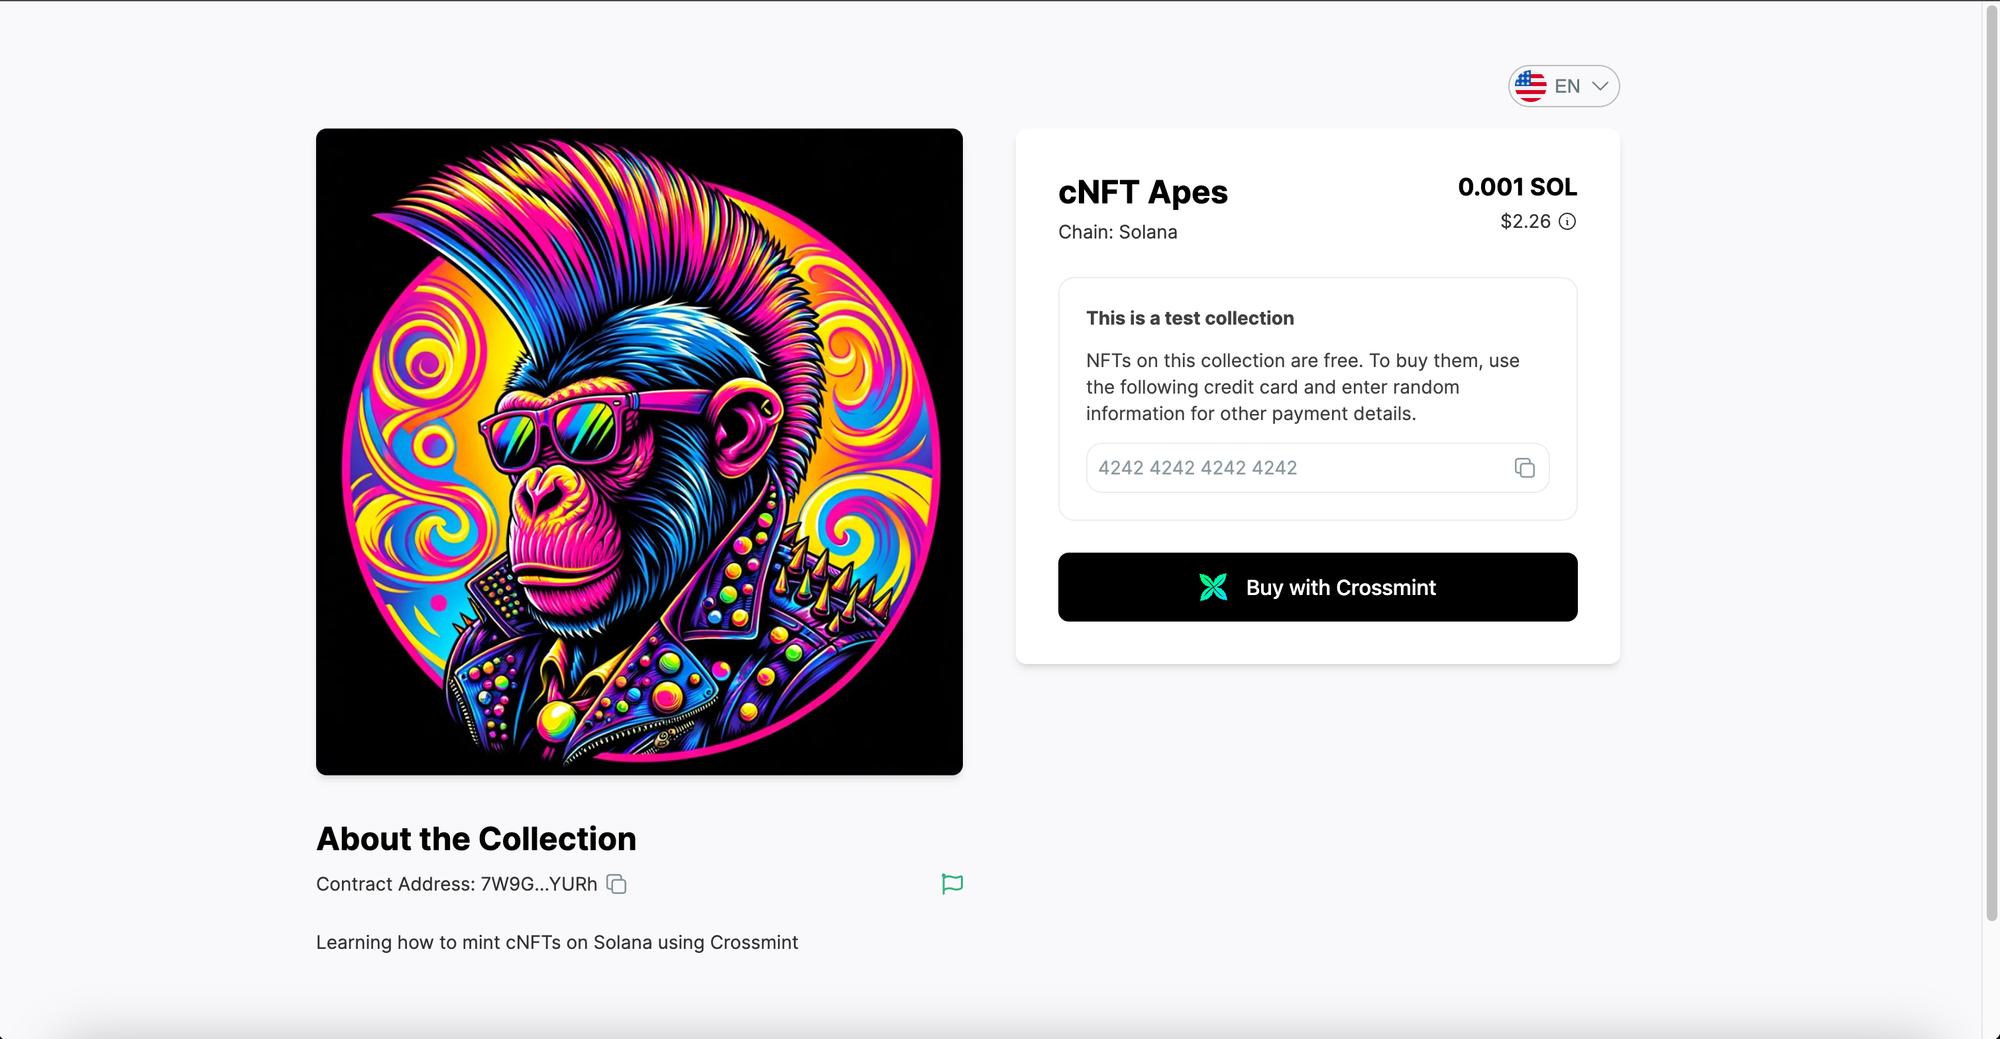
Now, click on "Save" to save the settings and it will generate a No-code Storefront for your NFT Collection. The URL generated below is the URL for your NFT Drop.
Copy and paste the URL in a new tab to see what your No-code Storefront looks like. Your users/customers can click visit this URL and click on "Buy with Crossmint" to purchase your NFT.
Note: You can change the branding of your No-code Storefront as per your preference. In order to do so, you need to click on "Branding" on the Collection's page from the Crossmint Console. You can view this tutorial here to learn more.
How to allow your users to claim your NFT for free?
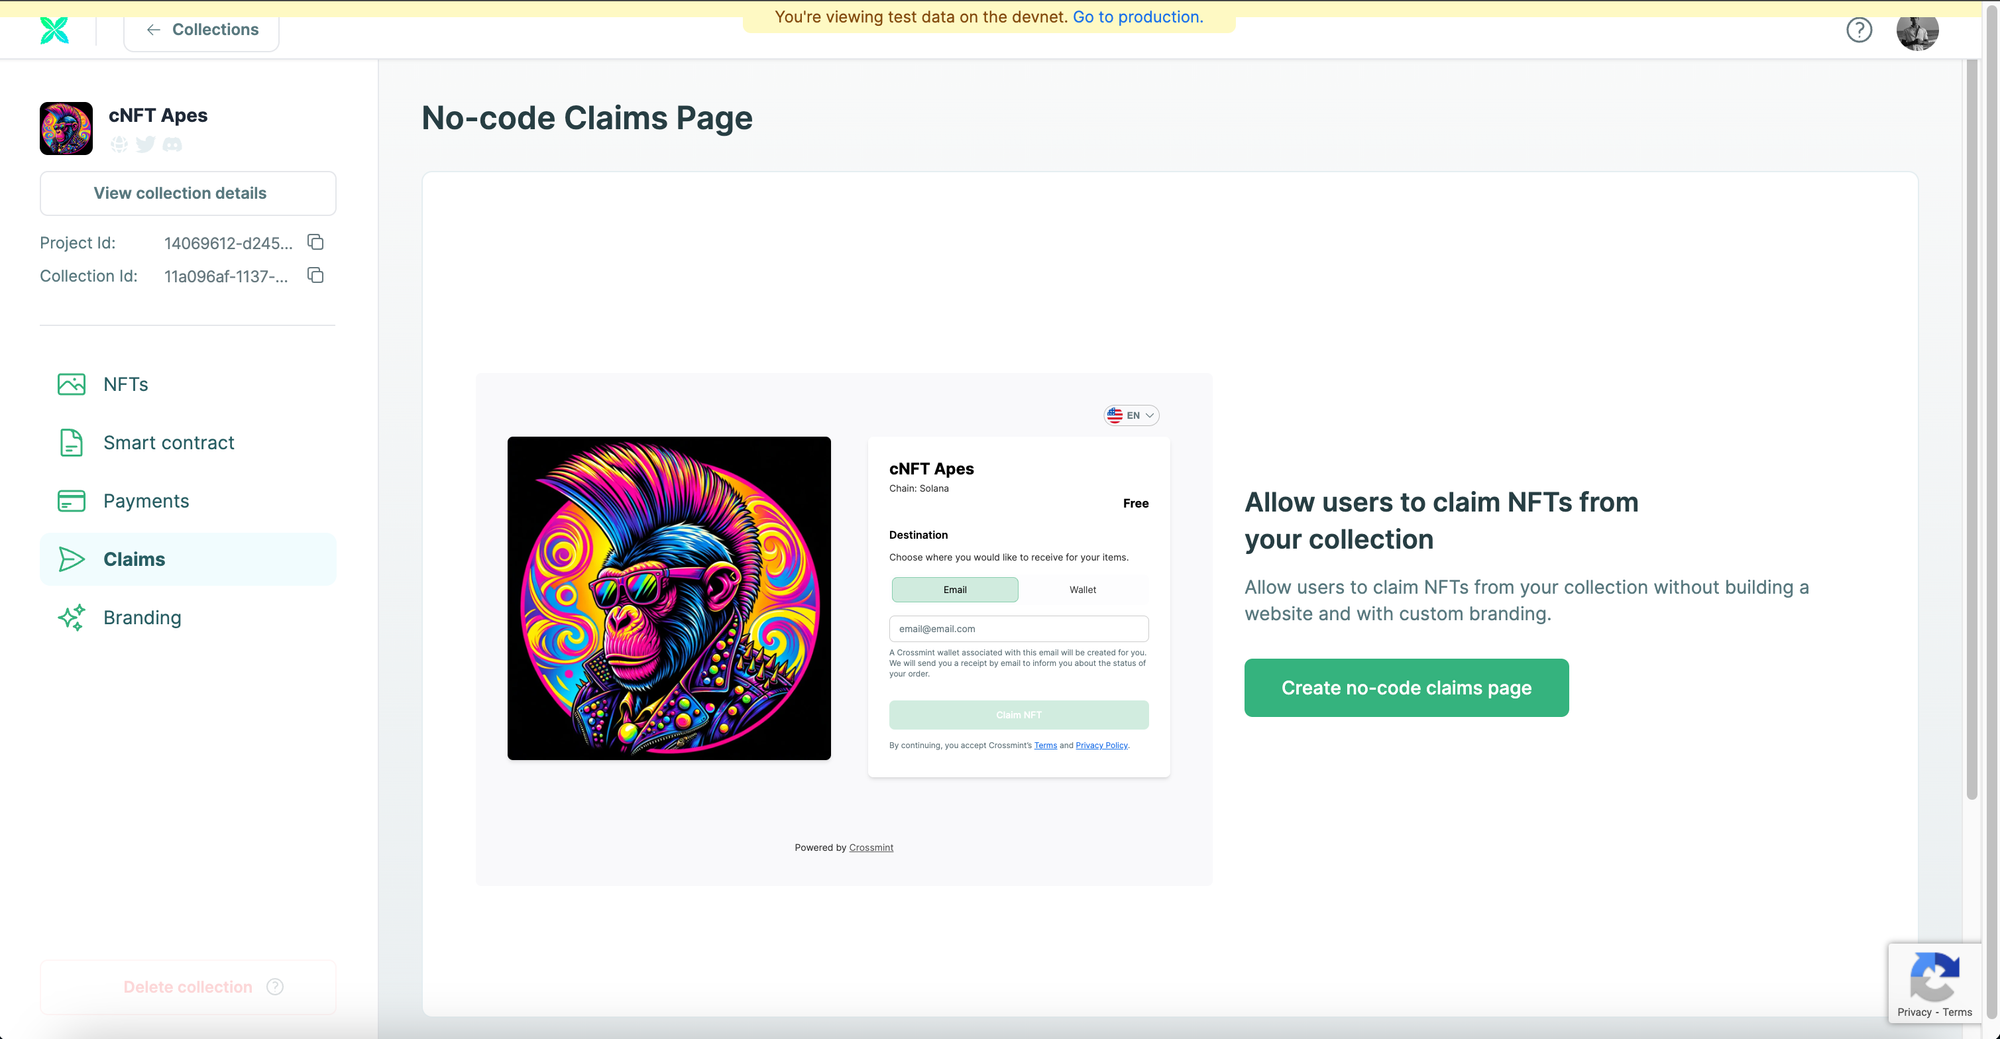
If your goal is to create an NFT Drop and allow your users to claim your NFTs for free, you need to use the "No-code Claims Page".
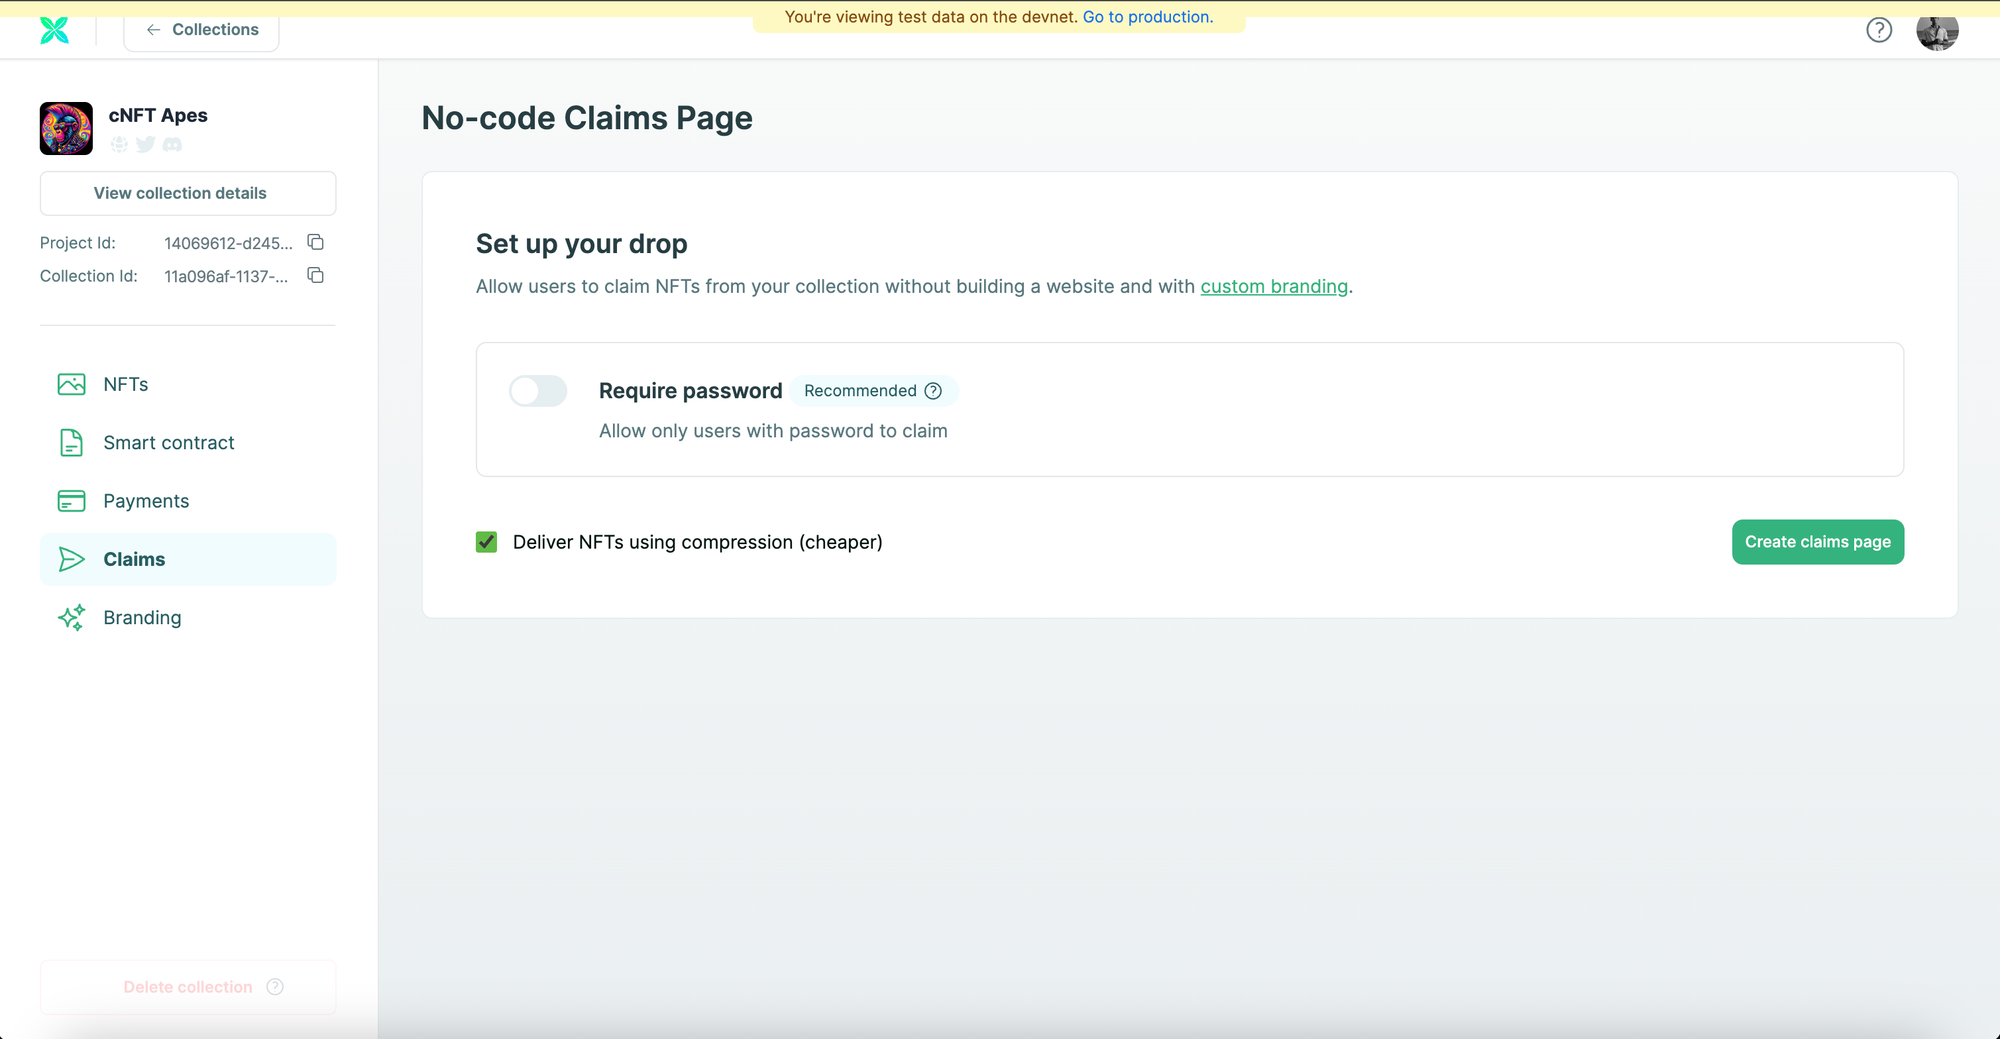
Click on "Claims" on the Collection's page from the Crossmint Console. Now, click on "Create no-code claims page".
Click on "Create claims page" and it will generate a No-code Claims page for your NFT Collection. You can also set a password so that only allowed users can use the password to claim it. However, for the sake of this tutorial, I will be skipping this step.
Click on "Show live page" to view what the No-code Claims Page looks like.
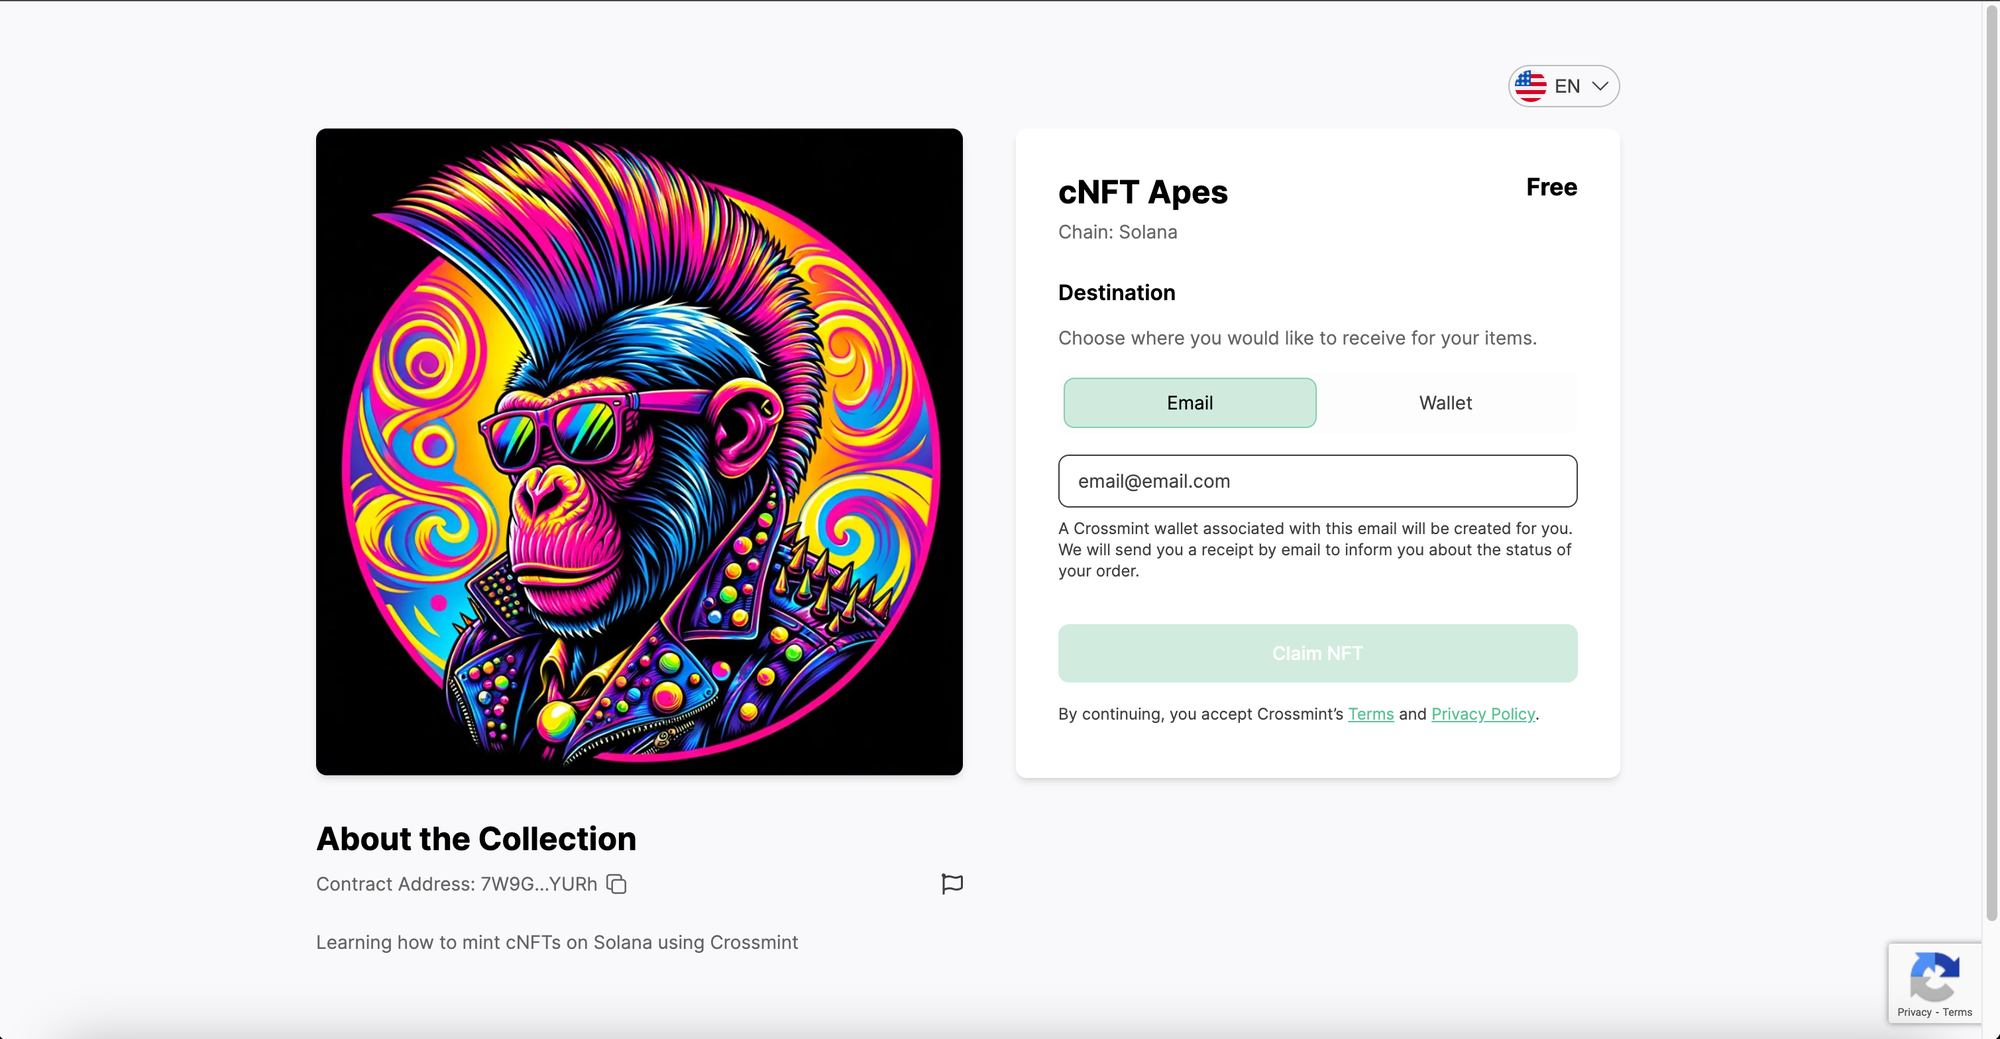
You can use this URL/webpage to let your users claim your NFTs for free using either their Email address or their Wallet address.
And that's it! You have now learned how to create an NFT Collection and create an NFT Drop for the same.
How to claim your NFT from the NFT Drop (Mint)?
You can either use the No-code Storefront page that you generated or you can use the No-code Claims Page. The process to claim/mint an NFT using the No-code Claims Page remains very straightforward. All you need to do is to copy and paste your email or wallet address and click on "Claim NFT".
If you are wondering what the flow would look like if you were to purchase the NFT via the No-code Storefront, please watch the video below.
What's next?
If you are wondering how Crossmint has helped enterprises and brands by powering their NFT Drops, you can click on the link below to read all our Case Studies.


If you want to learn how to use the Crossmint Console to the best of its capacity, please watch the videos in the YouTube Playlist below.
Need help?
For support, please join the official Crossmint Discord Server. You can also use Crossmint Help Page for the same.