


In this guide, you will learn how to create and mint NFTs on Ethereum using Crossmint.
By the end, you will learn how to:
- Create and Deploy an NFT Collection on Ethereum using an API
- Create and mint NFTs on Ethereum using the Mint API.
This guide will take you 10 mins to complete (approximately).
Let's get started!
Table of Contents:
- Create and Mint NFTs with No-code
- Setup
- Create an NFT Collection on Ethereum
- Create and Mint NFTs on Ethereum
- Conclusion
- What's Next?
- Need Help?
Create and Mint NFTs with No-code
If you are wondering how you can create an NFT Collection and mint NFTs with no-code, please read the in-depth guide linked below that teaches you how to do this with 0 code.
 Rohit Ramesh
However, the rest of this guide will show you how you can create NFT Collections and mint NFTs on Ethereum using 2 simple API calls.
Setup
In this section, we'll look at the different environments at Crossmint, how to create an API key, and configure the API key with the necessary scopes.
Difference between Staging and Production
Crossmint has two different environments, they are Staging and Production.
The staging environment is ideal for testing; it simulates the production environment without using real assets or incurring transaction costs. Access Crossmint's staging at https://staging.crossmint.com.
The production environment, accessed via https://www.crossmint.com, is where actual transactions occur.
It's crucial to test thoroughly in staging before moving to production to ensure smooth deployment.
Creating a Developer Account and API Key
An API key connects your project to Crossmint's services securely. Here's how to create one:
- Go to the Crossmint Developer Console and create a developer account.
- Log into Crossmint's Console and navigate to "Developers" section and click on "API Keys".
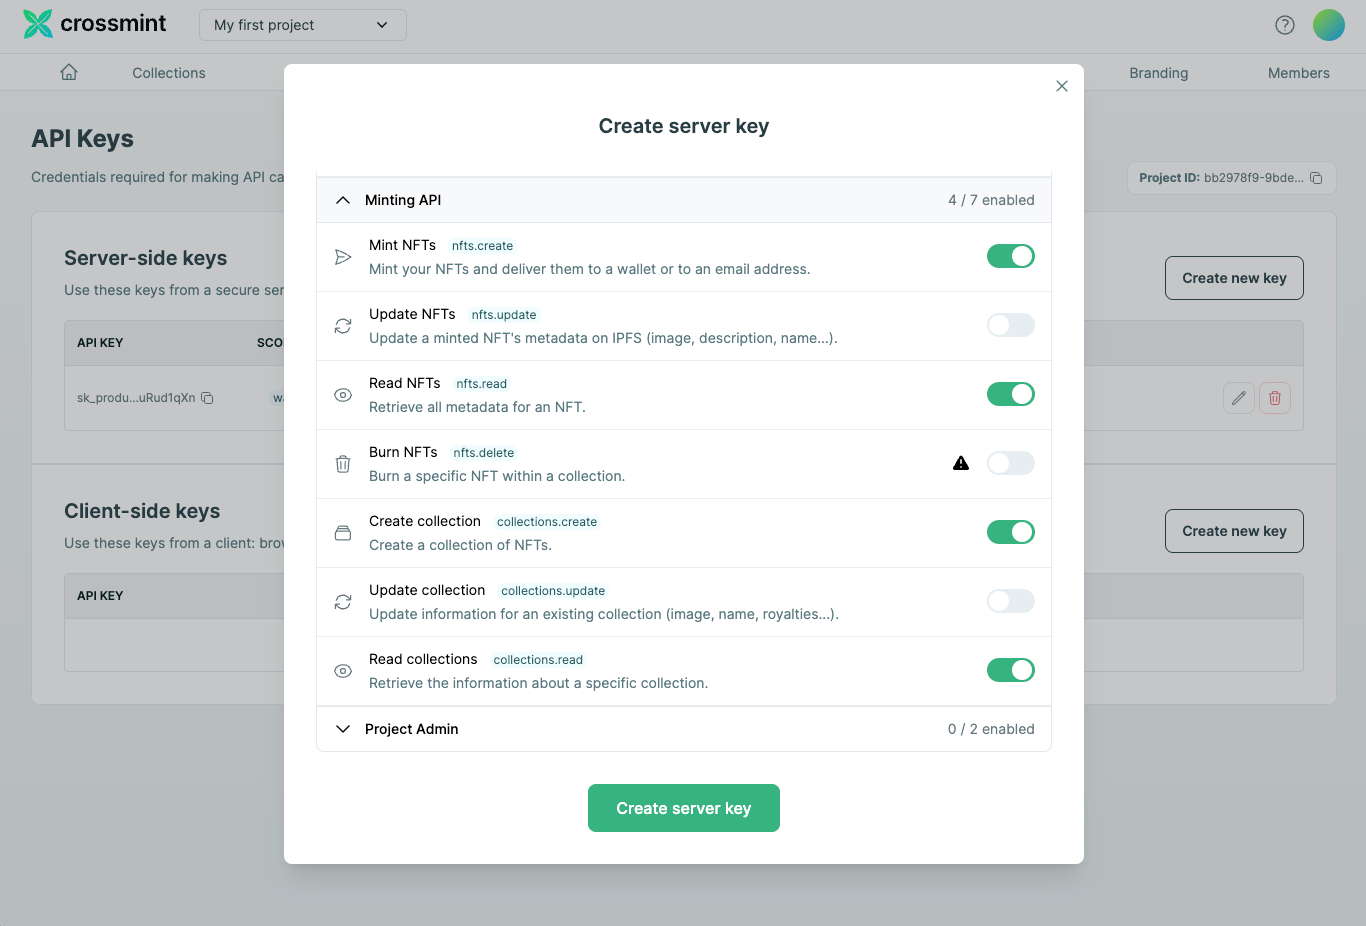
- Select "Create new key," choosing the "Server-side Key" for enhanced security.
- Configure the key's scopes based on your project's needs.
Required Scopes for the API Key
For NFT minting and collection creation, your API key needs specific permissions:
- "nfts.create": Required to mint new NFTs.
- "nfts.read": Grants the ability to read NFT data.
- "collections.create": Allows the creation of NFT collections.
- "collections.read": Permits reading collection information.
Create an NFT Collection on Ethereum
Before you create and mint NFTs on Ethereum, you first need to create an NFT Collection on Ethereum using Crossmint.
Set up Crossmint API Key and Base URL
Before we start, ensure you have your Crossmint API key ready. Also, decide whether you'll be working in the staging or production environment based on your needs. The staging environment is suitable for testing, while the production environment is for actual deployments. For this tutorial, we will be using the production environment.
const axios = require('axios');

// Replace 'YOUR_API_KEY' with your actual Crossmint API key
const CROSSMINT_API_KEY = 'YOUR_API_KEY';

// Use the appropriate URL based on your environment choice
const BASE_URL = 'https://www.crossmint.com/api'; // Production environment

// Setup axios instance for API calls
const apiClient = axios.create({
  baseURL: BASE_URL,
  headers: {
    'X-API-KEY': CROSSMINT_API_KEY,
    'Content-Type': 'application/json',
  },
});
This code sets up the basic configuration needed to make requests to the Crossmint API, including your API key and the base URL pointing to the production environment.
Create a Collection
To create an NFT collection on Ethereum, compose a POST request to the "/2022-06-09/collections/" endpoint with the necessary parameters. Ensure you specify "ethereum"as the "chain"value to deploy the collection on the Ethereum blockchain.
async function createNFTCollection() {
  try {
    const response = await apiClient.post('/2022-06-09/collections/', {
      chain: 'ethereum',
      metadata: {
        name: 'My Awesome NFT Collection',
        imageUrl: 'https://www.example.com/collection-image.png',
        description: 'A collection of unique NFTs',
        symbol: 'MAWC',
      },
      fungibility: 'non-fungible', // 'semi-fungible' is also an option for EVM collections
      supplyLimit: 1000, // Set according to your collection's needs
    });

    console.log('Collection created:', response.data);
    return response.data;
  } catch (error) {
    console.error('Failed to create NFT collection:', error.message);
  }
}

// Call the function to create the collection
createNFTCollection().then(collectionData => {
  console.log('NFT Collection ID:', collectionData.id);
  // You can now use this collection ID for minting NFTs in the collection
});
This function sends a request to create a new NFT collection with specified metadata including its name, image URL, description, and symbol. It logs the collection's creation response, which includes the collection ID. This ID is essential for minting NFTs within this collection in subsequent steps.
Verify Collection Deployment
It's possible to check the status of your collection's deployment process using the action ID returned from the collection creation request.
async function checkCollectionDeploymentStatus(actionId) {
  try {
    const response = await apiClient.get(`/2022-06-09/actions/${actionId}`);
    console.log('Deployment Status:', response.data.status);

    if (response.data.status === 'success') {
      console.log('Collection Deployed Successfully');
    } else {
      console.log('Collection Deployment is pending or has failed');
    }
  } catch (error) {
    console.error('Failed to check deployment status:', error.message);
  }
}

// Example usage:
// Assuming 'actionId' was obtained and passed on from the collection creation step
// checkCollectionDeploymentStatus('your_action_id_here');
After triggering the collection creation, you can use the action ID to check the deployment status. This function will request the status of the collection deployment and log whether it has been successfully deployed, is still pending, or has failed.
By following these steps, you've learned how to create an NFT collection on the Ethereum using Crossmint.
Create and Mint NFTs on Ethereum
After successfully setting up your API key and creating a collection, you can now mint NFTs within your collection on Ethereum.
Mint an NFT on the Created Collection
To mint an NFT, you'll need the "collectionId" of the collection you've created. The minting process requires specifying the recipient and providing metadata for the NFT. This metadata includes the name, image, and description of the NFT, among other optional fields.
Here's how you can mint an NFT to a specified recipient:
const axios = require('axios');
const API_KEY = 'your_crossmint_api_key';
const collectionId = 'your_collection_id';  // Replace with your actual collection ID

const nftMetadata = {
    recipient: 'email:testy@crossmint.io:ethereum',  // Recipient format
    metadata: {
        name: "Crossmint Example NFT",
        image: "https://www.crossmint.com/assets/crossmint/logo.png",
        description: "My NFT created via the mint API!",
    },
};

axios.post(`https://www.crossmint.com/api/2022-06-09/collections/${collectionId}/nfts`, nftMetadata, {
    headers: {
        'X-API-KEY': API_KEY,
        'Content-Type': 'application/json',
    }
})
.then(response => {
    console.log(`NFT Minting initiated. Action ID: ${response.data.actionId}`);
})
.catch(error => {
    console.error('Error minting NFT:', error);
});
This code snippet sends a POST request to the Crossmint API to create and mint an NFT. The "recipient"can be specified in several formats, including directly using a wallet address or an email address as shown above. The "metadata" object contains details about the NFT being minted.
Verify the NFT was Minted Using the Action ID
Once you've initiated the minting process, you'll receive an "actionId". You can use this ID to check the status of the minting process. It's a good practice to verify whether the minting was successful.
Here's how you can check the status:
const actionId = 'received_action_id';  // Replace with your actual action ID received from the minting response

axios.get(`https://www.crossmint.com/api/2022-06-09/actions/${actionId}`, {
    headers: {
        'X-API-KEY': API_KEY,
    }
})
.then(response => {
    console.log(`NFT Minting Status: ${response.data.status}`);
    if (response.data.status === 'success') {
        console.log('NFT minted successfully!');
    } else {
        // Handle other statuses accordingly
        console.log(response.data);
    }
})
.catch(error => {
    console.error('Error checking minting status:', error);
});
This code snippet uses the "actionId" you received from the minting process to make a GET request to Crossmint. It checks the status of the action, letting you know whether the minting process was successful or if there were any issues.
By following these steps, you can mint NFTs on Ethereum using Crossmint's APIs. Remember to handle errors accordingly and ensure you have the correct permissions set up with your API key.
Conclusion
In this guide, we walked through the process of creating and minting NFTs on Ethereum using Crossmint. You learned to navigate between staging and production environments, generate an API key with the necessary scopes, and create your own NFT collection on Ethereum. Following that, we learned how to mint an NFT within your collection and validate its creation with an action id.
What's Next?
If you are wondering how Crossmint has helped enterprises and brands by powering their NFT Drops, you can click on the link below to read all our Case Studies.

If you want to learn how to use the Crossmint to create Custodial Wallets for your users using their Email Address, please watch the YouTube video below.
Need help?
For support, please join the official Crossmint Discord Server. You can also use Crossmint Help Page for the same.
 Rohit Ramesh