


Creating a Farcaster Frame to Mint NFTs can be a little complicated. It becomes even trickier when you want to create a Frame that can mint NFTs cross-chain, such as minting an NFT on Aptos.
Minting NFTs and creating an NFT Collection on the Aptos Blockchain is now easier than ever before using Crossmint. This guide will teach you how to create a Farcaster Frame using Crossmint that will let you mint NFTs on Aptos, directly to your wallet address.
By the end, you will learn how to:
- Deploy an NFT Collection on Aptos using a single API call
- Create and mint NFTs using the Mint API.
- Create and post a Farcaster Frame that will let users mint NFTs on Aptos.
This guide will take you 30 mins to complete (approximately).
Let's get started!
Table of Contents:
- What is a Farcaster Frame?
- Create an NFT Collection on Aptos
- Create the Farcaster Frame
- Deploy the Frame using Vercel
- Testing and Casting the Farcaster Frame
- Conclusion
- What's Next?
- Need Help?
What is a Farcaster Frame?
Farcaster Frames introduce interactive iframes into posts on the decentralized Farcaster network. They enable direct embedding of applications like polls or galleries or NFT Drops, enhancing user engagement by integrating interactive elements within the social feed.
Utilizing blockchain technology, Frames offer secure and authenticated interactions using the OpenGraph standard to let static embeds extend to content functionality, allowing for innovative application development without necessitating external site redirection. This capability marks a significant development in blending content with interactive experiences in the web3 space.
Imagine a social media (in this case, decentralized social media, i.e., Farcaster or Warpcast) post which allows you to mint NFTs, tokens, participate in raffles, polls, navigate through social data, etc, all from within the post. Farcaster's Frames make this possible!
Create an NFT Collection on Aptos
Crossmint allows you to create NFT Collections on the Aptos Blockchain using a single API call. You do not need to create or code the smart contract yourself using the Move language. Using the Create Collection API, you can deploy a smart contract on Aptos and create an NFT collection.
The blog post linked below has a step-by-step guide on how to create an NFT Collection on Aptos. It's recommended that you read the blog post first, before you proceed with the next section of this guide. Let's learn how we can use this.
Note: The guide below uses Crossmint's Production Console.
It's recommended that you familiarize yourself with this tutorial on Staging before you work with Crossmint's Production Console. Click here to go to the Staging Console.
 Rohit Ramesh
After you have created the NFT Collection on Aptos. Please note down the "collectionId" as we will be using this later.
Create an API Key for Minting NFTs on Aptos
As shown in the above guide, you also need to create an API Key. You will be using this API Key to configure your Farcaster Frame to call Crossmint's Mint API, i.e., Minting NFTs on Aptos through the Frame. This API Key needs to have the following scopes:
- nfts.create
- nfts.read
- collections.create
- collections.update
- collections.read
Create the Farcaster Frame
Create a Next.js App
We will be using Next.js for this. So create a Next app by running the following command.
npx create-next-app aptos-farcaster-frameThis will now install a Next app on your computer inside the folder named "aptos-farcaster-frame". Please open this folder/directory inside your code editor (preferably Visual Studio Code).
Now you need to install "onchainkit" and "neynar" which will let you create frames and validate whether your cast has been liked and re-casted or not, respectively.
npm install @coinbase/onchainkit @neynar/nodejs-sdkAfter your Next app has been successfully installed, proceed with the next section.
Build the Farcaster Frame
Now, open "src/app/layout.tsx". The code that is already inside this file is a boiler plate code created by Next.js. Please remove all the existing code and replace it with the code below.
export const viewport = {
  width: "device-width",
  initialScale: 1.0,
};

export default function RootLayout({
  children,
}: {
  children: React.ReactNode;
}) {
  return (
    <html lang="en">
      <body>{children}</body>
    </html>
  );
}
layout.tsx
The code snippet above is a simple Next component written in TypeScript. It defines a basic layout component for our Next application and includes a viewport configuration object. In simple words, this decides the structure of our Web app.
Now, open "src/app/page.tsx". Once again, the code that is already inside this file is a boiler plate code created by Next. Please remove all the existing code and replace it with the code below.
import { getFrameMetadata } from "@coinbase/onchainkit";
import type { Metadata } from "next";

const NEXT_PUBLIC_URL = process.env.NEXT_PUBLIC_URL;

const frameMetadata = getFrameMetadata({
  buttons: [
    {
      label: "Mint an NFT on Aptos",
      action: "post",
    },
  ],
  image: {
    src: `${NEXT_PUBLIC_URL}/default.png`,
    aspectRatio: "1.91:1",
  },
  input: {
    text: "Enter your Aptos Wallet Address",
  },
  postUrl: `${NEXT_PUBLIC_URL}/api/frame`,
});

export const metadata: Metadata = {
  title: "Mint an NFT on Aptos",
  description: "Mint an NFT on Aptos",
  openGraph: {
    title: "Mint an NFT on Aptos",
    description: "Enter your Aptos Wallet address to Mint an NFT on Aptos",
    images: [`${NEXT_PUBLIC_URL}/default.png`],
  },
  other: {
    ...frameMetadata,
  },
};

export default function Page() {
  return (
    <>
      <h1>Mint an NFT on Aptos</h1>
    </>
  );
}
page.tsx
So what's happening in the above code? Let's understand it step-by-step:
- frameMetadata - this creates the Farcaster frame's metadata, that is, the buttons, text, image, input field and the postURL.
- buttons - this renders all the buttons you want your frame to contain.
- label - the text that will appear on the button
- action - the action that the button will perform. In this case, a simple POST request/call.
- image - sets the default image that will show up on the frame. This is a static image that the frame will display once it loads up. Farcaster requires you to set the name of the image as "default.png" and this image must be located at "NEXT_PUBLIC_URL/default.png".
For example, if your app was deployed to "https://aptos-farcaster-nft-frame.vercel.app" then the image needs to be located at "https://aptos-farcaster-nft-frame.vercel.app/default.png". - input - the inputs that your frame will be fetching/receiving.
- text - receives a simple text input (string). In this case, it will be an Aptos wallet address.
- postURL - the endpoint where the API request will be created. In this case, the endpoint is "/api/frame". This is where we will be making an API call to mint the NFT to the wallet address passed by a user as an input.
- buttons - this renders all the buttons you want your frame to contain.
- Now, we export some other metadata as shown in the code (title, description, etc) along with the "frameMetadata".
Creating the API endpoint to Mint the NFT
Now, we need to create the API endpoint where the API request will be made once user clicks on the "Mint an NFT on Aptos" button on the frame.
Inside "/src/app/api/frame" directory, create "route.ts". Now, paste the code below inside this file.
import {
  FrameRequest,
  getFrameMessage,
  getFrameHtmlResponse,
} from "@coinbase/onchainkit";
import { NextRequest, NextResponse } from "next/server";

export async function POST(req: NextRequest): Promise<Response> {
  let input: string | undefined = "";
  let recipientAddress = "";
  const NEXT_PUBLIC_URL = process.env.NEXT_PUBLIC_URL;
  const body: FrameRequest = await req.json();
  const env = process.env.CROSSMINT_ENV || "staging";

  try {
    const { message } = await getFrameMessage(body, {
      neynarApiKey: "NEYNAR_ONCHAIN_KIT",
    });

    if (message?.input) {
      input = message.input;
    }

    if (!input) {
      return new NextResponse(
        getFrameHtmlResponse({
          image: {
            src: `${NEXT_PUBLIC_URL}/error2.png`,
          },
          ogTitle: "Error",
        })
      );
    }

    recipientAddress = `aptos:${input}`;

    const crossmintURL = `https://${env}.crossmint.com/api/2022-06-09/collections/${process.env.CROSSMINT_COLLECTION_ID}/nfts`;
    const crossmintOptions = {
      method: "POST",
      headers: {
        accept: "application/json",
        "content-type": "application/json",
        "x-api-key": process.env.CROSSMINT_API_KEY!,
      },
      body: JSON.stringify({
        recipient: recipientAddress,
        metadata: {
          name: "The First Frame NFT on Aptos",
          image: `${NEXT_PUBLIC_URL}/nft.png`,
          description:
            "This is the first NFT that was minted on Aptos using Crossmint",
        },
      }),
    };

    const response = await fetch(crossmintURL, crossmintOptions);
    await response.json();

    return new NextResponse(
      getFrameHtmlResponse({
        image: {
          src: `${NEXT_PUBLIC_URL}/success.png`,
        },
        buttons: [
          {
            label:
              "Your NFT will be delivered to your Aptos wallet address soon!",
          },
        ],
      })
    );
  } catch (error) {
    return new NextResponse(
      getFrameHtmlResponse({
        image: {
          src: `${NEXT_PUBLIC_URL}/error.png`,
        },
        ogTitle: "Error",
      })
    );
  }
}

export const dynamic = "force-dynamic";
So what's happening in the above code? Let's understand it step-by-step:
- First, we need to get the frame's message from the request's body using onchainkit, then we get the input from the message.
- Now, this is where we configure Crossmint's Mint API to make a POST Request to Mint an NFT on Aptos.
- crossmintURL - this is the string used to construct the URL for an API request to Crossmint.
- env - this is the variable that specifies the environment (either staging or production). This allows for targeting different versions of the API or servers based on the environment.
- CROSSMINT_COLLECTION_ID - this is the collectionId of the NFT Collection that you created on Aptos using Crossmint. Earlier in this guide, it was mentioned that you need to note down the collectionId of the collection you deploy using the Crossmint API.
- For now, you do not need to worry about these two parameters. We will be configuring the values for this when we deploy our web app on Vercel. We will be passing them as Environment Variables to ensure that these values remain private and secure.
- crossmintOptions - this represents the configuration object used for making an HTTP POST request to the Crossmint API.
- X-API-KEY - Obtained in the Crossmint Developer Console.
This API Key was obtained from your Developer Console, as mentioned in the earlier half of this guide. - metadata - this is the object that contains the details about the NFT to be minted, including its name, image URL and description.
- recipient - The Aptos wallet address that the NFT should be sent to. recipientAddress as "aptos:<WALLET_ADDRESS>".
- description - A brief description of the NFT.
- image - Direct link to your NFT image. This is a URL. In this case, we will be hosting the image within our deployed web app in the path shown in the code snippet above.
- name - The name of your NFT.
- X-API-KEY - Obtained in the Crossmint Developer Console.
- Now we make the API call and receive the JSON response.
- If the API call was successful, we display a success message along with an image "success.png" (this will be hosted in our deployed web app as well). Remember how earlier it was mentioned that Frames only lets you embed static content? Well, this is why all of our responses to the user via the Frame will be posted using static images hosted within our deployed web app.
- If the API call fails, we catch the response and display "error.png" along with an error message.
- crossmintURL - this is the string used to construct the URL for an API request to Crossmint.
If you are still confused with how the Crossmint's Mint API works, read the guide below.
Rohit RameshThis is essentially all you need to get your Farcaster frame working. But how do we make it more interesting? Let's say that we need to check whether a user has liked the case and re-casted it. Let's learn how we can do that.
Verify whether a user has liked and re-casted the Cast
In order to check whether a user has liked the cast and re-casted it, we will be using Neynar. You need to obtain an API Key from Neynar to integrate this. Please note that you need to subscribe to Neynar before you proceed (paid subscription billed monthly), and hence this step is optional.
However, if you want to ensure that you reward a real user for their interaction, you can do so by integrating this. It will also ensure that other users do not post your web app's URL within their own cast and allow their followers to mint the NFT from it. With this, only if a user has liked and re-casted your cast, they will be able to mint the NFT.
if (process.env.WARPCAST_HASH && process.env.NEYNAR_API_KEY) {
      const neynarURL = `https://api.neynar.com/v2/farcaster/cast?identifier=${process.env.WARPCAST_HASH}&type=hash`;

      const neynarResponse = await fetch(neynarURL, {
        headers: {
          api_key: process.env.NEYNAR_API_KEY,
          "content-type": "application/json",
        },
        method: "GET",
      });

      const data = await neynarResponse.json();

      const reactions = await data.cast.reactions;

      const hasRecasted = reactions.recasts.some(
        (recast: { fid: Number }) => recast.fid === message?.interactor.fid
      );
      const hasLiked = reactions.likes.some(
        (likes: { fid: Number }) => likes.fid === message?.interactor.fid
      );

      if (!hasRecasted || !hasLiked) {
        return new NextResponse(
          getFrameHtmlResponse({
            image: {
              src: `${NEXT_PUBLIC_URL}/error1.png`,
            },
            postUrl: `${NEXT_PUBLIC_URL}/api/frame`,
            buttons: [
              {
                label: "Please try again",
                action: "post",
              },
            ],
          })
        );
      }
    }
So, as always, what's happening in the above code? Let's understand it step-by-step:
- We are making an API request to Neynar using a hash to get a cast's data.
- WARPCAST_HASH - the hash of cast that you posted on Warpcast. You will be able to obtain this only after you post the cast. Refer to this to learn how to obtain the hash.
- Now, using our cast's fetched data, we obtain all the reactions on our cast.
- We now check if the user trying to mint the NFT has two reactions to our cast.
- Whether they have liked the cast.
- Also, if they have re-casted the cast.
- We now check if the user trying to mint the NFT has two reactions to our cast.
- If the user has either of the above required reactions missing, then they will not be able to mint the NFT.
You can paste the above code snippet just above the below code line.
recipientAddress = `aptos:${input}`;The final code snippet for "route.ts" will look like this.
import {
  FrameRequest,
  getFrameMessage,
  getFrameHtmlResponse,
} from "@coinbase/onchainkit";
import { NextRequest, NextResponse } from "next/server";

export async function POST(req: NextRequest): Promise<Response> {
  let input: string | undefined = "";
  let recipientAddress = "";
  const NEXT_PUBLIC_URL = process.env.NEXT_PUBLIC_URL;
  const body: FrameRequest = await req.json();
  const env = process.env.CROSSMINT_ENV || "staging";

  try {
    const { message } = await getFrameMessage(body, {
      neynarApiKey: "NEYNAR_ONCHAIN_KIT",
    });

    if (message?.input) {
      input = message.input;
    }

    if (!input) {
      return new NextResponse(
        getFrameHtmlResponse({
          image: {
            src: `${NEXT_PUBLIC_URL}/error2.png`,
          },
          ogTitle: "Error",
        })
      );
    }

    if (process.env.WARPCAST_HASH && process.env.NEYNAR_API_KEY) {
      const neynarURL = `https://api.neynar.com/v2/farcaster/cast?identifier=${process.env.WARPCAST_HASH}&type=hash`;

      const neynarResponse = await fetch(neynarURL, {
        headers: {
          api_key: process.env.NEYNAR_API_KEY,
          "content-type": "application/json",
        },
        method: "GET",
      });

      const data = await neynarResponse.json();

      const reactions = await data.cast.reactions;

      const hasRecasted = reactions.recasts.some(
        (recast: { fid: Number }) => recast.fid === message?.interactor.fid
      );
      const hasLiked = reactions.likes.some(
        (likes: { fid: Number }) => likes.fid === message?.interactor.fid
      );

      if (!hasRecasted || !hasLiked) {
        return new NextResponse(
          getFrameHtmlResponse({
            image: {
              src: `${NEXT_PUBLIC_URL}/error1.png`,
            },
            postUrl: `${NEXT_PUBLIC_URL}/api/frame`,
            buttons: [
              {
                label: "Please try again",
                action: "post",
              },
            ],
          })
        );
      }
    }

    recipientAddress = `aptos:${input}`;

    const crossmintURL = `https://${env}.crossmint.com/api/2022-06-09/collections/${process.env.CROSSMINT_COLLECTION_ID}/nfts`;
    const crossmintOptions = {
      method: "POST",
      headers: {
        accept: "application/json",
        "content-type": "application/json",
        "x-api-key": process.env.CROSSMINT_API_KEY!,
      },
      body: JSON.stringify({
        recipient: recipientAddress,
        metadata: {
          name: "The First Frame NFT on Aptos",
          image: `${NEXT_PUBLIC_URL}/nft.png`,
          description:
            "This is the first NFT that was minted on Aptos using Crossmint",
        },
      }),
    };

    const response = await fetch(crossmintURL, crossmintOptions);
    await response.json();

    return new NextResponse(
      getFrameHtmlResponse({
        image: {
          src: `${NEXT_PUBLIC_URL}/success.png`,
        },
        buttons: [
          {
            label:
              "Your NFT will be delivered to your Aptos wallet address soon!",
          },
        ],
      })
    );
  } catch (error) {
    return new NextResponse(
      getFrameHtmlResponse({
        image: {
          src: `${NEXT_PUBLIC_URL}/error.png`,
        },
        ogTitle: "Error",
      })
    );
  }
}

export const dynamic = "force-dynamic";
route.ts
Deploy the Frame using Vercel
Vercel allows you to deploy your projects for free. We will be using Vercel to deploy our Next app.
Push the Next app to Github
Before you proceed with Vercel, you need to push your code to Github. Create a new repository on Github.
Now, from open a terminal on your code editor (make sure you are in the root directory, in this case, inside the folder "aptos-farcaster-frame").
Run the code below inside the terminal. This will push your Next app to your github repository.
Note: Ensure that you pass the correct github reposity URL.
git remote add origin https://github.com/<username>/<repo_name>.git
git add .
git commit -m "your commit message"
git branch -M main
git push -u origin main
Deploy the Next app
Open Vercel and select the newly created Github repository. Then deploy the Next app. This will deploy your code files to a default domain generated by Vercel.
Now, you need to configure your your Environment Variables. Head over to "Settings" and click on "Environment Variables". Now, let's configure the Environment Variables.
- "NEXT_PUBLIC_URL" - The URL of your deployed Next app.
- "CROSSMINT_ENV" - The Crossmint environment that you are using to deploy the NFT Collection. If it is on Production or Mainnet, use "www". If it is on Staging or Testnet, use "staging".
- "NEYNAR_API_KEY" - The Neynar API Key that you will be using to check whether a user has liked your cast and recasted it or not, before proceeding with the mint.
- "WARPCAST_HASH" - The Hash of the cast for which you want to check whether it has been liked and recasted. Refer to the Neynar Docs here. Get the hash after you post the cast and then configure this as one of your environment variables.
- "CROSSMINT_API_KEY" - The Crossmint API Key that you created using Crossmint Console. You will be using this key to create an NFT Collection and mint an NFT on Aptos.
- "CROSSMINT_COLLECTION_ID" - The Collection Id of the NFT Collection you deployed on Aptos. You can obtain this from the Crossmint Console after you created a collection on Aptos using the API.
Testing and Casting the Farcaster Frame
Now that we have everything setup, the only thing that is left for us to do is to test the Frame we created and cast (post) it on Warpcast.
Testing the Farcaster Frame
Head over to this Validator and paste your the URL you deployed your Next app/Frame to (you can get this from Vercel). Now hit the reload button as shown in the screenshot below.

You can test it out by pasting your Aptos wallet address and clicking on "Mint an NFT on Aptos" button. If the interaction was successful, the NFT will appear in your wallet within a few seconds.
Cast the Frame
You can now simply paste this URL inside your cast/post on Warpcast and cast it.
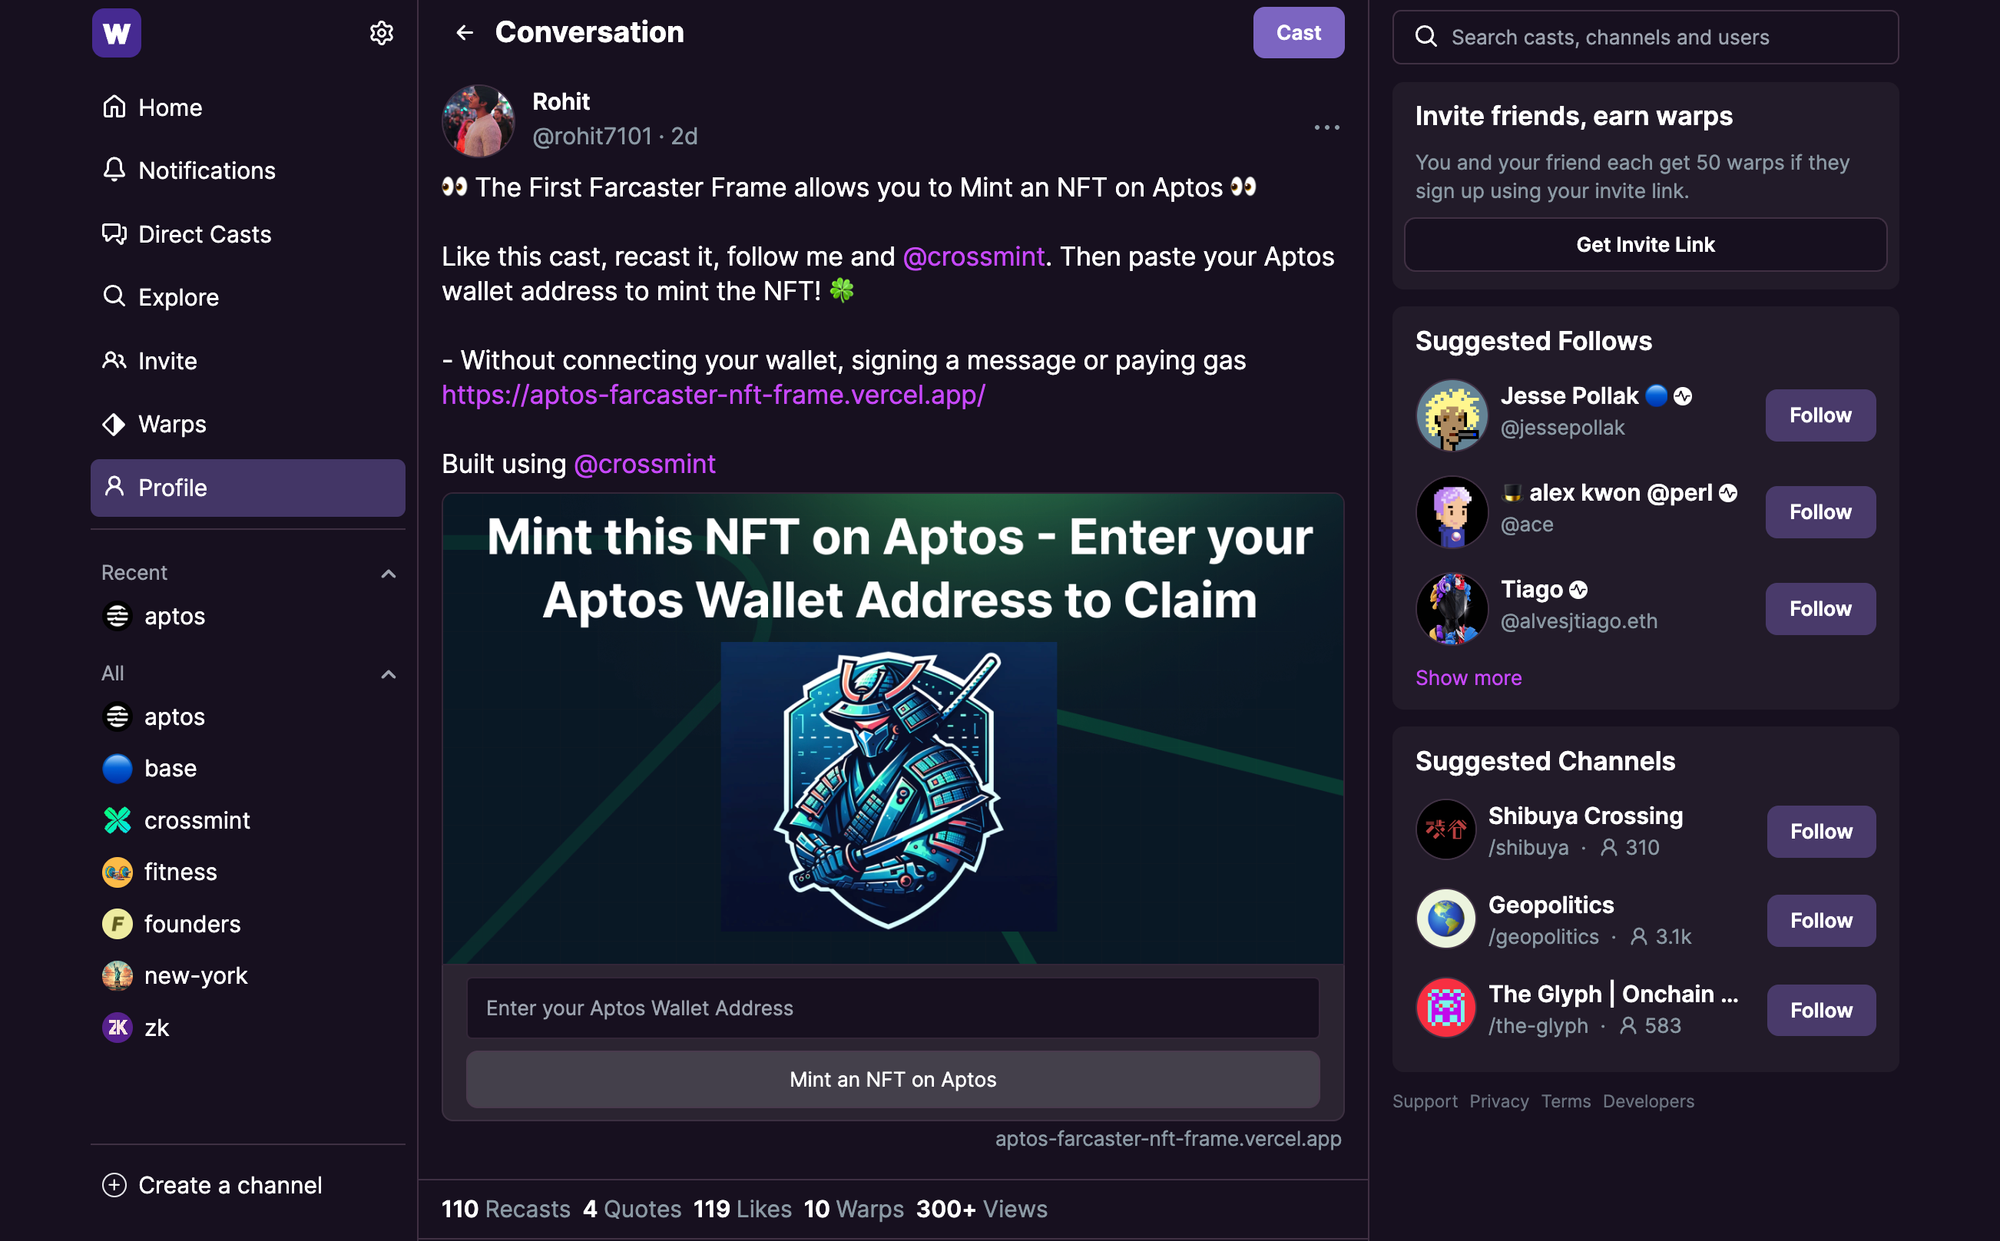
After you cast it, you can obtain the Hash of your cast and configure it as one of the environment variables on Vercel as mentioned in the section above.
Click here to interact with my cast.
Conclusion
And that's it! We have successfully created a Farcaster Frame that lets users mint an NFT on Aptos.
You have learned how to create
- A Farcaster Frame
- Create an NFT Collection on Aptos using Crossmint
- Mint NFTs on Aptos using Crossmint
- Use Neynar to verify if the cast has been liked and re-casted
You can view the complete code in this repository below.
 rohit-710
A special thanks to Avneesh for his code that shows how to integrate Onchainkit and Neynar.
What's Next?
If you are wondering how Crossmint has helped enterprises and brands by powering their NFT Drops, you can click on the link below to read all our Case Studies.


If you want to learn how to use the Crossmint to create Web 3 Wallets for your users using their Email Address, please watch the YouTube video below.
Need help?
For support, please join the official Crossmint Discord Server. You can also use Crossmint Help Page for the same.


