


Creating a Solarplex Frame to Mint NFTs can be a little complicated. It becomes even trickier when you want to create a Frame that can mint compressed NFTs Solana using a single click.
Minting compressed NFTs and creating an NFT Collection on the Solana Blockchain is now easier than ever before using Crossmint. This guide will teach you how to create a Solarplex Frame using Crossmint that will let your users mint NFTs on Solana, directly to their linked wallet address.
By the end, you will learn how to:
- Deploy an NFT Collection on Solana in a no-code fashion
- Create and mint compressed NFTs using the Mint API
- Create and post a Solarplex Frame that will let users mint NFTs on Solana after they like and repost your post.
This guide will take you 20 mins to complete (approximately).
Let's get started!
Table of Contents:
- What is Solarplex?
- Create an NFT Collection on Solana
- Create the Solarplex Frame
- Deploy the Frame using Vercel
- Posting the Solarplex Frame
- Conclusion
- What's Next?
- Need Help?
What is Solarplex?
Solarplex is a social platform that operates on the Solana blockchain and utilizes the AT Protocol. It is designed to enhance the interaction between creators and consumers, enabling them to share, create, monetize content, and engage in a more meaningful way. Users can benefit from features such as collectibles, tipping, and increased engagement and retention.
The platform introduces "Missions," which are tasks or challenges that users can complete to earn rewards. These rewards come in various forms, including unique badges, NFTs, and other exciting items. Missions are designed to keep the community engaged, with tasks ranging from daily activities to weekly challenges and specialized engagement missions.
Claiming rewards from these missions is also made simple. Once a mission is completed, users will see a 'Claim Reward' button. By clicking this button and ensuring their Solana wallet is connected to their account, they can easily collect their rewards.
Solarplex offers a novel and engaging way for users to interact with each other, create and consume content, and earn rewards, all within a blockchain-based ecosystem.
What are Solarplex Frames?
Solarplex Frames are a feature within the Solarplex platform that empowers users to create their own applications and configure them with actionable buttons, simply by sharing a link to the app on Solarplex. When a link supported by Frames is shared, it transforms into an interactive card embedded within a post, complete with buttons that perform specific actions.
This capability is made possible through the use of the Solarplex SDK, allowing for a highly customizable and interactive experience within the Solarplex ecosystem. Solarplex Frames enhance user engagement by integrating interactive functionalities directly into a shared social media post.
Create an NFT Collection on Solana
Crossmint allows you to create NFT Collections on the Solana Blockchain using a single API call and also using the Console. You do not need to create or code the smart contract yourself using the Rust language. Using the Create Collection API, you can deploy a smart contract on Solana and create an NFT collection. You can also achieve this directly from the Crossmint Console.
The blog post linked below has a step-by-step guide on How to Create an NFT Collection and Mint cNFTs on Solana. It's recommended that you read the blog post first, before you proceed with the next section of this guide. Let's learn how we can use this.
Note: The guide below uses Crossmint's Production Console.
It's recommended that you familiarize yourself with this tutorial on Staging before you work with Crossmint's Production Console. Click here to go to the Staging Console.
 Rohit Ramesh
After you have created the NFT Collection on Solana. Please note down the "collectionId" as we will be using this later.
Create an API Key for Minting Compressed NFTs on Solana
As outlined in the guide, creating an API Key is a crucial step in configuring your Solarplex Frame, especially for integrating functionalities like calling Crossmint's Mint API for NFT minting on Solana. This API Key, must be configured with the following scopes:
- nfts.create
- nfts.read
- collections.create
- collections.update
- collections.read
Create the Solarplex Frame
Create a Next.js App
To get started with Next.js, create a new Next app by executing the command below.
npx create-next-app solarplex-frameThis command installs a Next app on your computer within a folder titled "solarplex-frame". Open this folder in your code editor, Visual Studio Code is recommended for this purpose.
Now you need to install "solarplexSDK" which will let you create frames and validate whether your cast has been liked and re-posted or not.
npm install @usedispatch/solarplex-frame-sdkOnce the Next app installation is complete, you can move on to the following section.
Build the Solarplex Frame
Begin by navigating to "src/app/layout.tsx". The pre-existing code in this file is standard boilerplate provided by Next.js. Delete all the current content and substitute it with the new code snippet provided.
export const viewport = {
  width: "device-width",
  initialScale: 1.0,
};

export default function RootLayout({
  children,
}: {
  children: React.ReactNode;
}) {
  return (
    <html lang="en">
      <body>{children}</body>
    </html>
  );
}
layout.tsx
The above code snippet introduces a simple Next component in TypeScript, establishing a fundamental layout for your Next application, including a viewport configuration. This essentially shapes the architecture of your web application.
Next, proceed to "src/app/page.tsx". Similar to the previous file, this contains Next.js's default boilerplate code. You should remove all of this initial code and replace it with the new code snippet provided below.
import { getFrameMetadata } from "@usedispatch/solarplex-frame-sdk";
import type { Metadata } from "next";

const NEXT_PUBLIC_URL = process.env.NEXT_PUBLIC_URL;

const frameMetadata = getFrameMetadata({
  buttons: [
    {
      label: "Mint a cNFT from Solarplex",
      action: "post",
    },
  ],
  image: `${NEXT_PUBLIC_URL}/default.png`,

  input: {
    text: "Enter your wallet or .sol or email address", //text input field is not supported on Solarplex frames at the moment
  },
  post_url: `${NEXT_PUBLIC_URL}/api/frame`,
});

export const metadata: Metadata = {
  title: "Mint a cNFT from Solarplex",
  description: "Mint a cNFT from Solarplex",
  openGraph: {
    title: "Mint a cNFT from Solarplex",
    description: "Mint a cNFT with a single click",
    images: [`${NEXT_PUBLIC_URL}/default.png`],
  },
  other: {
    ...frameMetadata,
  },
};

export default function Page() {
  return (
    <>
      <h1>Mint a cNFT from Solarplex</h1>
    </>
  );
}
page.tsx
So what's happening in the above code? Let's understand it step-by-step:
- frameMetadata - constructs the metadata for the Solarplex frame, defining elements such as buttons, text, image, input field, and the postURL.
- buttons - this renders all the buttons you want your frame to contain.
- label - the text that will appear on the button
- action - the action that the button will perform. In this case, a simple POST request/call.
- image - specifies the frame's default image, shown upon loading. Solarplex mandates naming this image "default.png", located at "NEXT_PUBLIC_URL/default.png". For instance, if your app is hosted at "https://solarplex-nft-frame.vercel.app/", then the image should be accessible at "https://solarplex-nft-frame.vercel.app/default.png".
- input - the inputs that your frame will be fetching/receiving.
- text - receives a simple text input (string). This feature is not yet supported by Solarplex SDK, so you can ignore this for now. But here, we can ask for an email address input for users who want to mint the NFT to their email address. Crossmint creates a custodial wallet associated to the email address entered by the user.
- postURL - is the API endpoint "/api/frame" where the request to mint the NFT to the user's wallet address will be sent.
- buttons - this renders all the buttons you want your frame to contain.
- Additionally, the code exports other metadata such as title and description, alongside "frameMetadata".
Creating the API endpoint to Mint the NFT
To establish the API endpoint for handling requests initiated by the "Mint a cNFT from Solarplex" button on the frame, follow these steps:
Navigate to the "/src/app/api/frame" directory and create a file named "route.ts".
Then, insert the provided code snippet into this file. This setup will define the endpoint's logic to process the minting operation when the user interacts with the frame button.
import {
  FrameRequest,
  getFrameMessage,
  getFrameHtmlResponse,
} from "@usedispatch/solarplex-frame-sdk";
import { NextRequest, NextResponse } from "next/server";

export async function POST(req: NextRequest): Promise<Response> {
  let recipientAddress = "";
  const NEXT_PUBLIC_URL = process.env.NEXT_PUBLIC_URL;
  let isEmail = false; //for email minting, disable at the moment. You can use this when Solarplex supports text inputs
  const body: FrameRequest = await req.json();
  const env = process.env.CROSSMINT_ENV || "staging";

  try {
    const { message } = await getFrameMessage(body);
    const { untrustedData } = body;
    const linkedWallet = untrustedData.linkedWallet;

    if (!linkedWallet) {
      return new NextResponse(
        getFrameHtmlResponse({
          image: `${NEXT_PUBLIC_URL}/error2.png`,
        })
      );
    }

    recipientAddress = `solana:${linkedWallet}`;

    const crossmintURL = `https://${env}.crossmint.com/api/2022-06-09/collections/${process.env.CROSSMINT_COLLECTION_ID}/nfts`;
    const crossmintOptions = {
      method: "POST",
      headers: {
        accept: "application/json",
        "content-type": "application/json",
        "X-API-KEY": process.env.CROSSMINT_API_KEY!,
      },
      body: JSON.stringify({
        recipient: recipientAddress,
        metadata: {
          name: "First Solarplex Mint NFT Frame", //should not exceed 32 characters
          image: `${NEXT_PUBLIC_URL}/nft.png`,
          description:
            "This is the first NFT that was minted from Solarplex. Powered by Crossmint",
        },
        compressed: true, //mint compressed NFTs on Solana
      }),
    };

    const response = await fetch(crossmintURL, crossmintOptions);
    await response.json();

    return new NextResponse(
      getFrameHtmlResponse({
        image: `${NEXT_PUBLIC_URL}/success.png`,
        buttons: [
          {
            label: `Your NFT will be delivered to your wallet soon!`,
          },
        ],
        post_url: `https://solscan.io/token/2hPmQbHKuohRWQqRvU28t13zEdoUZjYnxs8ES6L7NnUc#txs`,
      })
    );
  } catch (error) {
    return new NextResponse(
      getFrameHtmlResponse({
        image: `${NEXT_PUBLIC_URL}/error.png`,
      })
    );
  }
}

export const dynamic = "force-dynamic";
So what's happening in the above code? Let's understand it step-by-step:
- First, we need to get the frame's message from the request's body using SolarplexSDK, then we get the "untrustedData" from the message. This data when returned will contain the user's linked Solana wallet address.
- Now, this is where we configure Crossmint's Mint API to make a POST Request to Mint a Compressed NFT on Solana.
- crossmintURL - this is the string used to construct the URL for an API request to Crossmint.
- env - this is the variable that specifies the environment (either staging or production). This allows for targeting different versions of the API or servers based on the environment.
- CROSSMINT_COLLECTION_ID - This identifier represents the NFT Collection you've created on Solana via Crossmint. It's important to record the collectionId after deploying your collection using Crossmint's API. However, regardless of whether you used the Console or the API to create the NFT Collection, you can find the value for collectionId on the Crossmint Console.
- For now, ignore the details for "crossmintURL" and "CROSSMINT_COLLECTION_ID". This will be configured later when deploying the web app on Vercel, using Environment Variables to keep these values private and secure.
- crossmintOptions - this represents the configuration object used for making an HTTP POST request to the Crossmint API.
- X-API-KEY - Obtained in the Crossmint Developer Console.
This API Key was obtained from your Developer Console, as mentioned in the earlier half of this guide. - metadata - this is the object that contains the details of the NFT to be minted, such as its name, image URL and description.
- recipient - The Solana wallet address that the NFT should be sent to. recipientAddress needs to be formatted as "solana:<WALLET_ADDRESS>"
- description - A brief description of the NFT.
- image - Direct link to your NFT image. This is a URL. In this case, we will be hosting the image within our deployed web app in the path shown in the code snippet above.
- name - The name of your NFT.
- X-API-KEY - Obtained in the Crossmint Developer Console.
- Now we make the API call and receive the JSON response.
- If it was successful, a message will display alongside an "success.png" image hosted within the deployed web app. This approach aligns with the Frames' feature of embedding static content only.
- Conversely, if the API call fails, the response is caught, and an "error.png" image is displayed with an error message.
- crossmintURL - this is the string used to construct the URL for an API request to Crossmint.
If you are still confused with how the Crossmint's Mint API works, please read the docs below.
This is essentially all you need to get your Solarplex frame working. But how do we make it more interesting? Let's say that we need to check whether a user has liked the case and reposted it. Let's learn how we can do that.
Verify whether a user has liked and reposted your post
In order to check whether a user has liked the cast and re-casted it, we need to use the "untrustedData" that the Frame's body returns along with the message.
To guarantee that the NFT can only be minted by genuine users based on their interaction, and to prevent others from sharing your web app's URL within their own posts for unauthorized minting, you can integrate a verification mechanism.
This ensures that only users who have liked and reposted your original post can mint the NFT. This method effectively controls access to the minting process, rewarding engaged users and protecting against misuse of the minting feature by ensuring that only verified interactions trigger the ability to mint.
if (
      untrustedData.likedPost === false ||
      untrustedData.repostedPost === false
    ) {
      return new NextResponse(
        getFrameHtmlResponse({
          image: `${NEXT_PUBLIC_URL}/error1.png`,
          buttons: [
            {
              label: "Try again!",
              action: "post",
            },
          ],
        })
      );
    }
code block inside route.ts
So, as always, what's happening in the above code? Let's understand it step-by-step:
- We are fetching the data of the post.
- Now, using our post's fetched data, we obtain all the reactions on our post.
- We now check if the user trying to mint the NFT has two reactions to our cast.
- Whether they have liked the cast.
- Also, if they have re-casted the cast.
- If the user has both of the above reaction requirement satisfied, they will be able to mint the NFT.
- We now check if the user trying to mint the NFT has two reactions to our cast.
- If the user has either of the above required reactions missing, then they will not be able to mint the NFT.
You can paste the above code snippet just above the below code line.
const linkedWallet = untrustedData.linkedWallet;The final code snippet for "route.ts" will look like this.
import {
  FrameRequest,
  getFrameMessage,
  getFrameHtmlResponse,
} from "@usedispatch/solarplex-frame-sdk";
import { NextRequest, NextResponse } from "next/server";

export async function POST(req: NextRequest): Promise<Response> {
  let recipientAddress = "";
  const NEXT_PUBLIC_URL = process.env.NEXT_PUBLIC_URL;
  let isEmail = false; //for email minting, disable at the moment. You can use this when Solarplex supports text inputs
  const body: FrameRequest = await req.json();
  const env = process.env.CROSSMINT_ENV || "staging";

  try {
    const { message } = await getFrameMessage(body);
    const { untrustedData } = body;
    const linkedWallet = untrustedData.linkedWallet;

    if (
      untrustedData.likedPost === false ||
      untrustedData.repostedPost === false
    ) {
      return new NextResponse(
        getFrameHtmlResponse({
          image: `${NEXT_PUBLIC_URL}/error1.png`,
          buttons: [
            {
              label: "Try again!",
              action: "post",
            },
          ],
        })
      );
    }

    if (!linkedWallet) {
      return new NextResponse(
        getFrameHtmlResponse({
          image: `${NEXT_PUBLIC_URL}/error2.png`,
        })
      );
    }

    recipientAddress = `solana:${linkedWallet}`;

    const crossmintURL = `https://${env}.crossmint.com/api/2022-06-09/collections/${process.env.CROSSMINT_COLLECTION_ID}/nfts`;
    const crossmintOptions = {
      method: "POST",
      headers: {
        accept: "application/json",
        "content-type": "application/json",
        "X-API-KEY": process.env.CROSSMINT_API_KEY!,
      },
      body: JSON.stringify({
        recipient: recipientAddress,
        metadata: {
          name: "First Solarplex Mint NFT Frame", //should not exceed 32 characters
          image: `${NEXT_PUBLIC_URL}/nft.png`,
          description:
            "This is the first NFT that was minted from Solarplex. Powered by Crossmint",
        },
        compressed: true, //mint compressed NFTs on Solana
      }),
    };

    const response = await fetch(crossmintURL, crossmintOptions);
    await response.json();

    return new NextResponse(
      getFrameHtmlResponse({
        image: `${NEXT_PUBLIC_URL}/success.png`,
        buttons: [
          {
            label: `Your NFT will be delivered to your wallet soon!`,
          },
        ],
        post_url: `https://solscan.io/token/2hPmQbHKuohRWQqRvU28t13zEdoUZjYnxs8ES6L7NnUc#txs`,
      })
    );
  } catch (error) {
    return new NextResponse(
      getFrameHtmlResponse({
        image: `${NEXT_PUBLIC_URL}/error.png`,
      })
    );
  }
}

export const dynamic = "force-dynamic";
route.ts
Deploy the Frame using Vercel
Vercel provides a platform for deploying projects at no cost, and we'll be utilizing Vercel to deploy our Next.js application. This simplifies the deployment process and makes your Next app accessible online.
Push the Next app to Github
Before moving forward with Vercel, ensure your code is pushed to GitHub by creating a new repository there.
Next, open a terminal within your code editor, making sure you're in the root directory of your project (for this example, within the "solarplex-frame" folder).
Execute the following commands in the terminal to push your Next.js app to your GitHub repository:
Note: Ensure that you pass the correct github reposity URL.
git remote add origin https://github.com/<username>/<repo_name>.git
git add .
git commit -m "your commit message"
git branch -M main
git push -u origin main
Deploy the Next app
Open Vercel and choose the recently created GitHub repository to proceed with the deployment of your Next.js app. Vercel will deploy your code files to a default domain it generates.
Next, it's essential to set up your Environment Variables. Navigate to the "Settings" section and select "Environment Variables" to start configuring them. This step is crucial for ensuring that your application functions correctly with the necessary configurations for different environments.
- "NEXT_PUBLIC_URL" - The URL of your deployed Next app.
- "CROSSMINT_ENV" - The Crossmint environment that you are using to deploy the NFT Collection. If it is on Production or Mainnet, use "www". If it is on Staging or Testnet, use "staging".
- "CROSSMINT_API_KEY" - The Crossmint API Key that you created using Crossmint Console. You will be using this key to create an NFT Collection and mint an NFT on Solana.
- "CROSSMINT_COLLECTION_ID" - The Collection Id of the NFT Collection you deployed on Solana. You can obtain this from the Crossmint Console after you created a collection on Solana using the API or the Console.
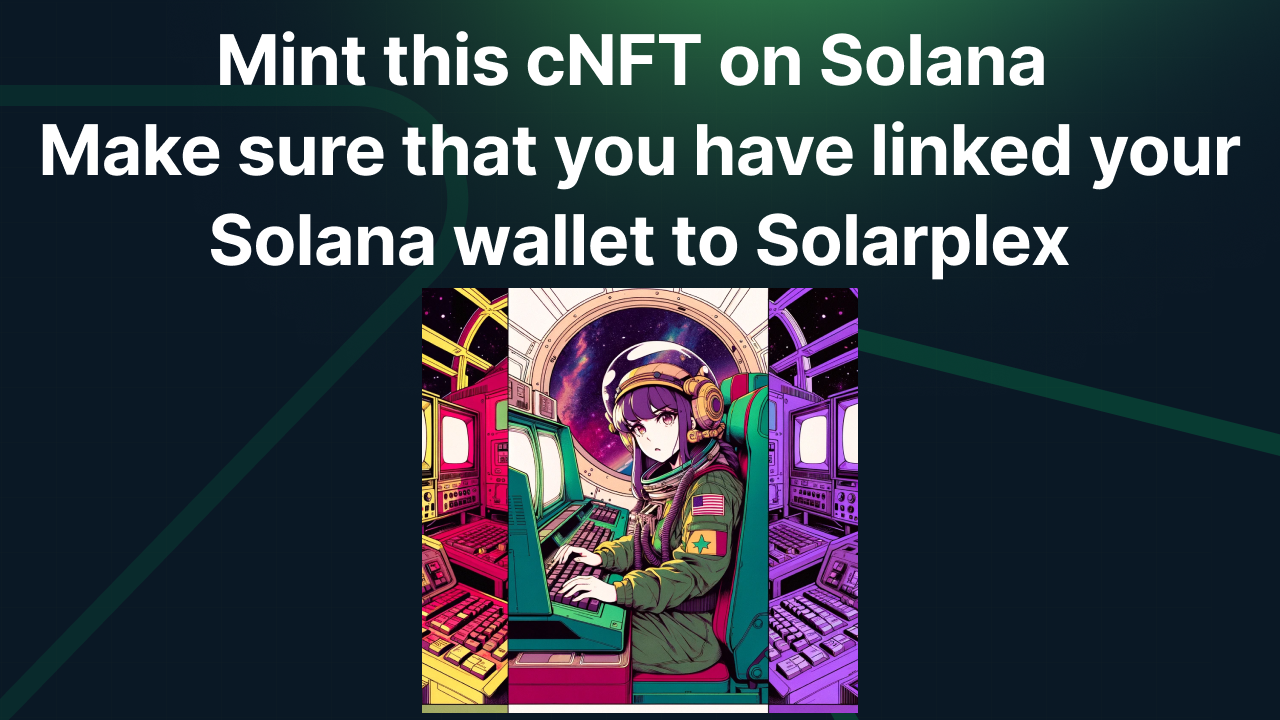
Posting the Solarplex Frame
Now that we have everything setup, the only thing that is left for us to do is to test post the Frame on Solarplex.
Cope and paste your the URL you deployed your Next app/Frame to (you can get this from Vercel). This is the "NEXT_PUBLIC_URL" you configured as one of the environment variables
Paste the URL and click on "Add link card:" and then post it.
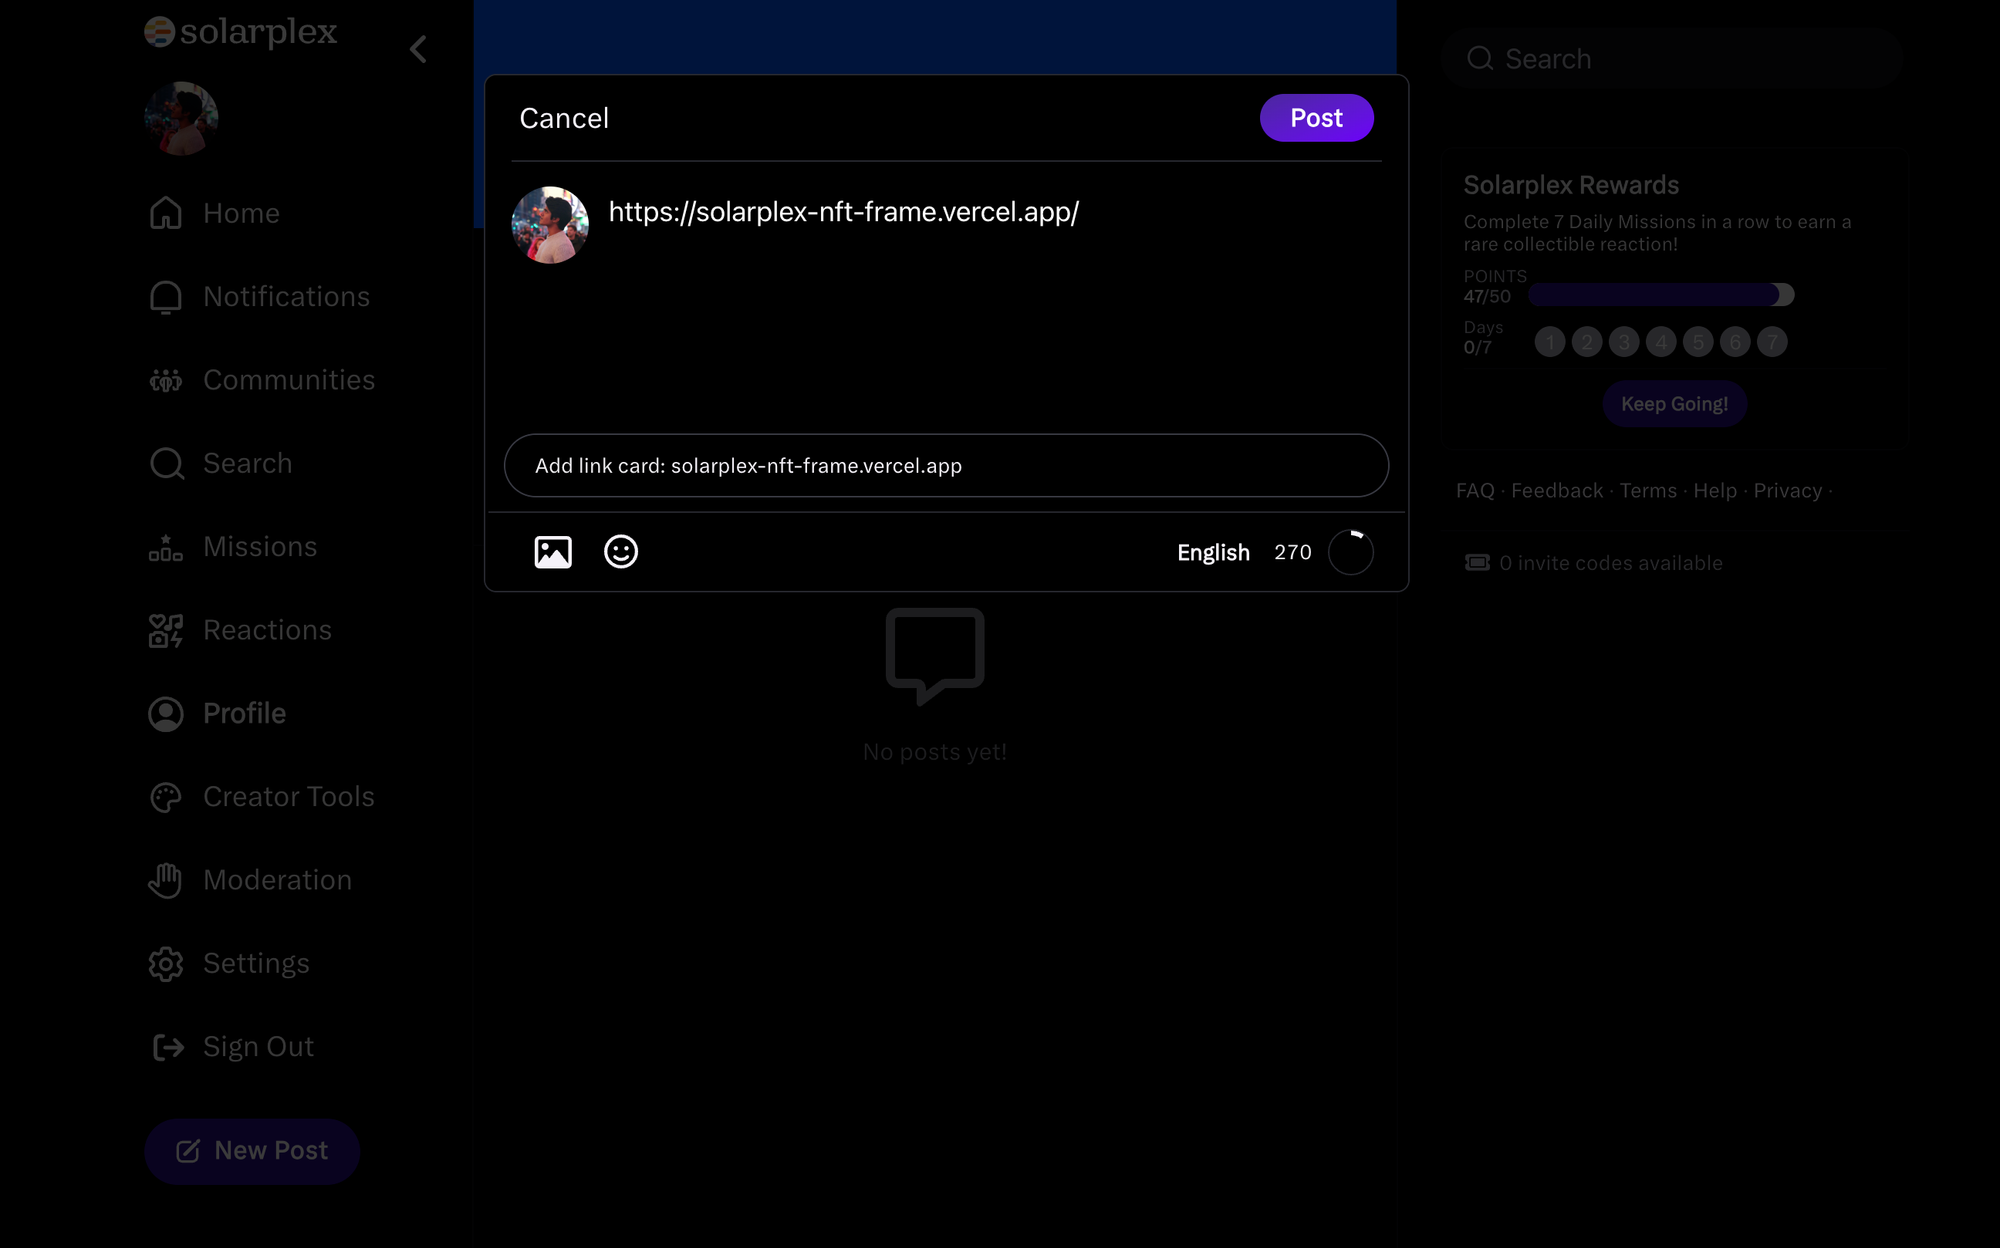
Click here to interact with our post.
Conclusion
And that's it! We have successfully created a Solarplex Frame that lets users mint a Compressed NFT on Solana.
You have learned how to create
- A Solarplex Frame
- Create an NFT Collection on Solana using Crossmint
- Mint Compressed NFTs on Solana using Crossmint
- Use the SolarplexSDK.
You can view the complete code in this repository below.
 Crossmint
What's Next?
If you are wondering how Crossmint has helped enterprises and brands by powering their NFT Drops, you can click on the link below to read all our Case Studies.


If you want to learn how to use the Crossmint to create Web 3 Wallets for your users using their Email Address, please watch the YouTube video below.
Need help?
For support, please join the official Crossmint Discord Server. You can also use Crossmint Help Page for the same.


