


Crossmint bridges the gap between Web 2 enterprises and blockchain technology. It simplifies the integration of blockchain assets into applications, making it accessible for businesses of any size to securely create, distribute, and manage digital assets without needing deep blockchain expertise.
Arbitrum Nova, on the other hand, is an advanced Layer 2 blockchain optimized for high-performance and cost-effective transactions, employing the AnyTrust protocol for efficient data handling. This guide will show you how to mint NFTs on Arbitrum Nova without requiring any blockchain experience or holding crypto.
This guide will take 10 minutes to complete. Let's get started!
Table of Contents:
Setup
To create and mint NFTs on Arbitrum Nova via Crossmint, you need to understand the distinctions between staging and production environments. Additionally, you must create an API key and specify the scopes that allow the API key to carry out the necessary functions.
Difference between Staging and Production
There are two different environments, they are staging and production environments.
The staging environment serves as a test environment, this works with the blockchain's testnet, mimicking the production setup without affecting the live version. It's accessible via https://staging.crossmint.com and allows you to deploy and test the features in a risk-free setting.
The production environment, found at https://www.crossmint.com, is where the live, user-facing application resides. Changes here are public and have real-world implications.
Creating a Developer Account and API Key
To utilize Crossmint's APIs for tasks such as NFT minting and creating NFT Collections, you need an API key. Here are the steps to create one:
- Set up a Developer Account: Create an account on the Crossmint Console.
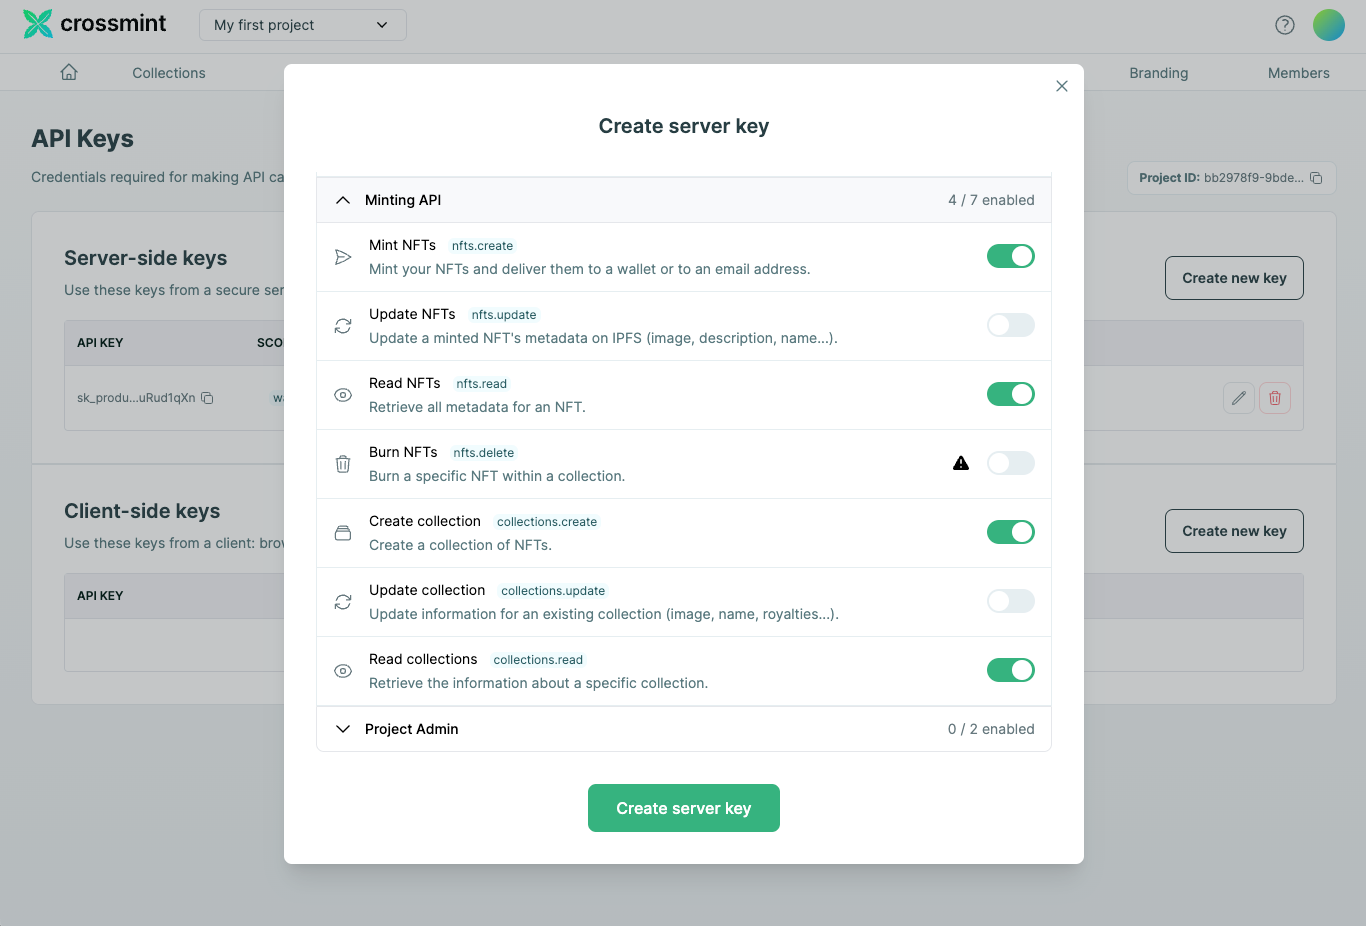
- Access the API Keys Section: After logging into the Crossmint Console, proceed to the "Developers" section and click on "API Keys".
- Determine the API Key Type: Create a Server-side API Key, which is necessary for creating a collection and minting. Ensure that you do not share your API keys with anyone.
- Configure Scopes: Define the API key’s capabilities by selecting appropriate scopes. Important scopes to enable are:
- "nfts.create"
- "nfts.read"
- "collections.create"
- "collections.read"
These scopes are essential as they grant the ability to create and access NFT Collections, as well as create and retrieve NFTs.
Create an NFT Collection on Arbitrum Nova
Before you can start creating and minting NFTs, you need to create an NFT Collection. So let's learn how to do that.
Prepare Your Collection's Metadata
The initial step in creating your NFT collection is to configure its metadata. This includes:
- Name: A name that effectively represents your collection.
- Image URL: An image URL that visually symbolizes the collection (cover image).
- Description: Provide a description that captures the essence and theme of your collection.
- Collection Symbol (for EVM-compatible blockchains only): Assign a symbol that will be used to identify your collection.
These define the identity and branding of your NFT collection, ensuring it is recognisable and distinct within the blockchain environment.Here's an example of how to prepare this metadata:
const collectionMetadata = {
  chain: "arbitrumnova", // Specify 'arbitrumnova' for the Arbitrum Nova blockchain
  metadata: {
    name: "Arbitrum Nova Collection", // Your collection's name
    imageUrl: "https://www.example.com/collection-image.png", // URL of the collection's representative image
    description: "A collection of NFTs on Arbitrum Nova.", // Description of your collection
    symbol: "tst" // Collection symbol (EVM chains only)
  },
  fungibility: "non-fungible", // Specify whether the collection is non-fungible or semi-fungible
  supplyLimit: 1000, // The maximum number of NFTs in the collection
  payments: {
    price: "0.01", // Price per NFT in the native currency
    recipientAddress: "0xYourWalletAddress" // Your wallet address to receive payments
  },
  reuploadLinkedFiles: true // Indicates if URLs in metadata should be reuploaded to IPFS
};
Here, we have a JavaScript object "collectionData" housing the configuration for our collection. Adjust these fields as per your collection's specifics.
Make sure to replace the placeholders ("https://www.example.com/collection-image.png" and "0xYourWalletAddress") with your actual collection image URL and recipient wallet address.
Create the NFT Collection
Now that your collection's metadata is ready, the next step is to create the NFT collection by making a POST request to the Crossmint API.
const axios = require('axios'); // Ensure you have axios installed

const createCollection = async (metadata) => {
  const API_URL = "https://www.crossmint.com/api/2022-06-09/collections/";
  const API_KEY = "your_api_key_here"; // Replace with your actual Crossmint API key

  try {
    const response = await axios.post(API_URL, metadata, {
      headers: {
        "X-API-KEY": API_KEY,
      },
    });

    console.log("Collection created successfully:", response.data);
    return response.data; // This includes the collection ID and action ID
  } catch (error) {
    console.error("Failed to create collection:", error.response.data);
  }
};

createCollection(collectionMetadata).then((data) => {
  console.log("Created Collection ID:", data.id);
  console.log("Deployment Action ID:", data.actionId);
});
We will initiate a POST request containing our collection's metadata and authenticate it by using the API key in the header of the request. After the request is successfully processed, we will log the response data to confirm the collection has been created.
Verify Deployment Status
Once you've used the Crossmint API to create the NFT Collection, you can check if it has been successfully deployed on the blockchain by polling for the deployment status. To do this, use the action ID provided in the response from the initial creation step. This ID allows you to query the status of the deployment to ensure everything is functioning as expected.
const ACTION_ID = "your_action_id_here"; // Replace with your actual action ID

const checkDeploymentStatus = async (actionId) => {
  const API_URL = `https://www.crossmint.com/api/2022-06-09/actions/${actionId}`;

  try {
    const response = await axios.get(API_URL, {
      headers: {
        "X-API-KEY": API_KEY,
      },
    });

    console.log("Deployment Status:", response.data.status);
    return response.data.status; // This is the status of your collection's deployment
  } catch (error) {
    console.error("Failed to check deployment status:", error.response.data);
  }
};

checkDeploymentStatus(ACTION_ID).then((status) => {
  if (status === "success") {
    console.log("Your collection has been deployed successfully!");
  }
});
Replace "your_action_id_here" with the actual action ID you obtained when you created the collection. This script will verify the deployment status and confirm if the collection has been successfully deployed on the blockchain.
By following these instructions, you will have effectively created your NFT collection on Arbitrum Nova using the Crossmint API. The collection is now prepared for NFT minting, which we will explore in the subsequent section.
Create and Mint NFTs on Arbitrum Nova
Now that your NFT Collection has been created, we can move on to creating and minting NFTs on Arbitrum Nova using the Crossmint API. Let's proceed with the next steps in the process.
Mint an NFT on the Created Collection
To mint an NFT, you'll need the collection ID from the NFT Collection you created. You will also need to specify the metadata for your NFT, which includes the name, image, and description of the NFT, as well as the details of the recipient.
Start by ensuring you have the "collectionId" handy from when you created your collection. Next, gather and prepare the metadata for your NFT and the recipient's information, which are crucial for the minting process. Here's how you can do it in JavaScript:
const axios = require('axios');
const apiKey = 'YOUR_CROSSMINT_API_KEY';
const collectionId = 'YOUR_COLLECTION_ID'; // Replace with your actual collection ID
const nftMetadata = {
  name: "Crossmint Example NFT",
  image: "https://www.crossmint.com/assets/crossmint/logo.png",
  description: "My NFT created via the mint API!"
};
const recipient = "email:testy@crossmint.io:arbitrumnova"; // Example recipient format

axios.post(`https://www.crossmint.com/api/2022-06-09/collections/${collectionId}/nfts`, {
  recipient,
  metadata: nftMetadata
}, {
  headers: {
    'X-API-KEY': apiKey
  }
})
.then(response => {
  console.log("Mint Response:", response.data);
})
.catch(error => {
  console.error("Error minting NFT:", error);
});
In the provided code snippet, you need to make the following changes to tailor it for your use:
- API Key: Substitute "YOUR_CROSSMINT_API_KEY" with the actual API key you obtained from the Crossmint Console.
- Collection ID: Replace "YOUR_COLLECTION_ID" with the collection ID you received after creating your NFT collection.
- Recipient Details: In this example, the recipient is specified using an email and chain format. If you prefer, you can replace this with a direct wallet address. Also, change the email address to the target email address to which you want to mint the NFT.
These adjustments ensure that the code snippet is correctly configured to interact with the Crossmint API and successfully mint the NFT to the intended recipient.
Verify the NFT was Minted Using the Action ID
After utilizing Crossmint's Mint API to mint your NFT, you'll receive an "actionId" in the API response. This ID is crucial for monitoring the progress of the minting process. Here’s how you can check the status of the NFT mint by polling:
const actionId = 'YOUR_ACTION_ID_FROM_MINTING'; // Replace with your actual action ID

const checkMintingStatus = () => {
  axios.get(`https://www.crossmint.com/api/2022-06-09/actions/${actionId}`, {
    headers: {
      'X-API-KEY': apiKey
    }
  })
  .then(statusResponse => {
    console.log("Minting Status:", statusResponse.data);
    if(statusResponse.data.status !== 'completed') {
      console.log("Minting in progress, check back later.");
    } else {
      console.log("Minting completed successfully.");
    }
  })
  .catch(error => {
    console.error("Error checking minting status:", error);
  });
}

// Initial check
checkMintingStatus();

// Optionally, set an interval to poll periodically
// setInterval(checkMintingStatus, 60000); // Check every 60 seconds
To effectively monitor the minting process of your NFT, replace "YOUR_ACTION_ID_FROM_MINTING" in the script with the actual action ID you received from the minting response. This adjustment will enable the script to accurately check the status of your NFT mint.
Create and Mint NFTs with No-code
If you are wondering how you can create an NFT Collection and mint NFTs with no-code, please read the in-depth guide below that teaches you how to do this with 0 code.
 Rohit Ramesh
Conclusion
In this guide, we explored the steps necessary to create and mint NFTs on Arbitrum Nova, starting with creating an API key with the appropriate scopes to creating an NFT collection and minting NFTs within that NFT Collection.
And that's it! You have now learned how to create NFT Collections, and how to create and mint NFTs on Arbitrum Nova using Crossmint.
What's Next?
If you are wondering how Crossmint has helped enterprises and brands by powering their NFT Drops, you can click on the link below to read all our Case Studies.

If you want to learn how to use the Crossmint to create Web 3 Wallets for your users using their Email Address, please watch the YouTube video below.
Need help?
For support, please join the official Crossmint Discord Server. You can also use Crossmint Help Page for the same.
Danny Mulvihill Rohit Ramesh