


Start sending POA NFTs to attendees at your event without writing a single line of code.
Quick Summary
This is a step-by-step tutorial that will teach you how send NFTs to event guests easily and quickly using Zapier, Airtable and Crossmint in just a few minutes!
What is a POA?
Proof of Attendance (POA) NFTs are distributed at events such as conferences, concerts, and hackathons to serve as proof of participation. They contain information such as the event's date, time, and the recipient's name. Although they can be sold, they are usually collected for their sentimental value, as they capture memorable experiences from past events.
A few real world examples of Proof NFTs
Snoop Dog’s O2 London Concert : Using our stack at Crossmint, Snoop Dogg introduced the "Evolving Tour Collectible" at his O2 London concert. Attendees could purchase the digital collectible by scanning a QR code at the venue, which granted them early access to drops, experiences, merchandise, and music, as well as future access to art from leading creators.
Blockchain Conferences : In the past at different events by Binance, Dappcon, ETHDenver attendees were given a proof of attendance NFT for attending these events. Some of these NFTs had a unique way for attendees to claim and these NFTs gave them access to different perks during and after the event.
Now we know about Proof NFTs, let’s understand what are the different ways through which we can mint them for our guests.
Different ways to mint Proof NFTs through Crossmint
With Crossmint’s powerful set of APIs, you can easily create, sell, and distribute NFTs to anyone! This tutorial will focus on how to send NFTs to your guests at an event once they fill out a form shared with them.
If you have another use case, check out these previously created guides that may be helpful for sending Proof NFTs through other methods:
- Minting NFTs for all the people in Google Sheets: Do you want to mint an NFT for everyone whose data is stored in a Google Sheets file you created? This guide will help you get started in five minutes or less.
- How to mint tickets as NFTs with Eventbrite and Crossmint's Minting API : This video will guide you on how to mint tickets as NFTs whenever someone registers for your Eventbrite event. If you don’t want to do this using code, then check out this Zapier integration here.
- How to Set Up Your Own No-Code Crossmint Storefront : If you want to sell an NFT at an event and allow people to buy using their wallets or credit cards, this guide will help you set up a minting page instantly. Once you set up the minting page, you can encode the link inside a QR code and share it with everyone at the event venue.
Ready to get started with the tutorial? Let's begin!
Getting started
How would this work?
- At your event registration desk, you ask attendees to fill out a form.
- Using the Zapier flow below, a Proof of attendance NFT will be minted to the email addresses provided by the attendees upon form submission.
Requirements
Step 1: Setting up our Airtable account
To start, go to your Airtable dashboard and create a base. This base will contain the information of all our guests.
Next, on the left sidebar under the "Create" section, click on "Form". Give the form a name and create a new view. Now we have a form that can be shared with others. When people fill it out, the data gets stored in the table automatically 🙂
1.1 Modifying the Airtable Form
To start, we need to add the required fields to our Airtable form to make our workflow function properly.
Add the following fields to the Airtable form
- Name: Single-line text
- Email: Email input
After adding these two fields, feel free to add more fields to your form. Click on "Preview" to test the form and verify that the details are showing up correctly in the grid view.
Step 2. Setting up our Crossmint account
To make the entire experience of minting seamless and super easy, we will be using Crossmint’s Minting API through the Zapier integrations. Let’s start by generating an API key for Zapier by following these steps:
- Go to Crossmint’s Dev Console > API Keys click on New API Key and then Register an API key with the “nfts.mint” scope checked.
- Now save the "client secret" and "Project ID" with the Airtable key we generated a few moments ago.
Step 3. Automating everything with Zapier
Zapier will act as the bridge between Airtable and Crossmint, automating the process of minting and distributing Proof of Attendance NFTs to our guests without any manual intervention!
Zapier Template link : https://zapier.com/shared/4cdd2f79274865caf87148077e1abeb61cf59261
3.1: Duplicating the Zap
- Go to the Zap template provided in this tutorial here. This template includes the necessary triggers and actions for seamless integration.
- Click on “Try this Zap” to copy the template to your own Zapier account.
3.2: Configuring the Zap
[Airtable trigger]
- For the Event prompt select “New Record”. This will tell our zap to run only when a new record is added to our Airtable.
- Connect your Airtable account to Zapier by adding the API key we generated before in this tutorial.
- Fill the Trigger section with the following inputs:
- Base : Choose the Base we created for storing our guest’s data.
- Table : Choose the table that we want to monitor in our Airtable base. This by default should be “Table 1” unless you edited the name.
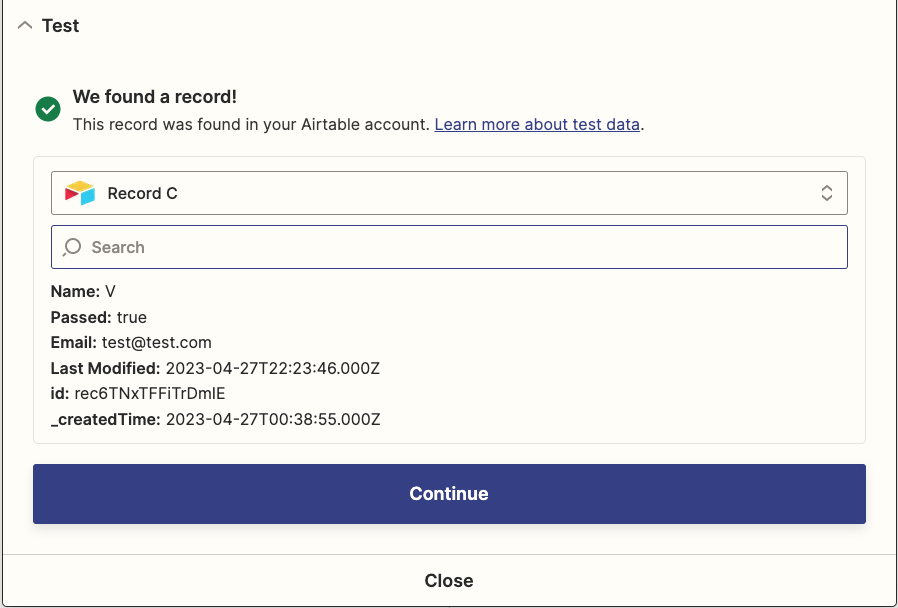
Click Continue and test the trigger. If everything works well you should see a response with details of our guest.
[Crossmint Action]
We can now retrieve details from Airtable form submissions and mint an NFT to their email addresses. To do this, in the Zapier workflow window for Crossmint action, select "Mint an NFT" as the event, connect your Crossmint account with Zapier using the "client secret" and "Project ID" that we generated before. Finally, add the necessary inputs in the Action window.
- Collection ID: We’ll be choosing the Default collection(default-solana) for Solana for now. We recommend you to create a collection and not go with the default collection options provided by us. Creating a collection will give your event a unique address on the blockchain and you’d be able to do a lot more with it in the future.
- Note: You can create a Collection from a Zapier tigger with “Create an NFT collection” as an Event or if you want to know more check out our API doc here.
- Chain: Choose “Solana” since we chose a Solana based collection before.
- Mint to: Choose “email” from the dropdown.
- Note: Crossmint autogenerates a wallet for your guests when this NFT gets minted and they can simply login to their wallets and view their NFT using their email addresses here - crossmint.com/signin. If you want the flow to instead mint an NFT to their wallets then remember to add a column for wallet address in your Airtable form and then choose “wallet” here.
- Email or Wallet address : Select the “Email” suggestion from the Airtable response here.
- Title: This will be the title of the NFT. Add the name of your event or anything you want here.
- Image URL: Add the URL of the Proof NFT Image that you want your guests to receive here.
- Description: Describe your Event and the purpose of the NFT here.
- Additional metadata: You can now add the metadata that this NFT will contain. For our case let us add the guest name and the date this NFT was issued on.
- Use compression technology (advanced) (Solana only): Compression technology for minting Solana NFTs will enable us to mint a lot of NFTs for very little cost. In our case we’ll keep this to “Yes”.
Now we’re almost done with our setup. Test the Zap to ensure that it is functioning correctly. You should see a response like this when testing. This means that our first NFT is now minting!

To verify, visit https://www.crossmint.com/signin and simply log in using the email address to which you minted the NFT and you will see the NFT in your Wallet once minting is successful.
[Gmail Action - optional flow]
Crossmint does not send a confirmation email when you deliver an NFT via the minting API. To notify your guests, you can use email marketing tools like SendGrid, Mailchimp, or Gmail. The Zapier template we provided includes a Gmail action after the Crossmint mint action, which allows you to notify your guests via email. Simply fill in the information related to your guest in the input fields for this action.
3.3: Publishing the Zapier
Once our Zap is set up properly with the steps mentioned above, a Proof of Attendance NFT will be minted every time someone fills out the Airtable form we created.
Finally, to ensure that the Zap is always listening for Airtable triggers, click "Publish Zap" in the Zap workflow window. This will run everything automatically in the background.
Conclusion
In this tutorial, we explored the significance of Proof of Attendance NFTs and learned how to automatically distribute them. If you followed every step in this tutorial, you should be able to log in to your Crossmint's wallet using your email address and view the Proof of Attendance NFT you just minted. Congratulations! 🎉
Encountered an issue? Feel free to contact us on Twitter or Discord with your questions, and we'll help you quickly apply these techniques to your specific use cases!


