


In this tutorial, you will learn how to create and mint NFTs on Optimism.
By the end, you will learn how to:
- Create and Deploy an NFT Collection on Optimism using an API
- Create and mint NFTs on Optimism using the Mint API.
This guide will take you 10 mins to complete (approximately).
Let's get started!
Table of Contents:
- Create and Mint NFTs with No-code
- Setup
- Create an NFT Collection on Optimism
- Create and Mint NFTs on Optimism
- Conclusion
- What's Next?
- Need Help?
Create and Mint NFTs with No-code
If you are wondering how you can create an NFT Collection and mint NFTs with no-code, please read the in-depth guide linked below that teaches you how to do this with 0 code.
 Rohit Ramesh
However, the rest of this guide will show you how you can create NFT Collections and mint NFTs on Optimism using 2 simple API calls.
Setup
Before we proceed with creating and minting NFTs on Optimism, we first need to understand the distinction between the different environments at Crossmint, and creating an API key with the necessary scopes.
Difference Between Staging and Production
Crossmint has two different environments, they are Staging and Production. The staging environment is essentially a testing ground. It mirrors the production environment but is not accessible to the general public. This is where you'll test your features and fixes. You can access it via https://staging.crossmint.com.
On the other hand, the production environment is live, hosting the final version of your application accessible by end users at https://www.crossmint.com.
It's crucial to test thoroughly in staging before moving to production to avoid potential issues affecting your users.
Creating a Developer Account and API Key
- Set Up a Developer Account on Crossmint: First, ensure you have a developer account on Crossmint. If not, register one here.
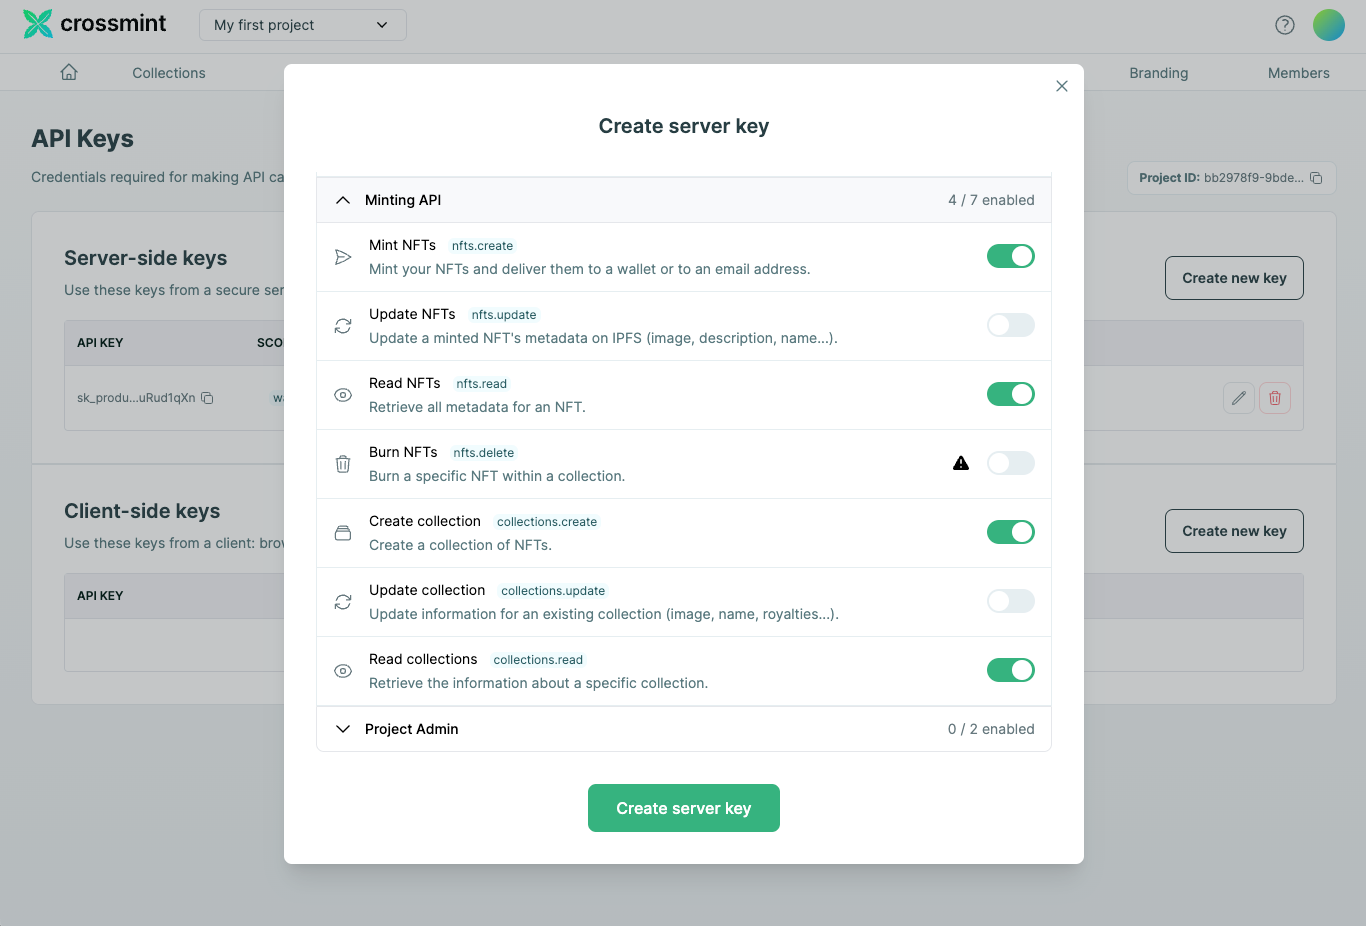
- Navigate to the API Keys Section: Log into Crossmint's Console and navigate to "Developers" section and click on "API Keys".
- Create a New API Key: Opt for "Create new key". You'll need a Server-side API Key for operations like minting NFTs. These keys ensure secure communication between your backend and Crossmint.
- Set the Scopes for the Key: When creating your API key, specify the necessary scopes. These scopes allow your API key to interact with various functions needed for your project. For NFT collection creation and minting, include:
- "nfts.create"
- "nfts.read"
- "collections.create"
- "collections.read"
- Security Practices: Securely store your generated API key. Do not expose it in publicly accessible areas like GitHub or the frontend of your application.
Create an NFT Collection on Optimism
Before you proceed with creating and minting NFTs on Optimism, you first need to create an NFT Collection on Optimism. Let's learn how to do this.
Creating a New Collection
To create a collection on Optimism, you need to make a POST request to the Crossmint API. This requires specifying the blockchain (Optimism in this case), and providing the collection metadata including the "name", "imageUrl", and "description" of the collection.
Here's how you can make the request using JavaScript and Node.js:
const axios = require('axios');
const apiKey = 'YOUR_CROSSMINT_API_KEY'; // Replace with your Crossmint API key.
const url = 'https://www.crossmint.com/api/2022-06-09/collections/'; // Use the production URL.

const collectionData = {
  chain: "optimism",
  metadata: {
    name: "My Optimism NFT Collection",
    imageUrl: "https://www.example.com/my-collection-image.png",
    description: "A unique NFT collection on Optimism",
    symbol: "OPNFT"
  }
};

axios.post(url, collectionData, {
  headers: {
    'X-API-KEY': apiKey
  }
})
.then(response => {
  console.log('Collection created:', response.data);
})
.catch(error => {
  console.error('Error creating collection:', error.response.data);
});
This code snippet utilizes the "axios" library to send a POST request to the Crossmint API. Ensure you replace "YOUR_CROSSMINT_API_KEY" with your actual Crossmint API key. The collection's metadata, including its name, image URL, description, and symbol, is sent in the request body. On successful creation, the API responds with details of the created collection, including its ID.
Confirming Collection Deployment with Action ID
After creating the collection, you receive an "actionId" in the response. This ID can be used to verify whether the collection has been successfully deployed on the blockchain. You make a GET request to the Crossmint API with the "actionId" to check the deployment status.
Here's the code snippet to verify the collection deployment:
const actionId = 'REPLACE_WITH_ACTION_ID_FROM_RESPONSE'; // Replace with your actual actionId

axios.get(`https://www.crossmint.com/api/2022-06-09/actions/${actionId}`, {
  headers: {
    'X-API-KEY': apiKey
  }
})
.then(response => {
  console.log('Action status:', response.data);
})
.catch(error => {
  console.error('Error fetching action status:', error.response.data);
});
Replace "REPLACE_WITH_ACTION_ID_FROM_RESPONSE" with the actual "actionId" you received from the collection creation response. This request fetches the status of the collection deployment. The Collection is successfully deployed if the status returns as "completed" or a similar success indicator.
These steps help you create a new NFT collection on Optimism using Crossmint. Proceed with minting NFTs into this newly created collection following the steps outlined in the next section.
Create and Mint NFTs on Optimism
In this section, we'll walk through the process of creating an NFT on a previously created collection on Optimism using the Crossmint API.
Mint an NFT on the Created Collection
To mint an NFT, you'll need to make a "POST" request to the "/collections/{collectionId}/nfts" endpoint with the "collectionId", recipient details, and NFT metadata. This example uses JavaScript with the "fetch" API for making HTTP requests.
const collectionId = "your-collection-id"; // Replace with your collection ID
const apiKey = "your-crossmint-api-key"; // Replace with your Crossmint API Key

const mintNFT = async (collectionId, recipientEmail, chain) => {
  try {
    const response = await fetch(`https://www.crossmint.com/api/2022-06-09/collections/${collectionId}/nfts`, {
      method: "POST",
      headers: {
        "X-API-KEY": apiKey,
        "Content-Type": "application/json",
      },
      body: JSON.stringify({
        recipient: `email:${recipientEmail}:${chain}`,
        metadata: {
          name: "Crossmint Example NFT",
          image: "https://www.crossmint.com/assets/crossmint/logo.png",
          description: "My NFT created via the mint API!",
        },
      }),
    });

    const data = await response.json();
    if(response.ok) {
      return data.actionId; // we'll use this to verify the minting
    } else {
      console.error('Error minting NFT:', data);
    }
  } catch (error) {
    console.error("Failed to mint NFT:", error);
  }
};

// Example usage
// Replace 'testy@crossmint.io' with the recipient's email and 'optimism' with the intended blockchain
mintNFT(collectionId, 'testy@crossmint.io', 'optimism').then(actionId => {
  console.log("Mint action ID:", actionId);
});
This code snippet defines a function "mintNFT" that makes a "POST" request to the Crossmint API to mint an NFT. It makes use of the collection ID obtained from creating your NFT collection. Upon success, it returns the action ID needed to verify the minting process.
Verify the NFT was Minted Using the Action ID
After minting the NFT, it's important to verify whether the minting process was successful or not. You can check the status of the minting action by using the action ID returned by the previous request.
const verifyMint = async (actionId) => {
  try {
    const response = await fetch(`https://www.crossmint.com/api/2022-06-09/actions/${actionId}`, {
      method: "GET",
      headers: {
        "X-API-KEY": apiKey,
      },
    });

    const data = await response.json();
    if(response.ok) {
      console.log("Mint action status:", data.status);
    } else {
      console.error('Error fetching mint action status:', data);
    }
  } catch (error) {
    console.error("Failed to verify mint action:", error);
  }
};

// Example usage
// Replace 'your-action-id' with the action ID returned from the mintNFT function
verifyMint('your-action-id').then(() => {
  console.log("Verification complete");
});
This code snippet defines a function "verifyMint" that makes a "GET" request to the Crossmint API to check the status of an action using its ID. It's a good practice to verify the minting to ensure the NFT was properly minted on the blockchain.
By following these steps, you can mint an NFT on Optimism using the Crossmint API and ensure its successful creation by verifying the action ID.
Conclusion
In this guide, we've taken you through the steps necessary to create and mint NFTs on the Optimism blockchain, leveraging the capabilities of Crossmint. You learned how to navigate between staging and production environments, create an API key with the required scopes, and create your own NFT collection on Optimism. Following that, we guided you through the process of minting an NFT within your collection and verifying its deployment using the action id. And that's it!
What's Next?
If you are wondering how Crossmint has helped enterprises and brands by powering their NFT Drops, you can click on the link below to read all our Case Studies.

If you want to learn how to use the Crossmint to create Web 3 NFT Wallets for your users using their Email Address, please watch the YouTube video below.
Need help?
For support, please join the official Crossmint Discord Server. You can also use Crossmint Help Page for the same.

Related Posts
Danny Mulvihill Rohit Ramesh