


In this guide, you are going to learn how to create and mint NFTs on the Polygon network using Crossmint.
By the end, you will learn how to:
- Create and Deploy an NFT Collection on Polygon using an API
- Create and mint NFTs on Polygon using the Mint API.
This guide will take you 10 mins to complete (approximately).
Let's get started!
Table of Contents:
- Create and Mint NFTs with No-code
- Setup
- Create an NFT Collection on Polygon
- Create and Mint NFTs on Polygon
- Conclusion
- What's Next?
- Need Help?
Create and Mint NFTs with No-code
If you are wondering how you can create an NFT Collection and mint NFTs with no-code, please read the in-depth guide linked below that teaches you how to do this with 0 code.
 Rohit Ramesh
However, the rest of this guide will show you how you can create NFT Collections and mint NFTs on Polygon using 2 simple API calls.
Setup
Before you create and minting NFTs on Polygon using Crossmint, it's important to understand the different environments at Crossmint.
Difference Between Staging and Production
Crossmint provides two environments for developers: Staging and Production.
The Staging environment is for testing and development purposes, allowing the use of test credit cards and testnets like Sepolia and Mumbai without real financial transactions or asset risks. You can access it here https://staging.crossmint.com.
Conversely, the Production environment is the live setting for real user interactions and transactions, accessed via https://www.crossmint.com. Transactions here occur on mainnets and use real money.
Creating a Developer Account and API Key
- Verify Your Crossmint Developer Account: Ensure you have an account on the Crossmint Console. If not, sign up at https://www.crossmint.com/console
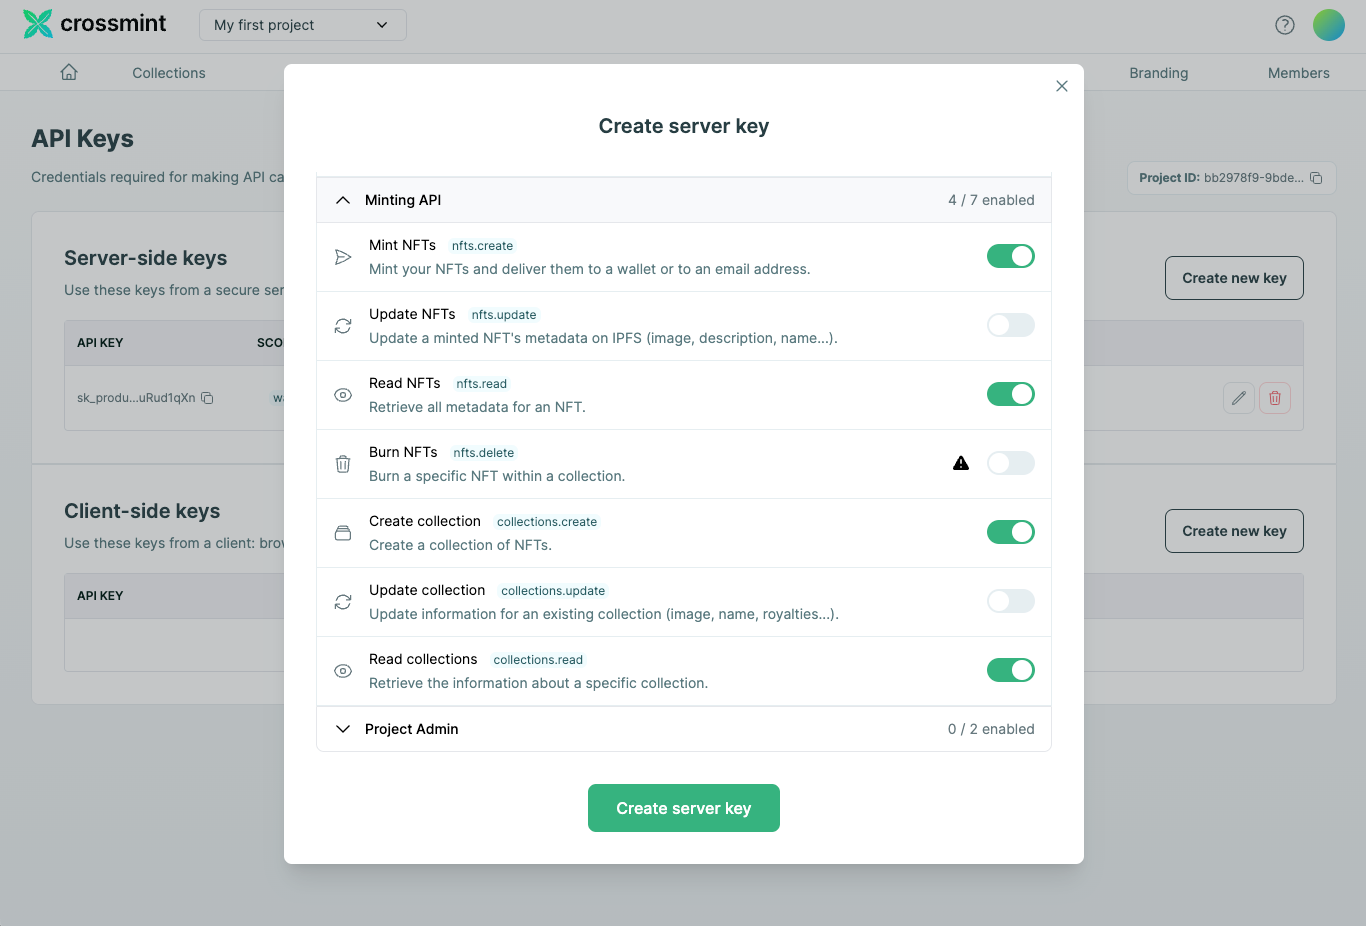
- Navigate to API Keys: Log into Crossmint's Console and navigate to "Developers" section and click on "API Keys".
- Create a New API Key: Click "Create new key" and select the type of API key you require. For backend operations like minting NFTs, you'll need a Server-side API key.
- Select the Required Scopes: For NFT and wallet operations, enable scopes such as:
- "nfts.create"
- "nfts.read"
- "collections.create"
- "collections.read"
Create an NFT Collection on Polygon
Now, we will create an NFT Collection on Polygon using Crossmint. Let's learn how!
First, configure your API Key within your code file as shown below.
const axios = require('axios').default;

const API_KEY = 'your_crossmint_api_key_here'; // Replace this with your API key
const BASE_URL = 'https://www.crossmint.com/api/2022-06-09/collections/';
In this step, we're importing Axios for making HTTP requests and setting up variables for our API key and the base URL targeting the Crossmint production environment, which will interact with mainnet blockchains like Polygon.
Define the NFT Collection
To create an NFT collection, define its characteristics such as name, image URL, description, and symbol. This information will be part of the collection's metadata.
const collectionData = {
  chain: "polygon", // Targeting the Polygon blockchain
  metadata: {
    name: "My Awesome NFT Collection",
    imageUrl: "https://example.com/my-collection-image.png",
    description: "A collection of unique digital assets",
    symbol: "MAWC" // This is an optional field for EVM chains like Polygon
  },
  fungibility: "non-fungible", // Set to 'non-fungible' for unique items
  supplyLimit: 1000, // Maximum number of tokens that can be minted
};
Here, we have a JavaScript object "collectionData" housing the configuration for our collection. Adjust these fields as per your collection's specifics.
Create the Collection
Now that we have our collection details defined, we'll make a POST request to the Crossmint API to create the collection.
axios.post(BASE_URL, collectionData, {
  headers: {
    'Content-Type': 'application/json',
    'X-API-KEY': API_KEY,
  },
})
.then(response => {
  console.log("Collection created successfully:", response.data);
  verifyCollectionDeployment(response.data.actionId);
})
.catch(error => {
  console.error("Failed to create collection:", error.response?.data || error.message);
});
In this step, we're sending a POST request with our collection data and including our API key in the request headers for authentication. Upon success, we log the response data.
Verify Collection Deployment
After creating the collection, use the returned "actionId" to verify the deployment status on the blockchain.
function verifyCollectionDeployment(actionId) {
  const actionStatusUrl = `https://www.crossmint.com/api/2022-06-09/actions/${actionId}`;

  axios.get(actionStatusUrl, {
    headers: {
      'X-API-KEY': API_KEY,
    },
  })
  .then(statusResponse => {
    console.log("Deployment Status:", statusResponse.data);
  })
  .catch(error => {
    console.error("Failed to verify deployment:", error.response?.data || error.message);
  });
}
This function polls the status of the collection creation process using the action ID we received. It's important to ensure that the collection is successfully deployed before proceeding to mint NFTs within it.
With these steps, you have created an NFT collection on the Polygon network using the Crossmint API. The process involves setting up your request, defining the collection, creating it via the API, and then verifying its deployment.
Create and Mint NFTs on Polygon
After you have successfully created an NFT Collection on Polygon, you need to create and mint the NFTs using Crossmint's Mint API.
Mint an NFT on the Created Collection
First, ensure you have the "collectionId" of the collection you created in the previous steps. This ID will be used to specify where the NFT should be minted. Let’s start by minting an NFT to our collection. The recipient of the NFT can be specified either by their blockchain address or by their email address. Here, we will use the recipient’s email address for simplicity.
const axios = require('axios');
const apiKey = 'YOUR_CROSSMINT_API_KEY'; // Replace with your API key
const collectionId = 'YOUR_COLLECTION_ID'; // Replace with your collection ID obtained from the create-collection endpoint

const mintNFT = async () => {
  try {
    const response = await axios.post(`https://www.crossmint.com/api/2022-06-09/collections/${collectionId}/nfts`, {
      recipient: 'email:testy@crossmint.io:polygon',
      metadata: {
        name: "Crossmint Example NFT",
        image: "https://www.crossmint.com/assets/crossmint/logo.png",
        description: "My NFT created via the mint API!"
      }
    }, {
      headers: {
        'X-API-KEY': apiKey
      }
    });

    console.log('NFT Mint Response:', response.data);
    return response.data.actionId; // We will use the returned action ID to verify the minting status.
  } catch (error) {
    console.error('Error minting NFT:', error.response.data);
  }
};

mintNFT();
This code snippet sends a POST request to the Crossmint API to mint a new NFT in the specified collection. We provide the recipient's information and metadata about the NFT, such as its name, image, and description. On success, it logs the response, which includes an "actionId" that we can use to verify if the NFT was minted successfully.
Verify the NFT was Minted Using the Action ID
After initiating the minting process, it’s important to check the status of the minting action to ensure it was completed successfully. Here’s how you can do that using the "actionId" received from the minting request:
const verifyMint = async (actionId) => {
  try {
    const response = await axios.get(`https://www.crossmint.com/api/2022-06-09/actions/${actionId}`, {
      headers: {
        'X-API-KEY': apiKey
      }
    });

    console.log('Mint Verification Response:', response.data);
  } catch (error) {
    console.error('Error verifying mint:', error.response.data);
  }
};

// Assuming mintNFT() was called and returned an actionId
mintNFT().then(verifyMint);
This script sends a GET request to Crossmint’s API to retrieve the status of our mint action using the "actionId". If the minting process was successful, we should see a response indicating that the action has been completed, along with information about the newly minted NFT.
By following these steps, you can create and mint NFTs on the Polygon blockchain using the Crossmint API. This process allows artists, developers, and businesses to easily integrate NFT minting into their applications, leveraging the power of blockchain technology.
Conclusion
In this guide, we walked through the process of creating and minting NFTs on the Polygon blockchain using Crossmint. We started by setting up our environment and creating an API key, proceeded to create an NFT collection, and then minted NFTs to that collection. Finally, we verified the success of our actions using the action id. Now you have learned what was needed to launch your NFT project on Polygon.
What's Next?
If you are wondering how Crossmint has helped enterprises and brands by powering their NFT Drops, you can click on the link below to read all our Case Studies.

If you want to learn how to use the Crossmint to create Web 3 NFT Wallets for your users using their Email Address, please watch the YouTube video below.
Need help?
For support, please join the official Crossmint Discord Server. You can also use Crossmint Help Page for the same.
Danny Mulvihill Rohit Ramesh