


In this guide, you will learn how to use Crossmint's Headless Checkout to allow your users to purchase your NFTs with $Degen and other memecoins on Base.
This guide will take you approximately 15 minutes to complete.
Let's get started!
Table of Contents:
- What is Headless Checkout?
- Create an NFT Collection
- Create the NFT Checkout with Degen Token
- Deploy the NFT Checkout using Vercel
- Testing the NFT Checkout with Degen
- What's Next?
- Need Help?
What is Headless Checkout?
We have created a detailed guide explaining what Crossmint's Headless Checkout is why should you use it. Please read through the blog post linked below.
 Connor Dempsey
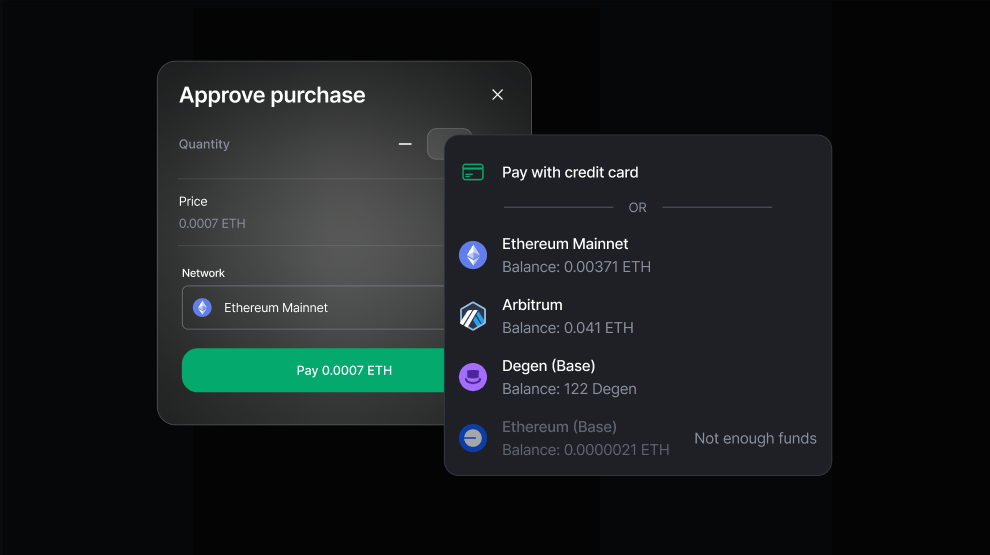
Create or Import an NFT Collection
Now, we need to create a new NFT Collection or import an existing NFT Collection.
Note: You can import an existing NFT Collection contract to Crossmint's Console and then use Headless Checkout. Click here to learn more.
For the sake of this tutorial, we will create an NFT collection from scratch by deploying a smart contract using Crossmint. This guide showcases the use of Headless Checkout for primary sales; however, Headless Checkout will also work on marketplaces, launchpads, and other platforms for secondary sales.
First, we need to deploy a smart contract for your NFT Collection. Crossmint's Console allows you to create NFT Collections using no-code.
Below is a guide that teaches you how to create NFT Collections using no-code. In this tutorial, we will be using an NFT Collection created on Base. Please read through the guide below and create an NFT Collection on Base.
Note: We will be using Crossmint's Production Console for this guide.
Rohit Ramesh
You can also create an NFT Collection and mint NFTs via APIs. Refer to the guide below to learn how to do this on Base. You can also refer to the docs page here.
Rohit Ramesh
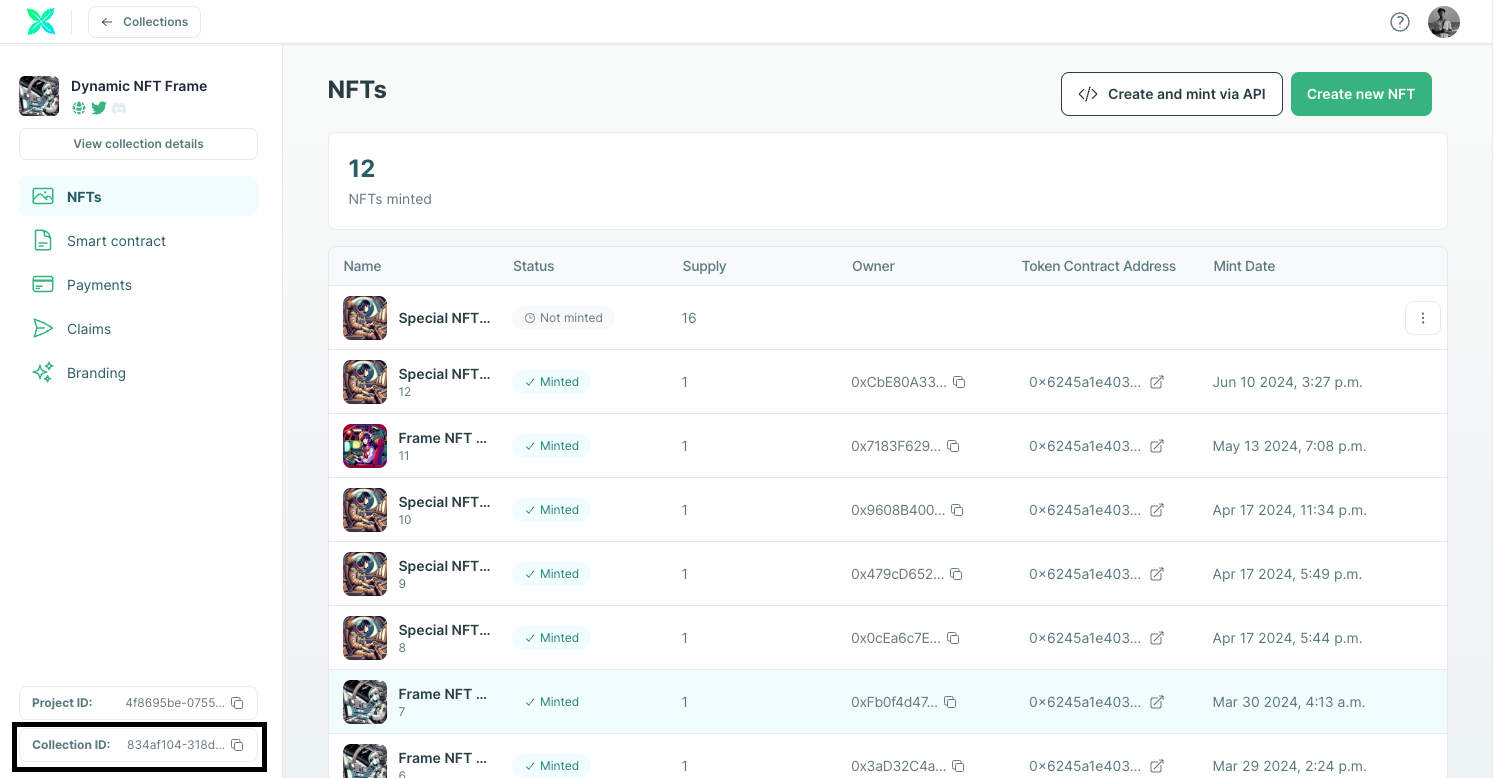
After you have created/imported the NFT Collection on Base. Please note down the "collectionId" as we will be using this later.
Create the NFT Checkout with Degen Token
After you have your NFT Collection created on Base, we can proceed with creating the Next app for our NFT Checkout.
Below is the Github repository that you can clone to build your own NFT Checkout.
 rohit-710
Create a Next.js App
We will be using Next.js for this. So create a Next app by running the following command.
npx create-next-app headless-checkout-degenThis will now install a Next app on your computer inside the folder named "headless-checkout-degen". Please open this folder/directory inside your code editor (preferably Visual Studio Code).
Now you need to install "viem" and "rainbow-me/rainbowkit", "wagmi", and "tanstack". These packages will be used to import different chains, add a "Connect Wallet" button, get the connected wallet address, and use it to send a transaction.
npm install viem @rainbow-me/rainbowkit wagmi @tanstack/react-queryAfter your Next app has been successfully installed, proceed with the next section.
Create the Checkout Interface
Now, open "/app/layout.tsx". The code that is already inside this file is a boiler plate code created by Next.js. Please remove all the existing code and replace it with the code below.
import "./globals.css";
import type { Metadata } from "next";
import { Inter } from "next/font/google";

const inter = Inter({ subsets: ["latin"] });

export const metadata: Metadata = {
  title: "Headless UI Demo",
  description: "Example by Crossmint.com",
};

export default function RootLayout({
  children,
}: {
  children: React.ReactNode;
}) {
  return (
    <html lang="en">
      <head>
        <link rel="icon" href="/favicon.ico" />
      </head>
      <body className={inter.className}>{children}</body>
    </html>
  );
}
layout.tsx
The code snippet above is a simple Next component written in TypeScript. It defines a basic layout component for our Next application and includes a viewport configuration object. In simple words, this decides the structure of our Web app.
Now, open "/app/page.tsx". Once again, the code that is already inside this file is a boiler plate code created by Next. Please remove all the existing code and replace it with the code below.
"use client";

import Checkout from "./components/checkout";
import "@rainbow-me/rainbowkit/styles.css";
import { getDefaultConfig, RainbowKitProvider } from "@rainbow-me/rainbowkit";
import { WagmiProvider } from "wagmi";
import { mainnet, arbitrum, optimism, base } from "wagmi/chains";
import { QueryClientProvider, QueryClient } from "@tanstack/react-query";

const config = getDefaultConfig({
  appName: "Crossmint Headless UI Demo",
  projectId: process.env.NEXT_PUBLIC_WALLET_CONNECT_ID || "",
  chains: [mainnet, arbitrum, optimism, base],
  ssr: true,
});

const queryClient = new QueryClient();

const Page = () => {
  return (
    <WagmiProvider config={config}>
      <QueryClientProvider client={queryClient}>
        <RainbowKitProvider modalSize="compact">
          <div className="container mx-auto max-w-3xl bg-white text-black rounded-lg my-5">
            <div className="grid grid-cols-1 sm:grid-cols-5 sm:gap-8 p-8">
              <Checkout />
            </div>
          </div>
        </RainbowKitProvider>
      </QueryClientProvider>
    </WagmiProvider>
  );
};

export default Page;
page.tsx
So what's happening in the above code? Let's understand it step-by-step:
- First, we are importing all the necessary packages.
- config - is created using "getDefaultConfig" with the following parameters:
- appName - this is the name of your app, in our case, it is "Crossmint Headless UI Demo".
- projectId - this is the projectId we got from our project set up on WalletConnect. The Next App gets this value from the configured environment variables for our deployed app (we will be doing this later).
- Head over to this URL and create a new project on WalletConnect.
- After creating the new project, you will be able to see a "projectId" for your created project.
- Make sure you save the projectId, as you will need this later.
- chains - this specifies the chains to be used, they are, Ethereum Mainnet, Arbitrum, Optimism, and Base.
- ssr - server-side rendering needs to be enabled, i.e., set to true.
- The main component inside the "return()" function wraps its children with several providers.
- WagmiProvider - provides Ethereum client functionalities.
- QueryClientProvider - provides server-state management using React Query.
- RainbowKitProvider - provides Ethereum wallet interactions.
- Now, we export the Page.
Build the Headless Checkout
Now, inside "headless-checkout-degen/app/" create a new folder called "components". Within "headless-checkout-degen/app/components" create a new code file called "checkout.tsx".
This code handles order creation, updates, and transaction processing and provides a user-friendly interface to enable NFT purchases with different cryptocurrencies such as Degen and chains such as Ethereum, Arbitrum, Base, and Optimism.
Copy and paste the code below inside "headless-checkout-degen/app/components/checkout.tsx" file.
"use client";

import { useState, useEffect, useRef } from "react";
import { parseTransaction } from "viem";
import { ConnectButton } from "@rainbow-me/rainbowkit";
import {
  useAccount,
  useChainId,
  useSwitchChain,
  useSendTransaction,
} from "wagmi";

const Checkout = () => {
  const [order, setOrder] = useState<any>();
  const [selectedCurrency, setSelectedCurrency] = useState<string>("degen");
  const hasCreatedOrder = useRef(false);

  const account = useAccount();
  const chainId = useChainId();
  const { switchChain } = useSwitchChain();
  const { data: hash, isPending, sendTransactionAsync } = useSendTransaction();

  // upon initial render create a new order and save it to state
  useEffect(() => {
    if (hasCreatedOrder.current) {
      return;
    }

    createOrder({
      payment: {
        method: "base",
        currency: selectedCurrency,
      },
      locale: "en-US",
      lineItems: {
        collectionLocator: `crossmint:${process.env.NEXT_PUBLIC_CROSSMINT_COLLECTION_ID}`,
        callData: {
          totalPrice: "30",
        },
      },
    });

    hasCreatedOrder.current = true;
  }, [selectedCurrency]);

  // update the existing order whenever chainId or connected wallet changes
  useEffect(() => {
    const updateExistingOrder = async () => {
      try {
        if (!order) {
          return;
        }

        const chain = chainIdMap[chainId.toString()];
        const currency = chain === "base" ? selectedCurrency : "eth";

        await updateOrder({
          payment: {
            method: chain,
            currency: currency,
            payerAddress: account.address,
          },
          recipient: {
            walletAddress: account.address,
          },
        });
      } catch (error) {
        throw new Error("Failed to update order");
      }
    };

    updateExistingOrder();
  }, [chainId, account.address, selectedCurrency]);

  const createOrder = async (orderInput: any) => {
    try {
      const res = await fetch(`/orders`, {
        method: "POST",
        headers: {
          "Content-Type": "application/json",
        },
        body: JSON.stringify(orderInput),
      });

      const order = await res.json();

      console.log("order", order);
      setOrder(order.order);
    } catch (e) {
      console.error(e);
      throw new Error("Failed to create order");
    }
  };

  const updateOrder = async (orderInput: any) => {
    console.log("update order with: ", orderInput);
    try {
      const res = await fetch(`/orders/${order.orderId}`, {
        method: "PATCH",
        headers: {
          "Content-Type": "application/json",
        },
        body: JSON.stringify(orderInput),
      });

      const updatedOrder = await res.json();

      console.log("order", updatedOrder);
      setOrder(updatedOrder);
    } catch (e) {
      console.error(e);
      throw new Error("Failed to update order");
    }
  };

  const getOrder = async () => {
    console.log("refresh order");
    try {
      const res = await fetch(`/orders/${order.orderId}`, {
        method: "GET",
        headers: {
          "Content-Type": "application/json",
        },
      });

      const refreshedOrder = await res.json();

      console.log("fetched order", refreshedOrder);
      setOrder(refreshedOrder);
    } catch (e) {
      console.error(e);
      throw new Error("Failed to fetch order");
    }
  };

  // send the ETH payment for the purchase
  const signAndSendTransaction = async () => {
    const txn = parseTransaction(
      order.payment.preparation.serializedTransaction || "0x"
    );

    if (txn.chainId !== chainId) {
      switchChain({ chainId: Number(txn.chainId) });
      return;
    }

    await sendTransactionAsync({
      to: txn.to as `0x${string}`,
      value: BigInt(txn.value ? txn.value.toString() : "0"),
      data: txn.data as `0x${string}`,
      chainId: txn.chainId,
    });
  };

  const handleNetworkChange = async (event: any) => {
    const chainId = event.target.value;
    switchChain({ chainId: Number(chainId) });
  };

  const handleCurrencyChange = (event: any) => {
    setSelectedCurrency(event.target.value);
  };

  const metadata = order ? order.lineItems[0].metadata : null;
  const price = order ? order.lineItems[0].quote.totalPrice : null;

  const chainIdMap: { [key: string]: string } = {
    "42161": "arbitrum",
    "8453": "base",
    "1": "ethereum",
    "10": "optimism",
  };

  return (
    <>
      <div className="flex justify-between items-center sm:col-span-5">
        <h1 className="text-xl font-bold my-4">Headless Checkout UI Demo</h1>
        <ConnectButton
          showBalance={false}
          chainStatus="none"
          accountStatus="full"
        />
      </div>

      <div className="col-span-2">
        {metadata && (
          <div className="">
            <img
              src={metadata.imageUrl}
              alt="Collection Image"
              className="border rounded"
            />
            <h3 className="text-lg font-bold py-3">{metadata.name}</h3>
            <p>{metadata.description}</p>
          </div>
        )}
      </div>

      <div className="col-span-3">
        <div className="py-2 px-5 my-2 w-full bg-blue-100 text-blue-700 border border-blue-400 rounded">
          <strong>Current Status: </strong>
          <code>{order?.status}</code>
        </div>

        {price && (
          <>
            {parseFloat(price.amount).toFixed(6)} {price.currency.toUpperCase()}
          </>
        )}

        <div className="flex justify-between items-center">
          <select
            value={chainId}
            onChange={handleNetworkChange}
            className="block w-full p-2 mr-3 border border-gray-300 bg-white rounded-md shadow-sm focus:outline-none focus:ring-2 focus:ring-blue-500"
          >
            <option value="">Select network</option>
            <option value="1">Ethereum</option>
            <option value="42161">Arbitrum</option>
            <option value="8453">Base Mainnet</option>
            <option value="10">Optimism</option>
          </select>

          {chainId === 8453 && (
            <select
              value={selectedCurrency}
              onChange={handleCurrencyChange}
              className="block w-full p-2 ml-3 border border-gray-300 bg-white rounded-md shadow-sm focus:outline-none focus:ring-2 focus:ring-blue-500"
            >
              <option value="degen">Degen</option>
              <option value="toshi">Toshi</option>
              <option value="brett">Brett</option>
            </select>
          )}

          <button
            onClick={() => signAndSendTransaction()}
            disabled={isPending}
            className="bg-gradient-to-br from-[#01b15d] to-[#0296a8] hover:bg-gradient-to-br hover:from-[#00ff85] hover:to-[#00e1fc] text-white font-bold py-2 px-4 my-2 rounded"
          >
            Pay
          </button>
        </div>

        {isPending && (
          <div className="pt-5">
            Awaiting confirmation...<div className="ml-3 spinner"></div>
          </div>
        )}

        {hash && (
          <>
            <div className="p-2 my-3 bg-gray-100 overflow-auto rounded">
              transaction hash:{" "}
              <pre>
                <code>{hash}</code>
              </pre>
            </div>

            <button
              onClick={() => getOrder()}
              className="bg-gradient-to-br from-[#01b15d] to-[#0296a8] hover:bg-gradient-to-br hover:from-[#00ff85] hover:to-[#00e1fc] text-white font-bold py-2 px-4 rounded"
            >
              Check Delivery Status
            </button>
          </>
        )}
      </div>
    </>
  );
};

export default Checkout;
checkout.tsx
So what's happening in the above code? Let's understand it step-by-step:
- First, we import the required hooks and utilities from various packages.
- Now, we need to create states and references:
- order - Stores the order details returned from the "createOrder" API call, such as, orderId, payment status, currency, total price, serialized transaction hash, etc.
- selectedCurrency - Stores the currently selected currency for payment, i.e., ETH, DEGEN, etc
- hasCreatedOrder - A reference to track if an order has already been created or not.
- The "useSendTransaction()" handles sending transaction to the connected wallet.
- Now, we create the effect hook for creating and updating an order. Order here means calling the Crossmint endpoint to create a checkout order to allow a user to purchase your NFT.
- createOrder() - sends a POST request to create a new order and saves the order details to the state.
- method - this sets the chain on which the payment should take place. In this case, since we want to purchase the NFT on Base using Degen, we set the "method" as "base".
- currency - this sets the currency to pay for the order with, for example, DEGEN, ETH, TOSHI, BRETT, etc.
- totalPrice - this is to set the total price for the NFT. For example, 30 DEGEN.
- updateOrder() - Sends a PATCH request to update the existing order with new details based on the current selected chain and the wallet address. This updates every time a user selects a different chain or currency or connects a different wallet.
- getOrder() - gets the details of the order created or updated.
- createOrder() - sends a POST request to create a new order and saves the order details to the state.
- signAndSendTransaction() - parses the transaction details, ensures the correct chain is selected, and sends the transaction using the connected wallet.
- Now, we create the handlers for network and currency changes.
- handleNetworkChange() - Switches the chain when the network is changed.
- handleCurrencyChange() - Updates the selected currency for payment.
- After we have all of the above set up, we write the code for the Front-End structure.
- The component renders a header with a title and a "ConnectButton" for connecting Ethereum wallets.
- Displays order metadata, including an image, name, and description.
- Shows the current status of the order and the total price.
- Provides dropdowns for selecting the network and currency, and a button for making the payment.
- Displays the transaction hash and a button to check the delivery status if a transaction is pending.
Create the API endpoints for Headless Checkout
Now, inside "headless-checkout-degen/app/" create a new folder called "orders". Within "headless-checkout-degen/app/orders" create a new code file called "route.ts".
Copy and paste the code below inside "headless-checkout-degen/app/orders/route.ts" file.
import { NextRequest, NextResponse } from "next/server";
import { callCrossmintAPI } from "@/app/utils/crossmint";

// required for CORS
export async function OPTIONS(req: NextRequest, res: NextResponse) {
  return NextResponse.json({ status: 200 });
}

export async function POST(req: NextRequest, res: NextResponse) {
  try {
    const body = await req.json();
    console.log("create order: ", body);

    const apiResponse = await callCrossmintAPI("/orders", {
      method: "POST",
      body,
    });

    return NextResponse.json(apiResponse, { status: 200 });
  } catch (error) {
    console.log("failed to create order");
    return NextResponse.json(
      { message: "Error creating order" },
      { status: 500 }
    );
  }
}
/app/orders/route.ts
This above code defines two API route handlers in a Next.js application for creating orders using the Crossmint API. The "OPTIONS" handler is included to handle CORS preflight requests, responding with a status of 200. The "POST" handler processes incoming POST requests by extracting the request body, logging the order creation attempt, and then calling the "callCrossmintAPI" function to send the order data to the Crossmint API endpoint.
If the API call is successful, it returns the response with a status of 200; otherwise, it catches any errors, logs a failure message, and returns a JSON response with an error message and a status of 500.
Now, inside "headless-checkout-degen/app/orders" create a new folder called "[orderId]". Within "headless-checkout-degen/app/orders/[orderId]" create a new code file called "route.ts".
Copy and paste the code below inside "headless-checkout-degen/app/orders/[orderId]/route.ts" file.
import { NextRequest, NextResponse } from "next/server";
import { callCrossmintAPI } from "@/app/utils/crossmint";

// required for CORS
export async function OPTIONS(req: NextRequest, res: NextResponse) {
  return NextResponse.json({ status: 200 });
}

export async function GET(
  req: NextRequest,
  { params }: { params: { orderId: string } }
) {
  if (params.orderId) {
    const order = await callCrossmintAPI(`/orders/${params.orderId}`, {
      method: "GET",
    });

    return NextResponse.json(order, { status: 200 });
  } else {
    return NextResponse.json(
      { error: true, message: "Missing orderId" },
      { status: 400 }
    );
  }
}

export async function PATCH(
  req: NextRequest,
  { params }: { params: { orderId: string } }
) {
  try {
    console.log("req:", req);
    const body = await req.json();
    console.log("update order: ", body);

    const apiResponse = await callCrossmintAPI(`/orders/${params.orderId}`, {
      method: "PATCH",
      body,
    });

    console.log("apiResponse:", apiResponse);

    return NextResponse.json(apiResponse, { status: 200 });
  } catch (error) {
    console.log("failed to create order");
    return NextResponse.json(
      { message: "Error creating order" },
      { status: 500 }
    );
  }
}
/app/orders/[orderId]/route.ts
The above code defines three API route handlers in a Next.js application for interacting with the Crossmint API to manage orders. The "OPTIONS" handler is required for CORS preflight requests and responds with a status of 200. The "GET" handler retrieves an order by its "orderId" from the URL parameters, calling the Crossmint API to fetch the order details and returning the response with a status of 200. If the "orderId" is missing, it returns a 400 status with an error message. The "PATCH" handler updates an order by its "orderId", extracting the request body and sending a PATCH request to the Crossmint API. If successful, it returns the API response with a status of 200; if an error occurs, it logs the failure and returns a 500 status with an error message.
Your Next App should now be ready for deployment.
Deploy the NFT Checkout using Vercel
Vercel allows you to deploy your projects for free. We will be using Vercel to deploy our Next app.
Push the Next app to Github
Before you proceed with Vercel, you need to push your code to Github. Create a new repository on Github.
Now, from open a terminal on your code editor (make sure you are in the root directory, in this case, inside the folder "headless-checkout-degen").
Run the code below inside the terminal. This will push your Next app to your github repository.
Note: Ensure that you pass the correct github reposity URL.
git remote add origin https://github.com/<username>/<repo_name>.git
git add .
git commit -m "your commit message"
git branch -M main
git push -u origin main
Deploy the Next app
Open Vercel and select the newly created Github repository. Then deploy the Next app. This will deploy your code files to a default domain generated by Vercel.
Now, you need to configure your your Environment Variables. Head over to "Settings" and click on "Environment Variables". Now, let's configure the Environment Variables.
NEXT_PUBLIC_CROSSMINT_COLLECTION_ID=
NEXT_PUBLIC_WALLET_CONNECT_ID=
CROSSMINT_API_KEY=
CROSSMINT_API_URL=https://www.crossmint.com/api/2024-01-01
env.sample
- "NEXT_PUBLIC_CROSSMINT_COLLECTION_ID" - the Collection Id of the NFT Collection you deployed on Base. You can obtain this from the Crossmint Console after you created a collection on Base. Refer to the "Create an NFT Collection" section above.
- "NEXT_PUBLIC_WALLET_CONNECT_ID" - the projectId we got from our project set up on WalletConnect.
We now have to create a Crossmint API Key. Follow the steps below to create one:
- In the Crossmint Console, click on "Developers" to expand the dropdown menu, and then click on "API Keys".

- Now, under "Server-side keys", click on "Create new key" and select the following scopes:
- "orders.create" - to create an order for headless checkout.
- "orders.read" - to get an existing order for headless checkout.
- "orders.update" - to update an existing order for headless checkout.
- After selecting the scopes, click on "Create server key" to create an API key.
- Copy the created API Key, you will be using this in the next step.
- "CROSSMINT_API_KEY" - The Crossmint API Key that you created above using Crossmint Console. You will be using this key to create orders, read orders, and update orders.
- "CROSSMINT_API_URL" - This is where the API endpoint is located. Set it to https://www.crossmint.com/api/2024-01-01
Testing the NFT Checkout with Degen
Now that we have everything set up, the only thing left to do is test the checkout we created for our NFT Collection on Base and try to purchase it with Degen.
Conclusion
And that's it! We have successfully created a checkout page for our NFT Collection on Base using Crossmint's Headless Checkout.
You have learned how to create
- An NFT Collection on Base using no-code.
- Build a checkout for the collection using Crossmint's Headless Checkout.
- Deploy it via Vercel and configure Crossmint's API.
You can view the complete code in this repository below.
rohit-710What's Next?
If you are wondering how Crossmint has helped enterprises and brands by powering their NFT Drops, you can click on the link below to read all our Case Studies.

If you want to learn how to use the Crossmint to create an NFT minting Farcaster Frame, please refer to the detailed guide below.
Rohit Ramesh
Need help?
For support, please join the official Crossmint Discord Server. You can also use Crossmint Help Page for the same.